background image

10

Easy Start

Easy Start

Easy Start

Easy Start

Easy Start

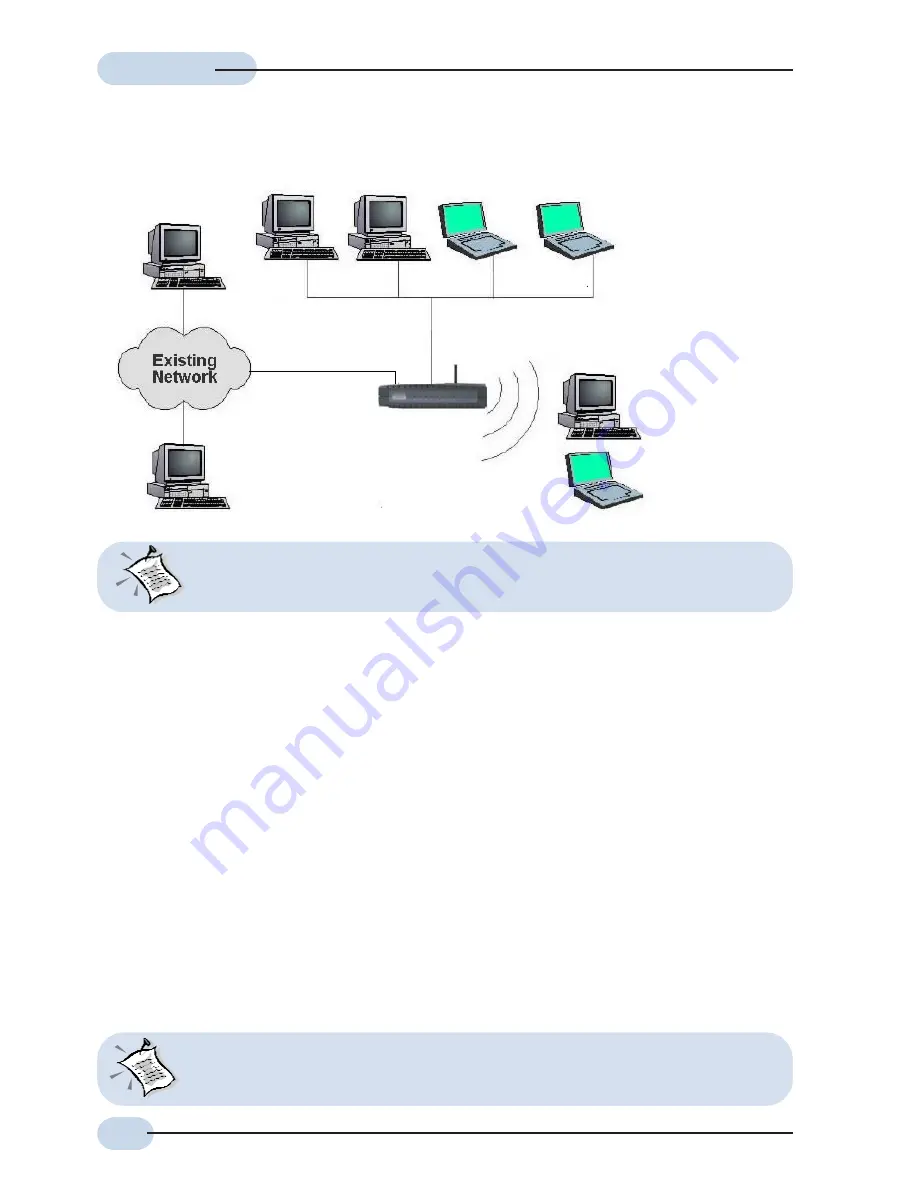
  D.   Connect to an Existing Network (AP Mode)

Computers or

Notebooks with
Ethernet Network

Cards

Cable/DSL

Wireless

Router

Computers or

Notebooks with

Wireless PC Cards

or USB Client

To LAN Port

To LAN Port

With the Auto MDI/MDIX feature, both cross and straight UTP cable can be utilized.

Step 1:Connect the computer to the LAN port of the Cable/DSL Wireless Router. Refer to

the section on 

"Connecting the Cable/DSL Wireless Router to your Computer/

notebook"

 follow by 

"Configuring Your Ethernet Card"

 and 

"Configuring Your Internet

Browser"

.

Step 2:Access the Router. Refer to the section on 

"Accessing To The Router"

.

Step 3:Under 

Configuration

, click 

LAN

.

Untick 

"Enable DHCP Server?"

.

Click 

Apply

.

Under 

Configurations

, click 

NAT

.

Untick 

"EnableNAT?"

Click 

Apply

.

Click 

Reboot

 for setting to take effect.

Step 4:Connect Existing Network via an Ethernet Cable to the Lan port of the Cable/DSL

Wireless Router.

Step 5:The Cable/DSL Wireless Router is in AP Mode now. The default SSID is 11G and

          the default channel is 11. You may need to release and renew to get the IP address
         form the Existing Network.
Step 6:You are now connected to your Existing Network.

This type of connection is for those who wish to extent their Existing Network but do
not want the Cable/DSL Wireless rouer in router mode.

Содержание Cable/DSL Wireless Broadband4-Port Router

Страница 1: ...etup Overview 7 Step 1 Connecting the CABLE DSL Router to Your Computer Notebook 11 Step 2 Configuring Your Ethernet Network Card Wireless Client 14 Step 3 Configuring Your Internet Browser 16 Step 4 Accessing to the Router 17 Step 5 Wireless Configuration 18 Step 6 Port Filters WAN 22 Frequently Asked Questions 23 Product warranty does not apply to damage caused by lightning power surges or wrong...

Страница 2: ...e user must use the configuration utility provided with this product to check the current channel of operation and confirm that the devices operating in conformance with the spectrum usage rules for Euroean Community countries as described below If operation is occurring outside of the allowable channels as indicated in this guide then the user must cease operating the product and consult with the...

Страница 3: ...iving antenna Increase the separation between the equipment and the receiver Connect the equipment into an electrical outlet on a circuit different from that which the radio receiver is connected Consult the dealer or an experienced radio TV technician for help Modifications made to the product unless expressly approved by Atheros Communication could void the user s right to operate the equipment ...

Страница 4: ...to be utilized The Wireless 4 port Ethernet Router has an in built IEEE802 11g Wireless LAN Access Point for wireless connectivity This Router also supports AtherosTM Wireless Super G Turbo mode which allow 108Mbps Wireless networking when connected to another Wireless Super G client This documentation assumes that you have already installed an Ethernet card or wireless adapter on your computer no...

Страница 5: ...e Wireless LAN connection is ready n PPP Lights upwhen the PPP connection is established For ADSL Modem PPP0E configuration only o WAN Lights up when the WAN connection is established p LAN LINK ACT Lights up when the Ethernet cable is properly connected from your CABLE DSL Wireless Router to the Ethernet Card Flickers when the LAN is transmitting receiving data l Front Indicators n o m p ...

Страница 6: ...nction Ensure that your CABLE DSL Router is powered on There are two ways to reset 1 Use a paper clip or a pencil tip to depress the reset button and release This will do a normal reboot with the last saved setting At this point the WAN if connected and the ETHERNET indicators will light up The reset is in progress When the indicator light up or blinking it means that the reset process is complete...

Страница 7: ...rnet Browser Step 3 Access the Router Refer to the section on Accessing To The Router Step 4 Under Quick Configuration select ADSL Modem PPPoE configuration Enter the Username and Password provided by your ISP Internet Service Provider Click Apply and Reboot the Router for the setting to take effect Step 5 Check if connection type is PPPoE in Overall status under the WAN section WAN IP address wil...

Страница 8: ...net Browser Step 3 Access the Router Refer to the section on Accessing To The Router Step 4 Under Quick Configuration select DHCP Client configuration Click Apply and Reboot the Router for the setting to take effect Step 5 Check if connection type is DHCP Client in Overall status under the WAN section WAN IP address will display under IP Address once the Internet connection is establised Step 6 Yo...

Страница 9: ...onnecting the Cable DSL Wireless Router to your Computer notebook follow by Configuring Your Ethernet Card and Configuring Your Internet Browser Step 3 Access the Router Refer to the section on Accessing To The Router Step 4 Under Quick Configuration select DHCP Client configuration Click Apply and Reboot the Router for the setting to take effect Step 5 Check if connection type is DHCP Client in O...

Страница 10: ...uring Your Internet Browser Step 2 Access the Router Refer to the section on Accessing To The Router Step 3 Under Configuration click LAN Untick Enable DHCP Server Click Apply Under Configurations click NAT Untick EnableNAT Click Apply Click Reboot for setting to take effect Step 4 Connect Existing Network via an Ethernet Cable to the Lan port of the Cable DSL Wireless Router Step 5 The Cable DSL ...

Страница 11: ... or and any connected devices before connecting to the ADSL Router NOT SURE HOW THE ETHERNET PORT LOOKS LIKE The following are some tips to help you locate your Ethernet Ports on your Computer Notebook Alternatively you may refer to the documentation that comes with your Computer Notebook Locating the Ethernet Port on your Computer Notebook Most Computers Notebooks have labels describing the Ports...

Страница 12: ...4 Port Router as illustrated 1 3 Checking Your Connections Please check your connections before proceeding Back view of the CABLE DSL Wireless Router Back view of the Modem Ethernet Network cable To your Power Outlet Back view of the CABLE DSL Wireless Router To your Modem To the Ethernet Port on your Computer s Notebook s ...

Страница 13: ...wer on the Power Outlet that is connected to your CABLE DSL Wireless Router Power on your Computer s Notebook s Please proceed to Step 2 1 4 Connecting to the Power Outlet Back view of the CABLE DSL Wireless Router Connect the other end of the Power Adapter to the Power Outlet ...

Страница 14: ...ies This screen shot uses 3Com EtherLink Ethernet card model as an example Step 2 Configuring Your Ethernet Network Card Wireless Client 2 1 Configuring Your Ethernet Network Card Wireless Client 2 2 For Windows 98 Second Edition Windows Me Ensure that your CABLE DSL Wireless Router is powered on Restart your system Proceed to Step 3 The following illustrated screen shots serve only as examples Fo...

Страница 15: ...t your CABLE DSL Wireless Router is powered on Restart your system Proceed to Step 3 2 3 For Windows 2000 Windows XP i Windows 2000 a From your Windows desktop right click on the icon My Network Places and select Properties b At the Network and Dial up Connections window right click on the Local Area Connection icon and select Properties Windows XP Instructions are based on default Start menu opti...

Страница 16: ...your Proxy Server is not enabled v Click OK to close the dialog box You may now proceed to Step 4 to establish your Internet connection 3 2 Netscape Navigator i From your Windows desktop double click on your Navigator icon to launch your Browser ii Depending on your Netscape versions carry out one of the following instructions Click Options Network Preferences Select Proxies Ensure that the No Pro...

Страница 17: ...sing a cable modem The WAN port will obtain an IP address from an upstream DHCP Server or Cable Modem Method 2 Enable ADSL Modem PPPoE Connection option if you are using ADSL Modem Key in your username and password provided by your Internet Service Provider ISP Method 3 Enable Static IP option if you are using Static IP connection Check with your administrator or Internet Service Provider for more...

Страница 18: ...router will not broadcast the SSID and unwelcome PCs will not be able to scan for the SSID of this router iv Turbo Mode When this mode is enabled the router would communicate with the CardBus at 108Mbps instead of 54Mbps Turbo mode must also be Enabled on the Cardbus In Turbo mode all the devices automatically use Channel 6 i Security Mode Check the box to enable the Encryption and Authentication ...

Страница 19: ...For Encryption in HEXADECIMAL format For Encryption in ASCII format Step 1 Uncheck the Hexadecimal Key Entry box for entering the encryption keys in Ascii format Ascii characters are 0 1 2 8 9 and a b c d x y z Step 2 You can choose to enter either 5 Ascii keys for 64 bits 13 Ascii keys for 128 bits or 16 Ascii keys for 152 bits via the pull down menu The 152 bits is the most secure but make sure ...

Страница 20: ... Hex digits for 152 bits via the pull down menu The 152 bits is the most secure but make sure that the Client card that you are using supports it Step 3 Enter the encryption keys in Hexadecimal format for Shared Key 1 For example the characters abcde12345 are in 10 Hex digits Step 4 Repeat Step 2 and Step 3 for Shared Key 2 3 and 4 The SAME Key must be entered in both the Router and Client Please ...

Страница 21: ...ard that you are using supports it Step 3 Enter the encryption keys in Ascii format For example the characters 2w3e4 are 5 Ascii keys Step 4 Repeat Step 2 and Step 3 for Shared Key 2 3 and 4 The SAME Key must be entered in both the Router and Client Please take note that if you use Key 4 on the Router you must also use Key 4 on the Client For example if the Router has Key 4 with encryption key as ...

Страница 22: ...have a remote access on the web configuration through the Internet Uncheck the box next to the HTTP service Always click Apply and then click Reboot for the setting to take effect It is advisable that you Enable the service back so as not to let any hackers to get access to the your router iii If you are to Totally Disable the WAN filtering uncheck the box beside the Enable filtering WAN Then clic...

Страница 23: ...atus please follow the steps below i Click Start then choose Run ii Type command or cmd without the quotes to open a DOS prompt iii In the DOS window type ipconfig and verify the information that is displayed iv If your computer is setup for DHCP then your TCP IP configuration should be similar to the information displayed IP address 10 0 0 X X is number between 2 to 254 Subnet 255 255 255 0 Gatew...

Страница 24: ...and type ipconfig renew in Window 2000 XP or ipconfig renew_all in Window 98 ME If you are still unable to get an IP address from Cable DSL Wireless Broadband 4 Port Router reinstall your network adapter Please refer to your adapter manual for information on how to do this Q3 I have another IP address displayed A3 If you have another IP address listed then the PC may not be configured for a DHCP c...

Страница 25: ...pconfig renew Once you are able to get a valid IP address from Cable DSL Wireless Broadband 4 Port Router then you can now access the web based management pages If you still are not getting an IP address from Cable DSL Wireless Broadband 4 Port Router please reset the hardware reset to factory default mode and then follow the above steps again ...

Отзывы: