background image

10

Chapter 3 — Setting Up the Modem Card

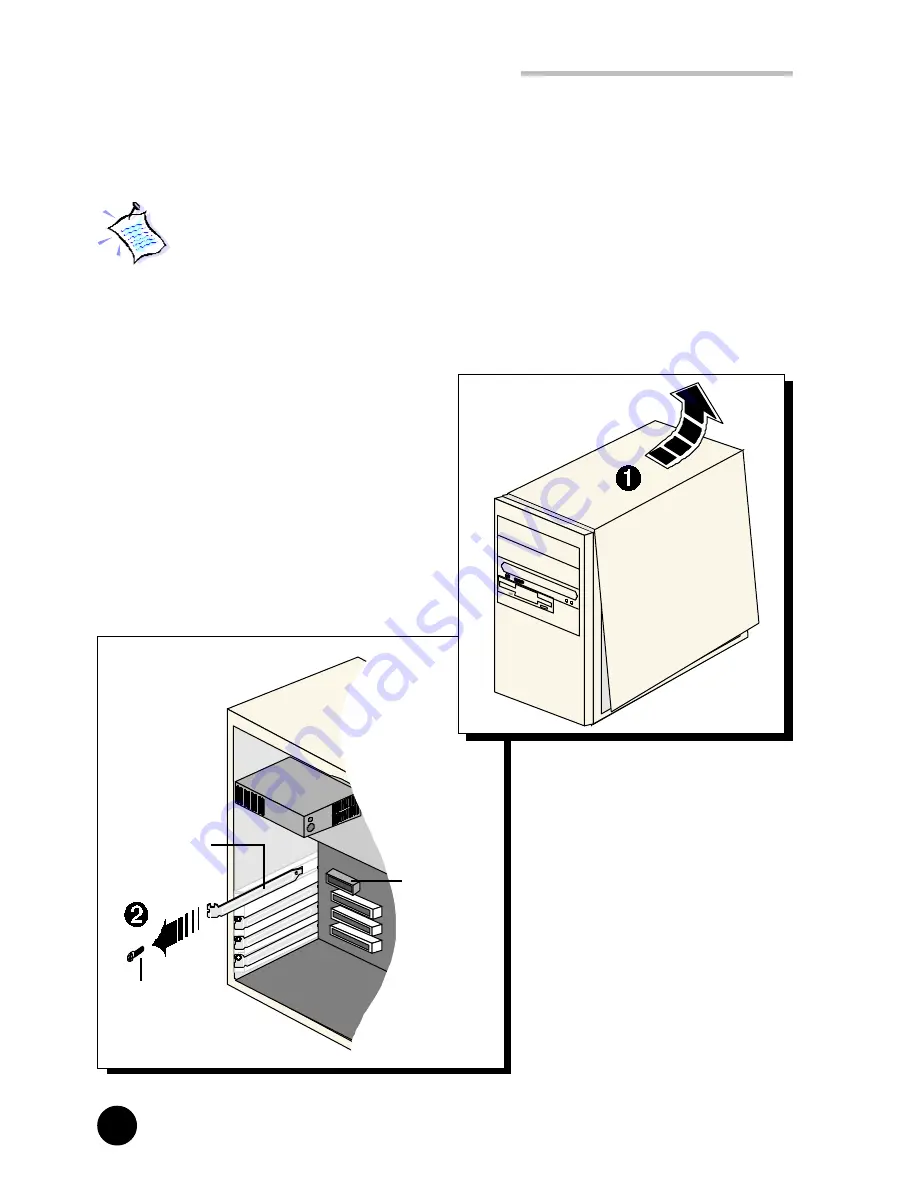
AMR Bus Slot

Mounting Screw

Cover Plate

·

Locate the AMR Bus

slot and remove its

cover plate.  Keep the

mounting screw to

secure your card later.

3.2 Installing the Modem Card

You need to remove any existing modem installed in your computer.

If your modem is non Plug-and-Play, you need to un-install its

modem drivers before you remove it. Check your existing modem

documentation for details on this.
Power off your computer and any connected devices before installing

your modem!

Remove the cover of your

computer.

Содержание 56?

Страница 1: ...56K MODEM RISER User s Manual Version 1 0 MR8800 U...

Страница 2: ...um System Requirements 2 2 Safety Precaution 2 3 Installation Notes Setting Up Your Modem Card 3 1 Configuring the Modem Card 3 2 Installing the Modem Card 3 3 Connecting the Modem Card Installing the...

Страница 3: ...P N 040 512402 101 22 26 28 Frequently Asked Questions Technical Specifications Card Layout...

Страница 4: ...o run the modem 4 Testing of the modem The section Frequently Asked Questions FAQ will explain some of the technical terms used in this manual as well as the possible solutions for some of the commonl...

Страница 5: ...of modem related functions including data communications sending and receiving of faxes The intensive demands of today s Internet applications will no longer be a bottleneck Using the 56K MR Modem yo...

Страница 6: ...g until you are ready to install it Always try to hold your card by its edges Avoid touching any electronic components on your card Static electricity can cause permanent damage to your card To preven...

Страница 7: ...on is completed 2 3 Installation Notes The graphics and screens illustrations shown in this easy start may differ from what you see in your system but the steps still apply A Philips screwdriver is re...

Страница 8: ...7 Audio is present that is you can see it in the BIOS Setup of your motherboard User s Manual you may configure your card as either Primary or Secondary device i If AC 97 Audio isEnabled you must conf...

Страница 9: ...e On your card insert the jumpers on Pin 1 and 2 for J1 J2 and J3 To configure as a Primary device On your card insert the jumpers on Pin 2 and 3 for J1 J2 and J3 Configuring as Primary Secondary Devi...

Страница 10: ...d later 3 2 Installing the Modem Card You need to remove any existing modem installed in your computer If your modem is non Plug and Play you need to un install its modem drivers before you remove it...

Страница 11: ...lign your card with the AMR Bus slot and firmly push it into the slot If the card does not slide in do not force it Make sure that the card is lined up properly and try again Secure your card to your...

Страница 12: ...12 Chapter 3 Setting Up the Modem Card Replace the cover of your computer...

Страница 13: ...set and your modem card if they are sharing the same telephone wall socket Connect one end of the telephone extension cord to the modem card and the other end to the telephone wall socket This comple...

Страница 14: ...n how to change the setting refer to Appendix A Frequently Asked Questions I am using my system with the modem card in another country Is there any settings that need to be changed 4 1 For Windows 95...

Страница 15: ...ng you have placed the Installation CD in your CD ROM Drive D Else substitute the drive letter accordingly Follow the on line instructions to complete the driver installation This completes the instal...

Страница 16: ...8 Windows 98 will detect the newly installed modem and an Add New Hardware Wizard window will appear The next window prompt will ask for your modem driver Place your Installation CD into the CD ROM dr...

Страница 17: ...alling the Modem Drivers At the next prompt select the source of your driver Windows will prompt that it has located the driver Click the option CD ROM drive Click Next 3 Click Next to proceed with th...

Страница 18: ...Modem Drivers This completes the installation of the modem driver in Windows 98 Proceed to the next chapter to test your modem Upon completion the following window will be displayed Click Finish Resta...

Страница 19: ...Card This chapter contains information on how to test your modem card in Windows 95 98 From the Windowstaskbar click Start Settings Control Panel 1 The screens illustrated may differ from what you see...

Страница 20: ...20 Chapter 5 Testing the Modem Card You will see the MR8800 modem listed Click the Diagnostics icon 3 Select theCOM Portthat your modem is connected to and click More Info 4...

Страница 21: ...s a successfully installed modem If your modem is not installed properly the set of AT commands will not be listed You may also be prompted by an error message stating that it was unable to open the C...

Страница 22: ...I identify the MR8800 card and its drivers MR8800 has its model name printed on the serial number label located at the rear of the card Alternatively you can issue an AT13 command using any Telephony...

Страница 23: ...t the system gave me an error message No Dial Tone Check the Telephone Cable PHONE connection If necessary plug out the Telephone Cable and reconnect the cable There are incomprehensible characters ap...

Страница 24: ...Port Make sure that you have closed all communication software e g Hyperterminal Dial up Networking etc when you are doing the diagnostics test However if there is no communications software running d...

Страница 25: ...her Primary or Secondary device before you install your card 3 The jumper settings are correctly configured for the respective device For details on the configuration please refer to the section on Se...

Страница 26: ...rnet Service Provider 33 6Kbps 300bps Data Throughput Up to 115 2Kbps with compression Error Correction V 42 LAP M and MNP2 4 Data Compression V 42bis and MNP5 Fax Modulations V 17 V 29 V 27ter Fax Cl...

Страница 27: ...train Tone or pulse dialing Silicon DAA line interface Caller ID support Digital Line guard optional Audio TAD optional External connectors 1 x RJ11 Telephone socket for telephone line 1 x RJ11 Telep...

Страница 28: ...28 Appendix C TAD Connection Card Layout LINE PHONE AUDIO1 allows connection to a compatible sound card via a TAD cable for audio input output Optional...

Отзывы: