10
the rod to the right of all of the precut holes.
46. Attach the red figurines to the five precut holes in the rod using five
small metal screws.
47. Slide both bumper groups so that they are positioned on the rod
directly next to the outside figurines as done with other rods.
Bumper groups should be outside of all of the figurines on both the
right and the left side.
48. Place an end cap on the unfinished end of the rod.
49. Now you have completed half of your table soccer table. Go to the
opposite end of the table and repeat steps 8 though 46, only this
time use the opposite color scheme.
50. Place one scorer (#11)- on the top of each end goalie panel, insert
one screw (#10)on each end of scorer.
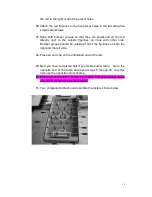
51. Your completed table should resemble the picture shown below.
Содержание 10 in 1
Страница 1: ...1 User Manual for Azooga 10 in 1 Multi game table...
Страница 13: ...13...
Страница 14: ...14...


