

Thank you for purchasing the Azden FMX-32 portable mixer. The FMX-32 has many unique
features, so please read this manual completely before using the mixer. Designed to work
with most microphones that have a low-impedance XLR output, the FMX-32 can be con-
nected to any video camera or audio recorder, which has XLR, or mini-jack mic/line inputs.
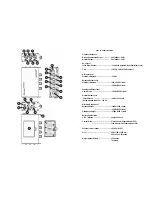
LOADING THE BATTERIES: Make sure the mixer is turned OFF. Remove the battery
cover (A) by pressing in the clip, then lift up and remove the cover from the unit. Install 6 new
“AA” ALKALINE batteries into the battery compartment. Be sure to follow the polarity
diagram inside the battery compartment. Do not force the batteries into the compartment.
Replace the battery door (A). New batteries should last up to 15 hours.
MOUNTING OPTIONS:
1) Hook and Loop fastener (supplied): Hook and Loop fastener can be attached to either side
of the mixer and to any adjoining flat surface (camera body, tripod, etc.) The strip with the soft
surface should be attached to the mixer and the strip with the rough surface should be attached
to the adjoining surface.
2) Strap (not supplied): A strap can be looped through the strap cutouts (B) on the sides of the
mixer.
CONTROLS and INPUTS/OUTPUTS
1 through 16
POWER SWITCH (1) and POWER LED (2):
To power the FMX-32 by the internal batteries. Move the POWER switch (1) to INT position.
The POWER ON LED (2) will turn green. When the battery voltage level is low the POWER
ON LED (2) will turn to RED. When the POWER ON LED (2) turns to red replace the
batteries with new “AA” ALKALINE batteries. (See LOADING THE BATTERY above).
When not in use turn the mixer OFF to conserve battery life.
Powering the FMX-32 with an external power supply. (Note: The FMX-32 does not come
with an external power supply. An optional power supply part number BC-26U is available
from the Azden web site www.azdencorp.com.) Move the power switch (1) to EXT position.
The POWER ON LED (2) will turn green. When not in use turn the mixer OFF and disconnect
the power supply from the mixer.
INPUT LEVEL CONTROLS for Channel 1 (3), Channel 2 (4) and Channel 3 (5):
CH1 (3): Controls the input level (volume) of the microphone connected to Input CH 1 (12).
Zero is the lowest (quietest) setting, 10 is the highest (loudest). For the best possible sound and
lowest noise increase the input level control until the input LED lights occasionally.
CH2 (4): Controls the input level (volume) of the microphone connected to Input CH 2 (13).
Zero is the lowest (quietest) setting, 10 is the highest (loudest).For the best possible sound and
lowest noise increase the input level control until the input LED lights occasionally.