background image

λ 

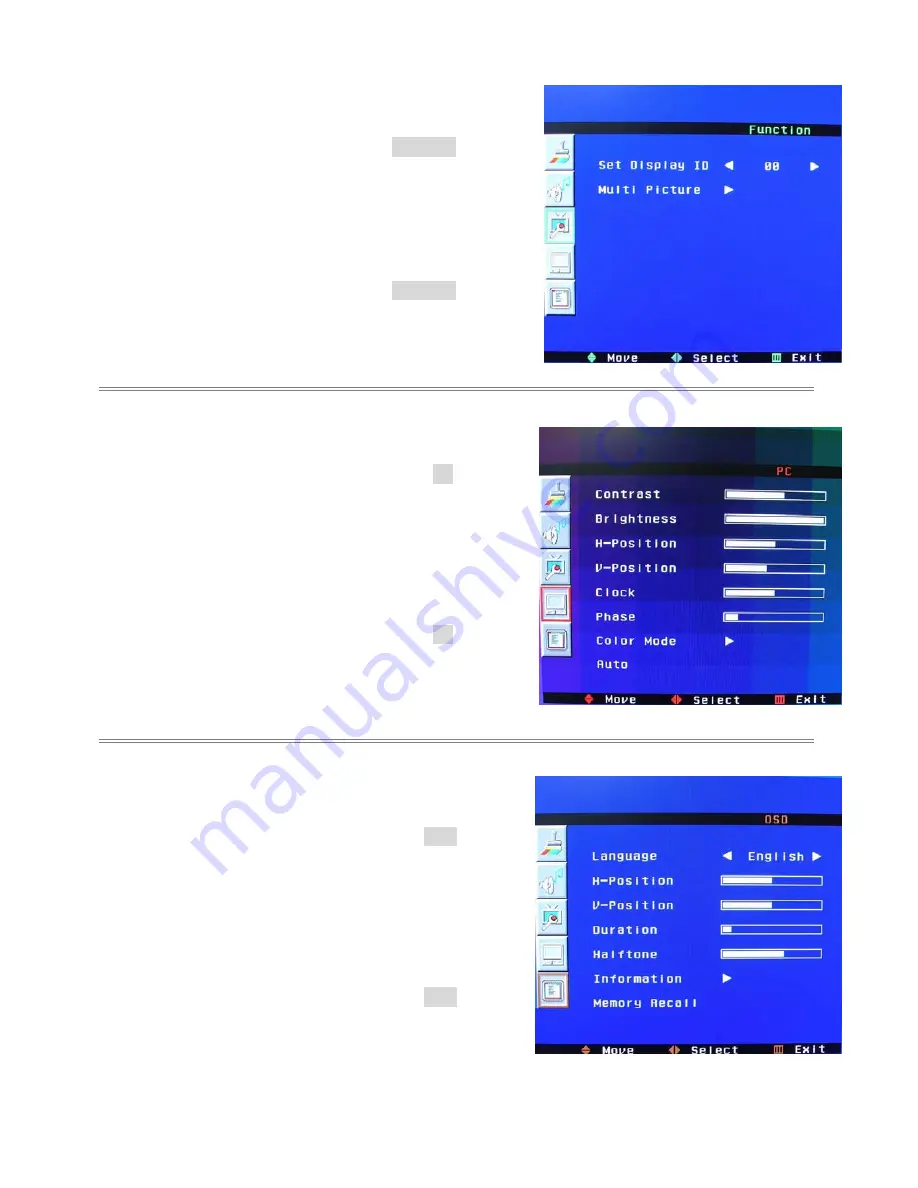
Function : OSD color is Green 


On side of controller:   

  Press “

MENU/EXIT

” to enter the OSD menu 

    Press”

” twice and then press “

X

”to select 

Function

 setting. 

    Press”

” to select the 

Set Display ID, Multi Picture

 setting 

Press“

X

” or “

W

”to adjust 

ID

 number or select 

Multi Picture


the setting. 

    Press“

MENU/EXIT

” to exit the OSD menu. 


On RCU:   

  Press “

MENU/EXIT

” to enter the OSD menu 

    Press”

” twice and then press “

X

”to select 

Function

 setting. 

    Press”

” to select the 

Set Display ID, Multi Picture

 setting. 

Press“

X

” or “

W

”to adjust 

ID

 number or select 

Multi Picture


the setting. 

    Press“

MENU/EXIT

” to exit the OSD menu. 


λ 

PC : OSD color is Red 


  On side of controller:   

  Press “

MENU/EXIT

” to enter the OSD menu 

    Press”

” three times and then press “

X

”to select 

PC

 setting. 

    Press”

” to select the 

Contrast, Brightness, H-Position 

,V-Position, Clock, Phase, Color Mode, Auto

 setting 

Press“

X

” or “

W

”to adjust the value or select the 

Color Mode


setting 

    Press“

MENU/EXIT

” to exit the OSD menu. 


On RCU:   

  Press “

MENU/EXIT

” to enter the OSD menu 

    Press”

” three times and then press “

X

”to select 

PC

 setting. 

    Press”

” to select the

Contrast, Brightness, H-Position 

,V-Position, Clock, Phase, Color Mode, Auto

 setting. 

Press“

X

” or “

W

”to adjust the value or select the 

Color Mode


setting 

    Press“

MENU/EXIT

” to exit the OSD menu. 


OSD : OSD color is Brown 


On side of controller:   

  Press “

MENU/EXIT

” to enter the OSD menu 

    Press”

” four times and then press “

X

”to select 

OSD

 setting. 

    Press”

” to select the 

Language, H-Position, V-Position 

, Duration, Halftone, Information, MemoryRecall 

setting


Press“

X

” or “

W

”to adjust the value or select the 

Information


setting. 

    Press“

MENU/EXIT

” to exit the OSD menu. 


150-CFP-320 

Page 16


On RCU:   

  Press “

MENU/EXIT

” to enter the OSD menu 

    Press”

” four times and then press “

X

”to select 

OSD

 setting. 

    Press”

” to select the 

Language, H-Position, V-Position 

, Duration, Halftone, Information, MemoryRecall 

setting.


Press“

X

” or “

W

”to adjust the value or select the 

Information


setting. 

    Press“

MENU/EXIT

” to exit the OSD menu. 


Содержание CFP32W1 Large Screen Series

Страница 1: ...CAMBRIDGE USERS MANUAL CFP32W1 Large Screen Series LCD Monitor User Guide Document No 150 CFP 320...

Страница 2: ...sion 8 Installation 9 Power Input 9 Power Interface 9 Connection 10 Single Source Input 10 Operating The Monitor 11 The Side Controller Of The Monitor 11 The Remote Controller RCU Instructions 11 Chan...

Страница 3: ...fire or an electrical shock Contact Aydin Displays for a return authorization If water is spilled or objects are dropped inside the monitor remove the power plug from the outlet immediately If the mo...

Страница 4: ...fire or an electric shock Don t use a damaged power plug or worn outlet Don t insert the improper power plug may cause a fire and an electric shock Don t place the monitor on the unstable shelf or de...

Страница 5: ...e the power cord and the plug from the outlet Otherwise it may cause an electric shock Clean the surface of the monitor When the surface of the monitor is polluted please wipe the surface with the cot...

Страница 6: ...tion Package Contents Unpacking CFP32W1 is packed by the carton box During transportation in order to protect the monitor CFP32W1 is packed by cushions to be safe packaged and protected Before unpacki...

Страница 7: ...cushion Packing list Q ty Item Q ty Item 1 set CFP32W1 1 pcs DVI D 24 pin cable 1 pcs Power cord 1 pcs D SUB 15pin cable 1 pcs User s manual 1 pcs S VIDEO Mini Din 4 pin cable 1 pcs Remote controller...

Страница 8: ...Dimension Front Back 150 CFP 320 Page 8...

Страница 9: ...monitor and the wall outlet Connect the power cord into main power of the monitor and is power on is power off Input 100 240V 3A 50 60Hz 150 CFP 320 Page 9 Single Input Interface The side of control...

Страница 10: ...Remarks 1 Video IN input connecter RCA 2 S video input connecter Mini Din 4 pin 3 Y Pb Pr Y Cb Cr inputs Mini Din 8 pin 4 DVI input connecter DVI D 24 pin 5 RGB input connecter D Sub 15 pin 6 Audio in...

Страница 11: ...2 SOURCE Input source selection 3 Menu up 4 Menu down 5 e Menu left Volume Value decrease 6 f Menu right Volume Value increase 7 MENU EXIT Enter OSD menu Exit menu or select The Remote Control RCU Ins...

Страница 12: ...UTION Risk of explosion if batty is replaced by an incorrect type Dispose of used batteries according to the instructions About the remote controllers Please don t drop shake or bump Please don t plac...

Страница 13: ...Display ID number Main source Sub source 00 PC H 48 2KHz V 59 8 Hz Current source Picture 1 150 CFP 320 Page 13...

Страница 14: ...re left right on the screen 0 100 V Position Move the picture up down on the screen 0 100 Clock Adjust the display clock 0 100 Phase Adjust the display phase 0 100 Select 5 kinds of the color temperat...

Страница 15: ...to enter the OSD menu Press X to enter Picture setting Press to select the Contrast Brightness HUE Saturation Color Tone Scale Picture setting Press X or W to adjust the value or select the Color Tone...

Страница 16: ...select the Color Mode setting Press MENU EXIT to exit the OSD menu On RCU Press MENU EXIT to enter the OSD menu Press three times and then press X to select PC setting Press to select theContrast Bri...

Страница 17: ...150 CFP 320 Page 17 Default Setting Item Default Power switch Off Brightness 80 Contrast 50 Color temp User Red 50 Green 50 Blue 50 Language English Auto Adjust On...

Страница 18: ...75 000 N N 1328 136 144 1024 24 806 6 29 768 3 O O 10 VESA XGA 1024x768 60 023 75 029 78 750 P P 1312 96 176 1024 16 800 3 28 768 1 O O 11 640x480 35 000 66 667 30 240 N N 864 64 96 640 64 525 3 39 48...

Страница 19: ...15 pins DVI D 24 pins Component Composite S Video RS 232C option Auto Adjust Clock Phase H Position V Position Screen Scaling VGA SVGA XGA SXGA WXGA Full Screen Display Power Management VESA DPMS DVI...

Страница 20: ...t clear Check picture quality to adjust If you are using YUV terminals make sure cables are correctly connected Compliance FCC Compliance Statement This equipment has been tested and found to comply w...

Страница 21: ...least two people If not it may drop and a serious injury may result Moving shipping the monitor please hold the white handles and be sure to make the bundle If not it may drop and a serious injury may...

Страница 22: ...qualified service personnel Moving the monitor requires at least two people If not it may drop and a serious injury may result Before installing please check the installing manual in wall mount kit b...

Страница 23: ...150 CFP 320 Page 23...

Страница 24: ...150 CFP 320 Page 24...

Страница 25: ...150 CFP 320 Page 25...

Страница 26: ...150 CFP 320 Page 26...

Отзывы: