background image

3

REV. 10/14/2019 INSTAX-DSP-X

INSTALLATION

1.

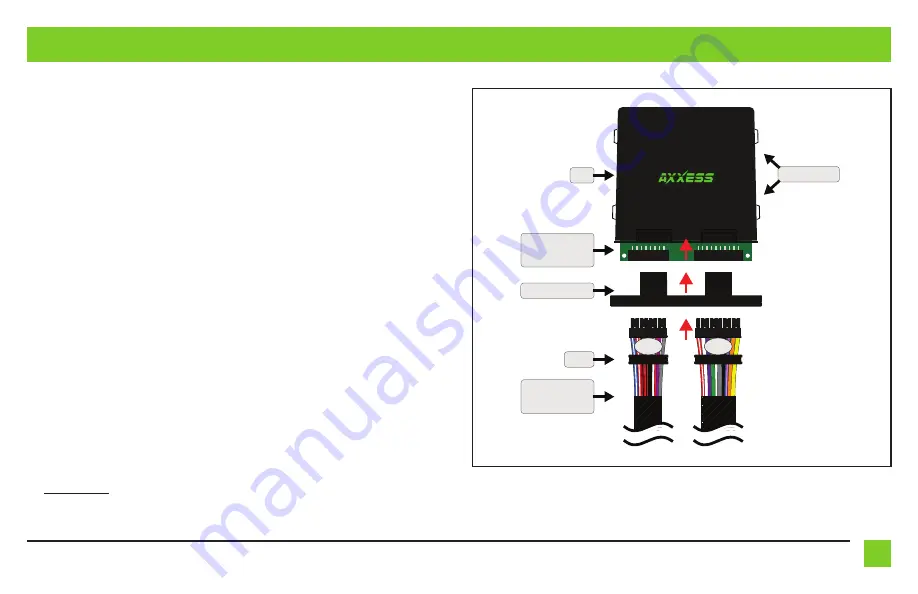
  With the arrow stamped onto the cap facing upwards, push the 16-pin connector from the 

AX-DSPX-WR


harness

 into the left side of the cap. The locking clip on the connector should 

face upward. Make sure the gasket is seating properly in the cap.  (Figure A)

2.

  With the arrow stamped onto the cap still facing upwards, push the 20-pin connector from 

the 

AX-DSPX-WR


harness

 into the right side of the cap. The locking clip on the connector 

should face upward. Make sure the gasket is seating properly in the cap.  (Figure A)

3.

  Plug the 16-pin and 20-pin connectors from the 

AX-DSPX-WR harness

 into the 

AX-DSPX-X circuit board

.  (Figure A)

4.

  Slide the assembly into the case, then click it shut. Zip-tie the enclosure to a secure location 

to secure it. Make sure the Axxess logo is facing up to further ensure that no outside elements 
can enter the enclosure.

5.

  Complete all necessary connections to the radio and vehicle, but leave the amp turn-on wire 

disconnected.

6.

  Download and install the AX-DSP-X app from the 

Google Play Store

 or 

Apple App Store

.

7.

  Open the app and follow the instructions on the 

Bluetooth Connection

 tab to pair the mobile 

device to the AX-DSPX-WR.

8.

  Scroll to the 

Configuration

 tab then select  

General

 as the vehicle type.

9.

  Connect the amp turn-on wire from the AX-DSPX-WR.

10.

 Adjust the DSP settings in the app as desired. Refer to the instructions starting on (page 7) 

for an explanation of each tab in the app. 
(refer to page 7)

Cap (with O-ring)

Case

AX-DSP-X

Circuit Board

AX-DSPX-WR

Harness

16-Pin

20-Pin

Gasket

Zip-tie Mounts

(Figure A)

Содержание AX-DSPX-WR

Страница 1: ...ital Signal Processor with Water Resistant Case Water resistant enclosure with zip tie mounts included 31 Band graphic EQ 6 Inputs 10 individually assignable outputs Independent equalization on each o...

Страница 2: ...io signal high level refer to page 6 PREFACE INSTALLATION OPTIONS In the following section Installation Options choose the installation type then either click on the hyperlink or reference the page nu...

Страница 3: ...the case then click it shut Zip tie the enclosure to a secure location to secure it Make sure the Axxess logo is facing up to further ensure that no outside elements can enter the enclosure 5 Complet...

Страница 4: ...s tape off and disregard Blue White Amp Turn On Wire Assignable Outputs Labeled CH 6 10 INPUT 5 INPUT 6 Optional An SPDT relay Metra part number E 123 must be used if more than one amplifier will be i...

Страница 5: ...eparately Blue White Amp Turn On Wire Bass Knob included Factory Radio These outputs can be used for additional sub amps or for adding onto the system at a later date I N P U T 5 Orange Control Wire I...

Страница 6: ...Factory Radio I N P U T 5 Orange Control Wire INPUT6 AX DSP X Enclosure included An SPDT relay Metra part number E 123 must be used if more than one amplifier will be installed RCA Jacks sold separate...

Страница 7: ...7 REV 10 14 2019 INSTAX DSP X AX DSP X APP Setup Instructions General information tab for installing the AX DSP X Continued on the next page...

Страница 8: ...luetooth pairing process then select the AX DSP X from the mobile device The AX DSP X must be powered during this process Confirmation that you are connected will show in the top left corner of the ap...

Страница 9: ...et process the amplifiers will shut off for 5 10 seconds Vehicle Type Select the vehicle type from the drop down box Select General as the vehicle type then click the apply button Lock Down Click this...

Страница 10: ...vice Set Password Assign a 4 digit password to lock the AX DSP X If no password is desired use 0000 This will clear out any currently set password It is not necessary to lock down the AX DSP X when se...

Страница 11: ...aker Group Used to join channels together Example left front woofer midrange and left front tweeter will be considered simply left front to the AX DSP X The letter M denotes the speaker assigned as th...

Страница 12: ...kers If a subwoofer is not being installed change the front and rear crossover points down to 20Hz for a full range signal or to the lowest frequency the speakers will play to Selecting High Pass and...

Страница 13: ...zer Adjust All channels can be adjusted independently within this tab with 31 bands of available equalization It is best to tune this by using an RTA Real Time Analyzer The Gain slider on the far left...

Страница 14: ...delay of each channel up to 10 milliseconds First measure the distance in inches from each speaker to the listening position then enter those values If a delay is desired add to the desired channel s...

Страница 15: ...can be adjusted to the listening preference of the user Chime Volume Not applicable in this application Amp Turn On Signal Sense Will turn the amplifier on when an audio signal is detected and keep o...

Страница 16: ...16 Locking Down Data Last and the most important You must lock down your configuration AX DSP X APP CONT...

Страница 17: ...for Bass Knob White RCA Jack Front Left Input Red Accessory Power Black Yellow Future Use Yellow Battery Power SUB CH6 CH7 CH8 CH9 CH10 INPUT6 INPUT 5 Output Connector Input Connector SUB CH6 CH7 CH8...

Страница 18: ...ak Ouput Channels 10 Output Voltage Up to 5v RMS Output Impedance 50 Ohms Equalizer Type 31 Band Graphic EQ 10dB THD 0 03 Frequency Response 20Hz 20kHz Crossover 3 Way LPF BPF HPF THP per channel Cros...

Страница 19: ...19 REV 10 14 2019 INSTAX DSP X...

Страница 20: ...tter tomorrow Metra recommends MECP certified technicians AxxessInterfaces com COPYRIGHT 2019 METRA ELECTRONICS CORPORATION REV 10 14 19 INSTAX DSPX WR I N S TA L L AT I O N I N S T R U C T I O N S AX...

Отзывы: