background image

4

Axon Flex Features

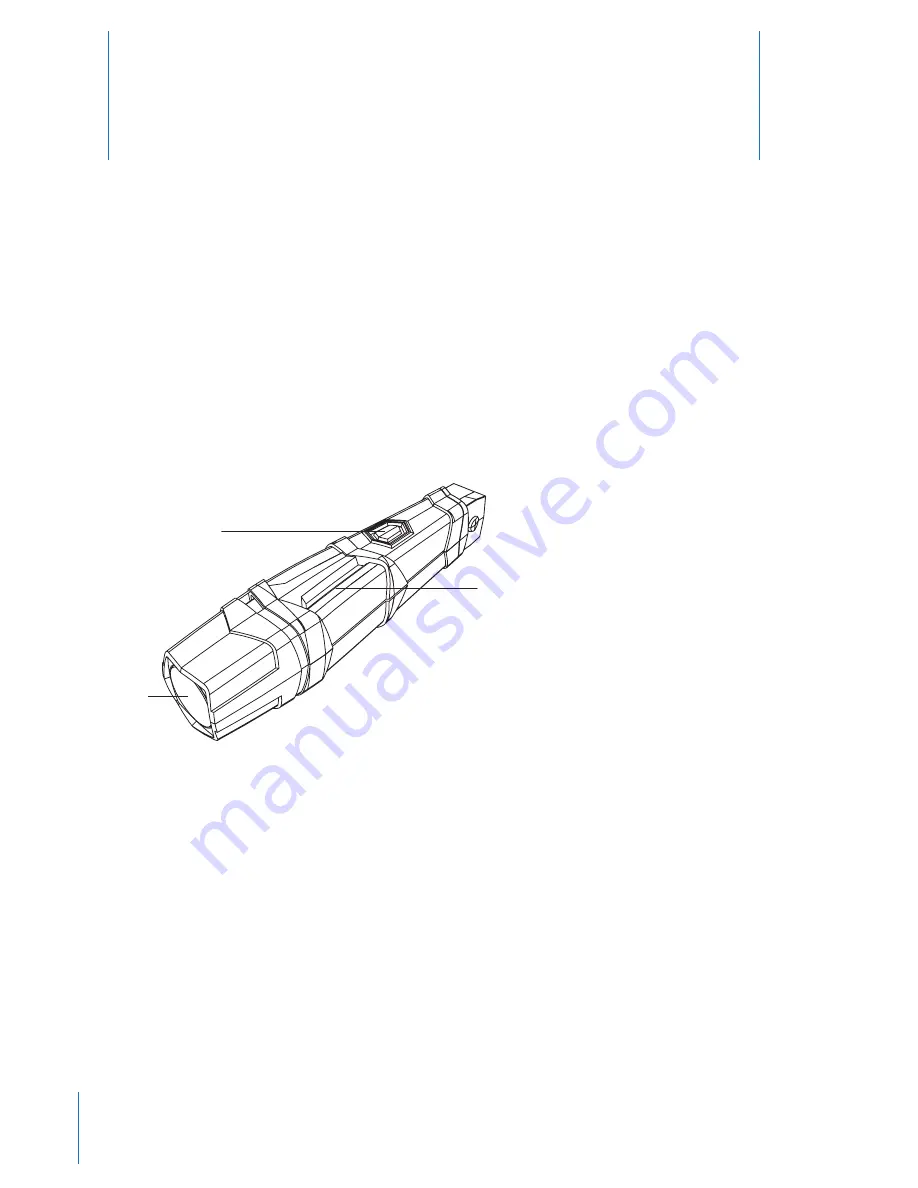
The primary Axon Flex components are the camera and controller. 

Axon Flex Camera

The camera offers high quality video and low-light gathering capabilities. The camera is designed to store at least 

4 hours of video (and up to 13 hours based on the video setting). If the camera is full (has reached its storage limit), 

the camera will not record over previous video but instead stops recording.

Volume/Pairing Button

Imager

Bracket Clip

  1 

Volume/Pairing Button

 – This button is used to adjust the volume of audio prompts coming from the camera. 

It also is used to pair the Axon Flex system with a smart phone; see the 

Axon Mobile for Android Devices

 or 

Axon 

Mobile for IOS Devices

 manuals for more information. This button does not control the volume of recorded 

audio.

  2

  Bracket Clip

 – A clamp attaches to this part of the camera, and the clamp can be attached to a variety of 

mounting tools.

  3


Imager

 – This is the camera lens. Avoid touching the lens. For cleaning information, see 

Chapter 5 Care and 

Maintenance

 in this manual.

Axon Flex Controller

The controller enables you to turn the unit on, begin recording of an event, stop recording, and turn the unit off. 

The controller features LEDs to indicate the operating mode and battery capacity.

Hardware

2

Содержание TASER

Страница 1: ...Axon Flex System User Manual The most up to date warnings and instructions are available at www TASER com IMPORTANT SAFETY INSTRUCTIONS Read all warnings and instructions Save these instructions MMU0040 Rev F ...

Страница 2: ...etic Clip Assembly 11 Mounting the Axon Flex Camera to Your Shirt Collar 12 Chapter 4 Basic Operations 12 Operating Modes 12 BUFFERING Mode 12 EVENT Mode 13 Battery Status 13 Adjusting the Audio Prompt Volume 14 Turning off the Controller LEDs 15 Chapter 5 Audio Prompts 16 Chapter 6 Axon Signal Operations 17 Chapter 7 Care and Maintenance 17 Cleaning the Axon Flex System Components 17 Charging the...

Страница 3: ...n enables playback of footage on a smart phone for review prior to storing the data Instructional videos for using your Axon Flex system are available at www TASER com under Training Videos Additional Reading This manual explains how to operate the Axon Flex hardware Other manuals cover additional aspects of the Axon Flex system These documents are available at www TASER com The TASER Axon System ...

Страница 4: ...rompts coming from the camera It also is used to pair the Axon Flex system with a smart phone see the AxonMobileforAndroidDevices or Axon Mobile for IOS Devices manuals for more information This button does not control the volume of recorded audio 2 Bracket Clip A clamp attaches to this part of the camera and the clamp can be attached to a variety of mounting tools 3 Imager This is the camera lens...

Страница 5: ...ibed below 2 On Off Switch Turns the controller on or off 3 On Off Indicator When the controller is turned on the red portion of the controller is exposed When the controller is turned off the red portion is covered from view 4 EVENT Button Used to start and stop recording Double press to start hold for 3 seconds to stop recording The controller might take several additional seconds to close out o...

Страница 6: ...s is available at www TASER com Axon Flex Cables and Connectors Straight to Right Angle Connector The Axon Flex camera and controller are designed to work with a purpose built cable with a straight connec tor at one end and a right angle connector at the other Insert the straight connector into the camera and the right angle connector into the controller The straight connector has jaws designed to...

Страница 7: ...7 Chapter 2 Hardware For instructions on downloading your Axon Flex camera to a computer see the TASERAxonEnd to EndDeployment Guide ...

Страница 8: ... factory are configured to be installed on the right side of the body If you wish to wear a camera on the left side you will have to adjust your settings through the Evidence Sync software or on the Evidence com website to re orient the camera The side on which you wear the camera is configured through the Evidence Sync software Try wearing your camera on your dominant side and your non dominant s...

Страница 9: ...able connector has a round opening that fits around the bump providing added security when connected Opening in Connector Protruding Bump on Camera If you do not connect the cable to the camera properly the connection may not be secure The controller holster has a cable retention clip that rolls into place to help keep the cable attached ...

Страница 10: ...e the foundation for many camera mounting options Each clip features a set of teeth on one side and a ring on the other The sides with teeth are magnetically attracted to each other The other clip can be placed inside a shirt collar or cap to hold the camera in place The magnetic clip is designed to allow some rotation up or down so you can adjust the camera s angle after it is mounted ...

Страница 11: ...her on each side of your collar 2 Tug on the parts slightly to confirm the connection is secure 3 Attach the camera assembly to the magnetic clip on the outside of your shirt 4 Tug on the parts slightly to confirm the connection is secure 5 Route the cable to your controller Ensure that the cable does not obstruct the motion of your head ...

Страница 12: ...irectly before the event will be saved and attached to the event in permanent memory This feature is intended to capture the video of an incident just before your activation of EVENT mode Because the system does not capture audio in BUFFERING mode the first 30 seconds of a recorded event will be video only Buffering mode starts only after the Axon Flex controller is turned on The system does not r...

Страница 13: ...o If the camera becomes disconnected from the controller during an event the system will stop recording 2 To stop recording and return to BUFFERING mode press the EVENT button for approximately 3 seconds The system will beep once 3 Toendarecordingandturnoffthesystem movetheon offswitchtothe off position Whenyouendarecording with the on off switch you will not go into BUFFERING mode instead the sys...

Страница 14: ... then green before shutting down the lights Pressing the Battery button will momentarily light both the Operation LED and the Battery LED displaying the current operating mode and battery level For interpreting the LED colors see Axon Flex Controller in Chapter 2 Hardware in this manual 2 To turn the lights back on press and hold the Battery button for 10 seconds If you disconnect a cable when the...

Страница 15: ...you still do not hear the audio prompts check the camera s volume Action Audio Prompt Powering on or off One beep Recording an event Two beeps sound every two minutes Press the battery button while the camera is recording Two beeps The device is ending an event and returning to BUFFERING mode One long beep The battery is at 20 percent capacity or lower Four quick beeps repeating every 20 seconds T...

Страница 16: ...om the Axon Flex system The ASU sends a signal to your Axon Flex controller Upon processing this signal your Axon system transitions from BUFFERING to EVENT mode When your Axon Flex camera starts recording you will hear two beeps The ASU has a range of approximately 30 feet Another vehicle s light bar activation may cause your Axon camera to start recording if the light bar is equipped to do so Th...

Страница 17: ...troller Battery A fully charged controller battery should provide enough power for approximately 12 hours of normal operation Rechargingabatteryaftera12 hourusecantakeupto6hoursifyouarerechargingyourcontrollerfromawalloutlet Evidence com Dock or an ETM Recharging could take considerably longer if you are recharging from a computer If the battery depletes significantly during the shift you will hea...

Страница 18: ... camera will beep once while shutting down The LED will go from blinking green BUFFERING mode to blinking yellow and then it will turn solid red The LED will then cycle back through solid red booting The camera will then beep once and the LED will blink green BUFFERING This will repeat until the Axon system is booted up If the reset occurs in the EVENT mode the camera will beep once while shutting...

Страница 19: ...guarantee that interference will not occur in a particular installation If this equipment does cause harmful interference to radio or television reception which can be determined by turning the equipment off and on the user is encouraged to try to correct the interference by one or more of the following measures Reorient or relocate the receiving antenna Increase the separation between the equipme...

Страница 20: ...u moyen d une antenne d un seul type et d un gain maximal ou inférieur approuvé pour l émetteur par Industrie Canada Dans le but de réduire les risques de brouillage radioélectrique pour les autres utilisateurs il faut choisir le type d antenne et son gain de sorte que la puissance isotrope rayonnée équivalente p i r e ne dépasse pas celle requise pour établir une communication satisfaisante THIS ...

Страница 21: ...k of Oakley Inc IOS is a trademark of Cisco Technology Inc and Windex is a trademark of S C Johnson Son Inc Axon Signal Evidence com and are trademarks of TASER International Inc Axon Axon Flex TASER and are trademarks of TASER International Inc registered in the US and other countries For more information visit www TASER com legal All rights reserved 2015 TASER International Inc MMU0040 Rev F ...

Отзывы: