background image

21

Содержание SIEG SC6

Страница 1: ...SIEG SC6 Variable Speed Lathe Axminster Tool Centre Unit 10 Weycroft Avenue Axminster Devon EX13 5PH www axminster co uk 951542 Mill Attachment for the SC6 Lathe Manual See Pages 31 50 ...

Страница 2: ...2 ...

Страница 3: ... Wheel F 1 No Leadscrew Reversing Sprocket Extra fixed shaft gear G 1 No Chuck Key H Set of Spanners 19 14 10 7mm I Set of Allen Keys Gears J 1 No 30 Teeth K 1 No 40 Teeth L 2 No 42 Teeth M 1 No 50 Teeth N 1 No 52 Teeth O 1 No 60 Teeth P 1 No 66 Teeth Q 1 No 70 Teeth R 1 No 75 Teeth S 1 No 80 Teeth A B C D E F G H I J K L M N O P Q R S ...

Страница 4: ...11 Automatic Carriage Feed Lever 12 Compound Slide 13 Tool Post 14 Tool Post Lock Handle 15 Compound Slide Handwheel 16 Tailstock Centre 17 Tailstock Clamp Bolt 18 Tailstock Axis Alignment Indicator 19 Tailstock Barrel Handwheel 20 Tailstock Centre Lock 21 Start Button 22 Digital Readout Speed Display RPM 23 Forward Button 24 Speed Down Button 25 Reverse Button 26 Stop Button 27 Lathe Bed 28 Fuse ...

Страница 5: ...the figure below Make sure the Emergency Stop Button 4 is pushed down before continuing Turn the switch 6 to the left for the lathe function The power indicator 5 will light up NOTE if it does not light up unplug the lathe and check the fuse on the lathe and then the plug Call our technical sales department on 0330 100 0299 if you are still having problems 2 24 21 4 5 22 23 25 26 6 6 8 then refer ...

Страница 6: ...6 FWD REV Buttons Fuse Digital Readout Speed Display Selector Switch Start Button Stop Button Variable Speed Controls Power Indicator LED Emergency Stop Button OPERATIONS ...

Страница 7: ...7 ...

Страница 8: ...8 ...

Страница 9: ...9 ...

Страница 10: ...10 ...

Страница 11: ...11 ...

Страница 12: ...12 ...

Страница 13: ...13 ...

Страница 14: ...14 ...

Страница 15: ... swarf and chips away from the machine bed slide surfaces and the tool post 2 Exercise the slides and ensure no swarf etc is lodged in the drive shaft tunnels 3 If you have been using ʻsudsʼ make sure the machine is thoroughly dried off Clear the suds tray of all swarf and chips especially around the drain 4 Check the tool ensure it is usable the next time if not re sharpen or replace the tool tip...

Страница 16: ...e Rocol Saphire 2 Part number 810129 Lubricant Rocol Slideway lubricant spray Part Number 810141 Cutting Fluid Rocol Multisol Cutting Fluid Part Number 810140 There are numerous accessories listed for the machine listed in the Axminster catalogue in section 2 LATHE MAINTENANCE LATHE MAINTENANCE OIL LUBRICATION POINTS 1 Fixed Shaft Gear 2 Synchronised Counter Pulley 3 Upper Adjustable Shaft 4 Lower...

Страница 17: ...LATHE MAINTENANCE 17 ...

Страница 18: ...18 ...

Страница 19: ...19 ...

Страница 20: ...20 ...

Страница 21: ...21 ...

Страница 22: ...22 SC6 WIRE DIAGRAM ...

Страница 23: ...23 ...

Страница 24: ...24 ...

Страница 25: ...25 ...

Страница 26: ...26 ...

Страница 27: ...27 ...

Страница 28: ...28 ...

Страница 29: ...29 ...

Страница 30: ...30 ...

Страница 31: ...SIEG SC6 Mill Attachment ...

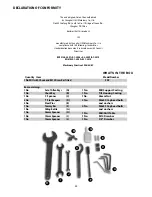
Страница 32: ... 2010 Machinery Directive 2006 42 EC WHATʼS IN THE BOX Quantity Item Model Number 1 No Mill with Chuck and M12 Draw Bar fitted SX2 Box containing 1 No Set of Allen Keys 1 No Chuck Key 1 No C Spanner 2 No T Slot Keepers 2 No Steel Pins 1 No Tommy Bar 1 No Oiling Bottle 1 No 36mm Spanner 1 No 19mm Spanner 1 No 10mm Spanner DECLARATION OF CONFORMITY 32 1 No Mill Support Casting 1 No Tilt Housing Cast...

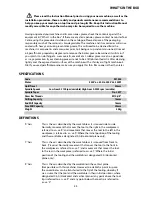
Страница 33: ...ou apply this thin film sooner rather than later SPECIFICATIONS Code 951542 Motor 230V a c 50 Hz 220V d c 350W Quill Travel 30mm Spindle Speeds Low Gear 0 1100rpm variable High Gear 0 2500 rpm variable Spindle Taper No 3 MT Draw Bar Threads M10 3 8 Drilling Capacity 13mm End Mill Capacity 16mm Face Mill Capacity 30mm Weight 35kg DEFINITIONS X Axis This is the axis described by the work table as it...

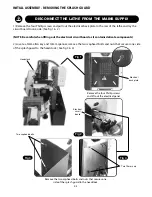
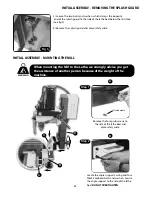
Страница 34: ... components 2 Locate a 5mm allen key and 10mm spanner remove the two caphead bolts and nuts that secures one side of the splash guard to the headstock See fig 3 4 DISCONNECT THE LATHE FROM THE MAINS SUPPLY Remove the four Phillip screws and lift out the electrical panel Electrical back plate Electrical circuit board Headstock Fig 2 Fig 3 Fig 4 Fig 1 Remove the two caphead bolts and nuts that secur...

Страница 35: ...fig 5 4 Remove the splash guard and place safely aside Fig 5 WARNING When mounting the Mill to the Lathe we strongly advise you get the assistance of another person because of the weight of the machine Remove the four grub screws to the side of the lathe bed and place safely aside Locate the angle support casting and four M8x35 caphead bolts and washers Secure the angle support to the side of the ...

Страница 36: ...port casting and secure in place using the M8 bolts and washers Lift the mill assembly and slide it over the tilt housing shaft until it is flush against the tilt housing Locate the 36mm nut and spanner and lock the mill assembly in position DO NOT OVER TIGHTEN Insert the Mill s power plug into the socket in the rear of the lathe as shown INITIAL ASSEMBLY FITTING THE MILL B C D Step 3 Step 4 Step ...

Страница 37: ...n by opening the switch shroud turn the Speed Control Switch to Off All lights are off n Press the on button turn the Speed Control On and advance until the chuck starts to rotate o Over a period of approximately 5 minutes advance the speed in stages to maximum run at maximum for at least 2 minutes check that there is nothing untoward no excessive vibration speed progression is smooth etc Stop the...

Страница 38: ...nd washers The tool post is mated to the housing and clamped by a 36mm nut The main tool post can tilt 45 from the vertical either left or right There is a pointer and a scale mounted on the housing to give an indication of the amount of tilt that has been applied Milling head This is the milling machine and the descriptions of its various parts and components are detailed as follows Milling head ...

Страница 39: ...ILLUSTRATION OF THE MILL Rise and fall Tri lever feed Main tool post Guard Depth stop Rack Feed handle Chuck Scale Pointer Angle support casting Control unit Motor 0 45 tilt either direction Tilt housing assembly ...

Страница 40: ...e machine precludes any fancy locking mechanism for the quill There is a blind pocket on the spindle that accepts the tommy bar supplied in the tool kit to enable the spindle to be held in position whilst the draw bar is loosened Draw bar cover A moulded plastic cover that clips into the top of the Motor Gearbox assembly to afford protection from the rotating top of the draw bar when the quill is ...

Страница 41: ...41 MACHINE ILLUSTRATION OF THE MILL Fault LED Fuse cap Pointer Scale High ratio Low ratio Power LED ON Off switch shroud Speed control knob Emergency stop Gear change lever ...

Страница 42: ...otor Head clamp Top of draw bar Fine feed thimble Fine feed control Quill hold pocket To engage the fine feed control push the tri lever assembly in until it meshes with the bevel gear Pulling the tri lever back will disengage the fine feed control Spindle NORMAL FINE FEED ...

Страница 43: ...the tool Screw in the draw bar finger tight Hold the quill immovable and tighten with the spanner DO NOT OVERTIGHTEN Replace the draw bar cover Remove all tooling and reconnect the machine Ensure the tool path is clear switch on and check that the tool is correctly seated is running true etc If all is O K proceed Milling all cases Ensure the workpiece is securely clamped to the table Along the lon...

Страница 44: ...that secure the compound slide to the cross slide remove the compound slide and place safely aside See fig A 3 Locate the milling table and the supplied caphead bolts Lower the table onto the cross slide line up the holes and insert and secure the table using a 6mm allen key See fig C 2 Using a Phillips screwdriver remove the four grub screws from the cross slide and place safely aside See fig B F...

Страница 45: ...faces 5 Clean and lightly oil any tools you may have been using drill chucks spanners chuck keys etc and put them away 6 Switch off the power supply Disconnect the plug 7 Cover the machine over with a dust cloth Weekly 1 Move the traverse slide fully back to give access to the tunnel blow out to make sure all swarf is cleared away and heavily spray oil the tunnel exercise the slide to work the oil...

Страница 46: ...MAINTENANCE OILING POINTS 46 Oil OIL ...

Страница 47: ...rills 610170 Bull Nose Slot Drill 3mm 610171 Bull Nose Slot Drill 4mm 610172 Bull Nose Slot Drill 6mm 610173 Bull Nose Slot Drill 8mm 610168 Bull Nose Slot Drill 10mm Code Description Metric Screwed Shank Two Flute Bull Nose Slot Drills AxminsterBullNoseSlotDrills RotaryMillingVice forMicroMill55mm AxminsterMicro MillCollets MicroMillClampingKit 50mmReleaseVise 610177 3mm End Mill 610178 4mm End M...

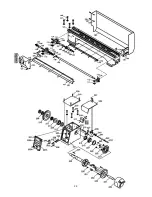
Страница 48: ...PARTS BREAKDOWN FOR THE MILL 48 ...

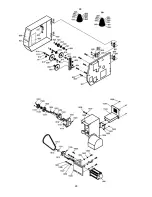
Страница 49: ...PARTS BREAKDOWN FOR THE MILL 49 ...

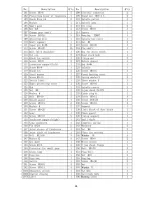
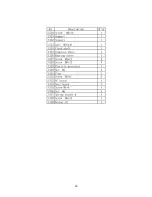
Страница 50: ...50 PARTS LIST FOR THE MILL ...

Отзывы: