


Operating Instructions
11
WARNING!! KEEP TOOLS AND
EQUIPMENT OUT OF REACH OF
YOUNG CHILDREN.
CONNECT THE WHEEL SHARPENER
TO THE MAINS SUPPLY.
ALWAYS WEAR EAR DEFENDERS
AND SAFETY GOGGLES.
Carry out final checks e.g. check the stones are not badly
deformed (rounded edges, grooved face, etc. Fill the trough
with water to the maximum water level, see page 07. Start the
machine, wait until it reaches full speed. Check it runs smoothly,
no knocking or scraping noises for example. If all ok, apply a
work piece. When work has been completed switch off the
wheel sharpener, see fig A and wait until it comes to a complete
stop. Disconnect the machine from the mains supply. Clean the
water trough.
NOTE: DO NOT leave the stone submerged in water if
the grinder is not in use. This will prevent the stone from
swelling and cracking.
NOTE: Store and use at room temperature.
1
3
2
A
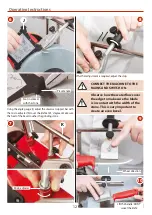
The Knife Jig
Slide the knife between the clamp making sure the knife
cutting edge is perpendiular with the clamp.
Tighten the clamping screw to secure the knife.
Mark the bevel with a marker to allow you to see were the
grinding will occur.
Adjust the knife thicknessing knob to fit the thickness of the
knife.
Loosen
Perpendicular line
Tighten
Adjust
Continues over...
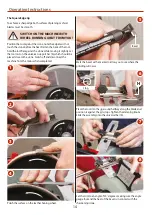
4
5
Loosen the adjustable stop clamping knob and twist the stop
to set it to zero.
Zero mark
Bevel
F
Press the forward
/reverse switch to
power on the unit.
Note:
When sharpening the
stone should rotate
towards you and away
from you when honing.
Содержание AC250WBS 250/40
Страница 5: ...Assembly Setup 5 1 5 8 7 6 4 2 3 Water trough mounting slots B D ...
Страница 6: ...Assembly Setup 6 14 15 16 17 13 12 11 10 9 K M View 1 View 2 View 3 View 4 ...
Страница 20: ...Exploded Diagrams Lists 20 ...
Страница 22: ...Wiring Diagram 22 ...
Страница 23: ...Notes 23 ...