background image

AXIS S1032/AXIS S1048 Installation Guide

Page 3

AXIS S1032/AXIS S1048 Installation 
Guide


This installation guide provides instructions for installing AXIS Camera Station S1032 Recorder and 
AXIS Camera Station S1048 Recorder. For more information about how to use the product, go to 
www.axis.com

Installation Steps

1. Hardware overview. See page 4.
2. Connect the cables:

• AXIS S1032. See page 6.
• AXIS S1048. See page 8.

3. Set up software. See page 10.
4. Network configuration. See page 10.
5. Get Started. See page 10.

Package Contents

• AXIS Camera Station S1032 Recorder or AXIS Camera Station S1048 Recorder
• Power cables
• Rails mount kit
• Bezel and bezel key
• Cable  straps
• Safety Regulation document
• Installation Guide (this document)

Содержание S1032

Страница 1: ...INSTALLATION GUIDE AXIS Camera Station S1032 Recorder AXIS Camera Station S1048 Recorder ...

Страница 2: ...ith the instructions given in the user documentation This equipment contains no user serviceable components Unauthorized equipment changes or modifications will invalidate all applicable regulatory certifications and approvals Trademark Acknowledgments Dell is a trademark of Dell Inc Ethernet Internet Explorer WWW are registered trademarks of the respective holders Microsoft Windows MS DOS Windows...

Страница 3: ...to use the product go to www axis com Installation Steps 1 Hardware overview See page 4 2 Connect the cables AXIS S1032 See page 6 AXIS S1048 See page 8 3 Set up software See page 10 4 Network configuration See page 10 5 Get Started See page 10 Package Contents AXIS Camera Station S1032 Recorder or AXIS Camera Station S1048 Recorder Power cables Rails mount kit Bezel and bezel key Cable straps Saf...

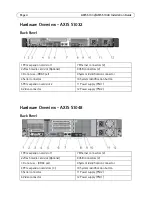
Страница 4: ...identification connector 4 Serial connector 10 System identification button 5 PCIe expansion card slot 2 11 Power supply PSU1 6 Video connector 12 Power supply PSU2 1 PCIe expansion card slot 1 7 Ethernet connectors 2 2 vFlash media card slot Optional 8 USB connectors 2 3 Do not use iDRAC port 9 System identification connector 4 PCIe expansion card slots 3 10 System identification button 5 Serial ...

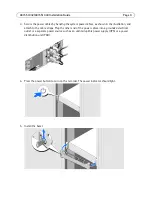
Страница 5: ...and Install the Recorder Unpack your system and identify each item see Package Contents on page 3 Assemble the rails and install the Axis recorder in the rack following the safety instructions and the rack installation instructions provided with your system ...

Страница 6: ...tion see www axis com NOTE Some devices may not be included if you did not order them 1 Connect the keyboard mouse and monitor The connectors on the back of your system have icons indicating which cable to plug into each connector Be sure to tighten the screws if any on the monitor s cable connector 2 Connect the system s power cable s to the system and if a monitor is used connect the monitor s p...

Страница 7: ... illustration and attach to the cable straps Plug the other end of the power cables into a grounded electrical outlet or a separate power source such as an uninterruptible power supply UPS or a power distribution unit PDU 4 Press the power button to turn on the recorder The power indicator should light up 5 Install the bezel ...

Страница 8: ...tion see www axis com NOTE Some devices may not be included if you did not order them 1 Connect the keyboard mouse and monitor The connectors on the back of your system have icons indicating which cable to plug into each connector Be sure to tighten the screws if any on the monitor s cable connector 2 Connect the system s power cable s to the system and if a monitor is used connect the monitor s p...

Страница 9: ...e illustration and attach to the cable straps Plug the other end of the power cables into a grounded electrical outlet or a separate power source such as an uninterruptible power supply UPS or a power distribution unit PDU 4 Press the power button to turn on the recorder The power indicator should light 5 Install the bezel ...

Страница 10: ...Area Network or to a WAN Wide Area Network Depending on the installation follow the instructions under Network Security Configuration in AXIS Camera Station User Manual available at www axis com Get Started AXIS Camera Station Client and the wizard Get Started with AXIS Camera Station start automatically when the installation is complete Get Started with AXIS Camera Station provides a quick way to...

Страница 11: ...ollowing specifications are only those required by law to ship with your system For a complete and current listing of the specifications for your system go to www axis com support Power AC Power Supply per power supply Note Heat dissipation is calculated by using the power supply wattage rating AXIS S1032 AXIS S1048 Wattage 350 W 495 W Heat dissipation 1356 BTU hr maximum 1908 BTU hr maximum Volta...

Страница 12: ...y RH with 26 C max dew point De rate maximum allowable dry bulb temperature at 1 C 300 m above 900 m 1 F per 550 ft Note For information on supported expanded operatingtemperature range and configura tions see sup port dell com manuals Continuous operation 10 C to 35 C at 10 to 80 relative humidity RH with 26 C max dew point De rate maximum allowable dry bulb temperature at 1 C 300 m above 900 m 1...

Страница 13: ...to 80 noncondensing at a maximum wet bulb temperature of 29 C 84 2 F 20 to 80 noncondensing at a maximum wet bulb temperature of 29 C 84 2 F Storage 5 to 95 at a maximum wet bulb temperature of 38 C 100 4 F 5 to 95 at a maximum wet bulb temperature of 38 C 100 4 F ...

Страница 14: ...n For more information about the product visit www axis com Visit Axis learning center www axis com academy for useful trainings webinars tutorials and guides Warranty For information about Axis product warranty and thereto related information see www axis com warranty ...

Страница 15: ......

Страница 16: ...Installation Guide Ver 1 0 AXIS Camera Station S1032 Recorder AXIS Camera Station S1048 Recorder Printed August 2014 2014 Axis Communications AB 2013 Dell Inc Part No 59344 ...

Отзывы: