background image

60

Содержание Q1604-E

Страница 1: ...AXIS Q1604 Network Camera ENGLISH FRANÇAIS DEUTSCH ITALIANO ESPANÕL ò ò Installation Guide ...

Страница 2: ...ademarks of SD 3C LLC in the United States other countries or both Also miniSD microSD miniSDHC microSDHC microSDXC are all trademarks or registered trademarks of SD 3C LLC in the United States other countries or both Regulatory Information Europe This product complies with the applicable CE marking directives and harmonized standards Electromagnetic Compatibility EMC Directive 2004 108 EC See Ele...

Страница 3: ...er with household or commercial waste Directive 2012 19 EU on waste electrical and electronic equipment WEEE is applicable in the European Union member states To prevent potential harm to human health and the environment the product must be disposed of in an approved and environmentally safe recycling process For information about your nearest designated collection point contact your local authori...

Страница 4: ......

Страница 5: ... a hazardous situation which if not avoided could result in death or serious injury CAUTION Indicates a hazardous situation which if not avoided could result in minor or moderate injury NO NO NOTICE TICE TICE Indicates a situation which if not avoided could result in damage to property Other Message Levels Important Indicates significant information which is essential for the product to function c...

Страница 6: ...ecification of the product These can be provided by Axis or a third party Use only spare parts provided by or recommended by Axis Do not attempt to repair the product by yourself Contact Axis support or your Axis reseller for service matters The power supply shall be plugged in to a socket outlet installed near the product and shall be easily accessible Transportation NO NO NOTICE TICE TICE When t...

Страница 7: ...f explosion if the battery is incorrectly replaced Replace only with an identical battery or a battery which is recommended by Axis Dispose of used batteries according to local regulations or the battery manufacturer s instructions 7 ENGLISH ...

Страница 8: ...8 ...

Страница 9: ...n are in order See page 9 2 Study the hardware overview See page 10 3 Study the specifications See page 14 4 Install the hardware See page 16 5 Access the product See page 18 6 Set the focus See page 17 Package Contents AXIS Q1604 Network Camera Camera stand Power block connector 2 pin connector block for power input Terminal block connector 4 pin connector block for connecting external devices to...

Страница 10: ...AXIS Q1604 Network Camera Hardware Overview 1 2 3 4 1 SD card slot 2 Status LED 3 Zoom puller 4 Focus puller 10 ...

Страница 11: ...2 3 10 5 6 1 Power LED 2 Network LED 3 Control button 4 Iris connector 5 Power connector 6 I O terminal connector 7 Product number P N Serial number S N 8 Network connector 9 Audio out 10 Audio in Not used for outdoor variants 11 ENGLISH ...

Страница 12: ...de failure Network LED Indication Green Steady for connection to a 100 Mbit s network Flashes for network activity Amber Steady for connection to a 10 Mbit s network Flashes for network activity Unlit No network connection Power LED Indication Green Normal operation Amber Flashes green amber during firmware upgrade Status LED Behavior for Focus Assistant Color Indication Green Focus Assistant is e...

Страница 13: ...erface to Digital output For connecting external devices such as relays and LEDs Connected devices can be activated by the VAPIX Application Programming Interface output buttons on the Live View page or by an Action Rule The output will show as active shown under System Options Ports Devices if the alarm device is activated Digital input An alarm input for connecting devices that can toggle betwee...

Страница 14: ... Control Button For location of the control button see Hardware Overview on page 10 The control button is used for Enabling the Focus Assistant Press and very quickly release the Control button Resetting the product to factory default settings See page 19 Connecting to an AXIS Video Hosting System service or AXIS Internet Dynamic DNS Service For more information about these services see the User M...

Страница 15: ...ed to deactivate 0 to max 40 V DC Digital Output 4 Connected to pin 1 when activated floating unconnected when deactivated If used with an inductive load e g a relay a diode must be connected in parallel with the load for protection against voltage transients 0 to max 40 V DC open drain 100 mA Power Connector 2 pin terminal block for DC power input Use a Safety Extra Low Voltage SELV compliant lim...

Страница 16: ...0 V DC 2 DC output 3 3 V max 50 mA 3 Digital input 0 to max 40 V DC 4 Digital output 0 to max 40 V DC open drain 100 mA Install the Hardware Connect the Cables 1 Connect external input output devices if required such as alarm devices For information about the terminal connector pins see page 15 2 Connect an active speaker and or external microphone if required 16 ...

Страница 17: ...Open the product s home page and go to Setup Basic Setup Focus 2 Under the Basic tab click Open iris If the button is inactive the iris is already open 3 If focus has been set before click Reset to reset the back focus 4 Loosen the zoom and focus pullers see Hardware Overview on page 10 on the lens by turning them counter clockwise Move the pullers to set zoom and focus and check the quality of th...

Страница 18: ...ase the control button When the status indicator flashes green the Focus Assistant is enabled If the status indicator flashes either red or amber before you are able to adjust the lens skip to step 7 to exit the Focus Assistant and repeat steps 3 7 5 Gently turn the focus ring anti clockwise until it stops 6 Finally turn the focus ring slowly clockwise until the status indicator flashes green or a...

Страница 19: ...uration 1 Go to Setup Video and Audio Camera Settings Iris configuration shows the current configured iris type 2 Click Edit 3 Select the installed iris lens from the drop down list and click OK To change the iris configuration for P Iris lenses not listed in the drop down list 1 Download the iris configuration file from www axis com 2 Go to Setup Video and Audio Camera Settings Iris configuration...

Страница 20: ... the default IP address is 192 168 0 90 5 Using the installation and management software tools assign an IP address set the password and access the video stream 6 Refocus the product It is also possible to reset parameters to factory default via the web interface Go to Setup System Options Maintenance Further Information For the latest version of this document see www axis com The User Manual is a...

Страница 21: ...dangereuse qui si elle n est pas évitée pourrait entraîner le décès ou des blessures graves ATTENTION Indique une situation dangereuse qui si elle n est pas évitée pourrait entraîner des blessures légères ou modérées A A AVIS VIS VIS Indique une situation qui si elle n est pas évitée pourrait endommager l appareil Autres niveaux de message Important Indique les informations importantes nécessaires...

Страница 22: ...nt être fournis par Axis ou un tiers Utiliser uniquement les pièces de rechange fournies ou recommandées par Axis Ne pas essayer de réparer ce produit par vous même Contacter l assistance technique d Axis ou votre revendeur Axis pour des problèmes liés à l entretien L alimentation électrique doit être branchée à une prise de courant installée près de l équipement et être facilement accessible Tran...

Страница 23: ...atterie est remplacée de façon incorrecte Remplacez la uniquement par une batterie identique ou une batterie recommandée par Axis Mettez au rebut les batteries usagées conformément aux réglementations locales ou aux instructions du fabricant de la batterie 23 FRANÇAIS ...

Страница 24: ...24 ...

Страница 25: ...onsultez la description du matériel Cf page 26 3 Étudiez les caractéristiques Cf page 31 4 Installez le matériel Cf page 33 5 Utilisez le produit Cf page 35 6 Réglez la mise au point Cf page 34 Contenu de l emballage Caméra réseau AXIS Q1604 Support de caméra Connecteur du bloc d alimentation Bloc de connexion à 2 broches utilisé pour l alimentation en entrée Bloc de connexion pour terminaux Bloc ...

Страница 26: ...AXIS Q1604 Network Camera Aperçu du matériel 1 2 3 4 1 Emplacement pour carte SD 2 Voyant d état 3 Commande de zoom 4 Commande de mise au point 26 ...

Страница 27: ... Voyant DEL réseau 3 Bouton de commande 4 Connecteur de l iris 5 Connecteur d alimentation 6 Connecteur pour terminal E S 7 Numéro de produit P N et numéro de série S N 8 Connecteur réseau 9 Sortie audio 10 Entrée audio Ne convient pas aux variantes extérieures 27 FRANÇAIS ...

Страница 28: ...Options Options du système Maintenance Maintenance Voyant d état Indication Vert Vert fixe en cas de fonctionnement normal Orange Fixe pendant le démarrage et lors de la restauration des paramètres Rouge Clignote en rouge en cas d échec de la mise à niveau du microprogramme Voyant DEL réseau Indication Vert Fixe en cas de connexion à un réseau de 100 Mbits s Clignote en cas d activité réseau Orang...

Страница 29: ...Pour plus d informations sur les exigences réglementaires consultez Electromagnetic Compatibility EMC on page 2 Connecteur d E S Utilisez le avec des périphériques externes associés aux applications telles que les alarmes de détérioration la détection de mouvement le déclenchement d événements l enregistrement à intervalles et les notifications d alarme En plus du point de référence 0 V CC et de l...

Страница 30: ...t de la carte SD Risque de perte de données Pour éviter la corruption des données la carte SD doit être démontée avant son retrait Pour ce faire rendez vous dans Setup System Options Storage SD Card Configuration Options du système Stockage Carte SD et cliquez sur Unmount Démonter Cet appareil est compatible avec une carte SD SDHC SDXC non incluse Pour obtenir des conseils sur la carte SD rendez v...

Страница 31: ...Caractéristiques 0 V CC 1 Sortie CC 2 Peut servir à alimenter le matériel auxiliaire Remarque cette broche ne peut être utilisée que comme sortie d alimentation 3 3 V CC Charge max 50 mA Entrée numérique 3 Connectez la à la broche 1 pour l activer ou laissez la flotter déconnectée pour la désactiver 0 à 40 V CC Sortie numérique 4 Connectée à la broche 1 lorsqu elle est activée flotte déconnectée l...

Страница 32: ...tée LPS conforme aux exigences de Très basse tension de sécurité TBTS dont la puissance de sortie nominale est limitée à 100 W ou dont le courant de sortie nominal est limité à 5 A Connecteur audio Connecteurs audio 3 5 mm stéréo 1 2 3 1 Pointe 2 Anneau 3 Manchon Entrée audio Entrée micro ligne Masse Sortie audio Sortie ligne mono Masse 32 ...

Страница 33: ... nécessaire par exemple des systèmes d alarme Pour plus d informations sur les broches du connecteur pour terminaux reportez vous à la section page 31 2 Branchez un haut parleur actif et ou un microphone externe si nécessaire 3 Connectez la caméra au réseau à l aide d un câble réseau blindé 4 Branchez l alimentation en suivant l une des méthodes décrites ci dessous Alimentation par Ethernet PoE l ...

Страница 34: ...is est déjà ouvert 3 Si la mise au point a déjà été effectuée cliquez sur Reset Réinitialiser pour réinitialiser la mise au point arrière 4 Desserrez les commandes de zoom et de mise au point de l objectif voir Aperçu du matériel page 26 en les tournant dans le sens inverse des aiguilles d une montre Déplacez les commandes pour régler le zoom et la mise au point et vérifiez la qualité de l image d...

Страница 35: ...rnant la bague de mise au point au maximum dans le sens des aiguilles d une montre 4 Appuyez sur le bouton de commande et relâchez le très vite Lorsque le voyant d état clignote en vert l assistant de mise au point est activé Si le voyant d état clignote en rouge ou en orange avant que vous n ayez pu régler l objectif passez à l étape 7 pour quitter l assistant et recommencez les étapes 3 à 7 5 To...

Страница 36: ...on pour le produit Axis Pour remplacer l objectif 1 Débranchez le câble de l iris 2 Dévissez l objectif standard 3 Fixez et vissez le nouvel objectif Note Si vous sélectionnez un fichier de configuration d iris DC pour un objectif de l iris P un message d erreur apparaît en dessous du type de configuration de l iris dans la page Camera Settings Réglages caméra Pour les objectifs d iris DC personna...

Страница 37: ...ibles sur les pages d assistance du site www axis com techsup Pour réinitialiser l appareil aux paramètres d usine par défaut 1 Déconnectez l alimentation de l appareil 2 Maintenez le bouton de commande enfoncé et remettez l appareil sous tension Consultez Aperçu du matériel page 26 3 Maintenez le bouton de commande enfoncé pendant 15 à 30 secondes jusqu à ce que le voyant d état passe à l orange ...

Страница 38: ...a version du micrologiciel actuellement installée reportez vous à la page Setup About Configuration À propos de Visitez le centre d apprentissage en ligne Axis sur le site www axis com academy pour en savoir plus sur les formations les webinaires les tutoriels et les guides Informations sur la garantie Pour obtenir de plus amples informations sur la garantie du produit AXIS et des renseignements c...

Страница 39: ...uation hin welche falls nicht verhindert zu Tod oder schweren Verletzungen führen kann VORSICHT Weist auf eine gefährliche Situation hin welche falls nicht verhindert zu geringfügiger oder mäßiger Verletzung führen kann HINWEIS HINWEIS HINWEIS Weist auf eine gefährliche Situation hin welche falls nicht verhindert zu Sachschäden führen kann Weitere Nachrichtenstufen Wichtig Weist auf wichtige Infor...

Страница 40: ...hen Daten des Produkts entspricht Dieses ist von Axis oder Drittanbietern erhältlich Verwenden Sie ausschließlich Ersatzteile die von Axis bereitgestellt oder empfohlen werden Versuchen Sie nicht das Produkt selbstständig zu reparieren Wenden Sie sich bezüglich Reparatur und Wartung an den Axis Support oder Ihren Axis Händler Das Netzteil sollte an eine Steckdose in der Nähe des Produkts angeschlo...

Страница 41: ...fehlerhaftem Batteriewechsel Die Batterie darf nur durch eine identische Batterie oder eine von Axis empfohlene Batterie ersetzt werden Verbrauchte Batterien sind gemäß den örtlichen Vorschriften oder den Anweisungen des Herstellers zu entsorgen 41 DEUTSCH ...

Страница 42: ...42 ...

Страница 43: ...n Sie sich mit der Hardware Übersicht vertraut Siehe Seite 44 3 Machen Sie sich mit den technischen Daten vertraut Siehe Seite 49 4 Installieren Sie die Hardware Siehe Seite 51 5 Greifen Sie auf das Produkt zu Siehe Seite 53 6 Stellen Sie den Fokus ein Siehe Seite 52 Lieferumfang AXIS Q1604 Netzwerk Kamera Kameramontagefuß Leistenstromanschluss 2 poliger Anschlussblock für Stromeingang Klemmenleis...

Страница 44: ...AXIS Q1604 Network Camera Übersicht über die Hardware 1 2 3 4 1 SD Kartensteckplatz 2 Status LED 3 Zoomregler 4 Schärferegler 44 ...

Страница 45: ...tzwerk LED 3 Steuertaste 4 Blendenanschluss 5 Stromanschluss 6 E A Anschluss 7 Produktnummer P N und Seriennummer S N 8 Netzwerk Anschluss 9 Audioausgang 10 Audioeingang Wird nicht für Ausführungen verwendet die für den Einsatz im Freien vorgesehen sind 45 DEUTSCH ...

Страница 46: ... blinkt wenn die Einheit erkannt wird Rufen Sie Setup System Options Maintenance Setup Systemoptionen Wartung auf Status LED Bedeutung Grün Leuchtet bei Normalbetrieb grün Gelb Leuchtet beim Start und beim Wiederherstellen der Einstellungen Rot Blinkt rot bei einem Fehler während der Firmware Aktualisierung Netzwerk LED Bedeutung Grün Leuchtet bei Verbindung mit einem 100 MBit s Netzwerk Blinkt be...

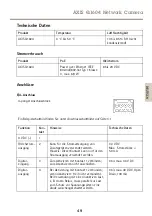
Страница 47: ...kgeräte gemäß den Anweisungen des Herstellers installiert wurden Informationen zu gesetzlichen Bestimmungen finden Sie unter Electromagnetic Compatibility EMC on page 2 E A Anschluss Zur Verwendung mit externen Geräten in Verbindung mit Manipulationsalarmen Bewegungserkennung Ereignisauslösung Zeitrafferaufnahmen Alarmbenachrichtigungen usw Abgesehen vom 0 V DC Bezugspunkt und einer Stromquelle Gl...

Страница 48: ...charfen spitzen Werkzeuge und wenden Sie nicht zu viel Kraft an Gefahr vor Datenverlust Um einer Beschädigung der Aufnahmen vorzubeugen sollte die SD Karte vor dem mechanischen Auswerfen getrennt werden Rufen Sie zum Trennen Setup System Options Storage SD Card Setup Systemoptionen Speicher SD Karte auf und klicken Sie auf Unmount Trennen Dieses Produkt unterstützt SD SDHC SDXC Karten separat erhä...

Страница 49: ...weise Technische Daten 0 V DC 1 Gleichstrom ausgang 2 Kann für die Stromversorgung von Zusatzgeräten verwendet werden Hinweis Dieser Kontakt kann nur für den Stromausgang verwendet werden 3 3 V DC Max Stromstärke 50 mA Digital eingang 3 Zum Aktivieren mit Kontakt 1 verbinden zum Deaktivieren nicht anschließen 0 bis max 40 V DC Digital ausgang 4 Bei Aktivierung mit Kontakt 1 verbunden wenn deaktivi...

Страница 50: ...r Schutzkleinspannung SELV kompatible Stromquelle mit begrenzter Leistung LPS mit einer Nennausgangsleistung von 100 W oder einem dauerhaft auf 5 A begrenzten Nennausgangsstrom Audioanschlüsse 3 5 mm Audioanschlüsse stereo 1 2 3 1 Spitze 2 Ring 3 Schaft Audioeingang Mikrofon Leitungseingang Masse Audioausgang Leitungsausgang mono Masse 50 ...

Страница 51: ...ie bei Bedarf externe Eingabe Ausgabegeräte wie Alarmanlagen an Für Informationen zur Anschlussbelegung siehe Seite 49 2 Schließen Sie ggf einen Aktivlautsprecher und oder ein externes Mikrofon an 3 Verbinden Sie die Kamera über ein abgeschirmtes Netzwerkkabel mit dem Netzwerk 4 Schließen Sie die Kamera auf eine der folgenden Arten an die Stromversorgung an PoE Power over Ethernet PoE wird beim An...

Страница 52: ...3 Wenn die Bildschärfe bereits eingestellt wurde klicken Sie auf Reset Zurücksetzen um das Auflagemaß zurückzusetzen 4 Lösen Sie den Zoomregler und den Schärferegler am Objektiv siehe Übersicht über die Hardware auf Seite 44 indem Sie sie gegen den Uhrzeigersinn drehen Bewegen Sie die beiden Regler und stellen Sie Zoomstärke und Bildschärfe ein Prüfen Sie die Bildqualität im Bildfenster Ist die Ka...

Страница 53: ... den Schärferegler lösen und den Fokusring vollständig im Uhrzeigersinn drehen 4 Drücken Sie die Steuertaste und lassen Sie sie schnell wieder los Wenn die Statusanzeige grün blinkt ist der Fokus Assistent aktiviert Wenn die Statusanzeige rot oder gelb blinkt bevor Sie das Objektiv einstellen können fahren Sie mit Schritt 7 fort um den Fokus Assistenten zu beenden und wiederholen die Schritte 3 bi...

Страница 54: ... Konfigurationsdatei für eine P Iris Blende auswählen wird auf der Seite Camera Settings Kameraeinstellungen unter dem Blendenkonfigurationstyp eine Fehlermeldung angezeigt Wählen Sie für eigene DC Iris Blenden die Option Generic DC Iris Generische DC Blende aus So wird die Blendenkonfiguration geändert 1 Rufen Sie Setup Video and Audio Camera Settings Einrichtung Video und Audio Kameraeinstellung...

Страница 55: ...odukt von der Stromversorgung 2 Halten Sie die Steuertaste gedrückt und stecken Sie den Netzstecker wieder ein Siehe Übersicht über die Hardware auf Seite 44 3 Halten Sie die Steuertaste etwa 15 bis 30 Sekunden gedrückt bis die LED Statusanzeige gelb blinkt 4 Lassen Sie die Steuertaste los Der Vorgang ist abgeschlossen wenn die LED Statusanzeige grün leuchtet Das Produkt wurde auf die Werkseinstel...

Страница 56: ...rmware Version zu sehen gehen Sie auf Setup About Setup Über Besuchen Sie das Axis Schulungszentrum www axis com academy für anregende Schulungen Webinare Lernprogramme und Anleitungen Gewährleistungsinformationen Informationen zur Gewährleistung der Axis Produkte und andere hierzu relevante Informationen finden Sie unter www axis com warranty 56 ...

Страница 57: ...ica una situazione pericolosa che se non evitata può provocare la morte o lesioni gravi ATTENZIONE Indica una situazione pericolosa che se non evitata può provocare lesioni medie o minori A A AVVISO VVISO VVISO Indica una situazione che se non evitata può danneggiare la proprietà Altri livelli di messaggio Importante Indica informazioni importanti essenziali per il corretto funzionamento del dispo...

Страница 58: ...he del dispositivo Questi possono essere forniti da Axis o da terze parti Utilizzare solo parti di ricambio fornite o consigliate da Axis Non tentare di riparare il dispositivo da soli Contattare l assistenza o il rivenditore Axis per questioni relative alla manutenzione L alimentazione sarà collegate alla presa installata vicino al dispositivo e sarà facilmente accessibile Trasporto A A AVVISO VV...

Страница 59: ...splosione se la batteria viene sostituita in modo errato Sostituire solo con una batteria identica o una batteria consigliata da Axis Smaltire le batterie usate in base alle normative locali o alle istruzioni del produttore della batteria 59 ITALIANO ...

Страница 60: ...60 ...

Страница 61: ...agina 61 2 Studiare la descrizione dell hardware Consultare pagina 62 3 Studiare le specifiche Consultare pagina 66 4 Installare l hardware Consultare pagina 69 5 Accedere al dispositivo Consultare pagina 71 6 Impostare la messa a fuoco Consultare pagina 70 Contenuto della confezione Telecamera di rete AXIS Q1604 Cavalletto Connettore di alimentazione morsettiera a 2 pin per ingresso alimentazione...

Страница 62: ...AXIS Q1604 Network Camera Panoramica dell hardware 1 2 3 4 1 Slot per scheda SD 2 LED di stato 3 Levetta zoom 4 Levetta di messa a fuoco 62 ...

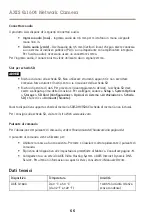
Страница 63: ...e 2 LED di rete 3 Pulsante di comando 4 Connettore del diaframma 5 Connettore di alimentazione 6 Connettore per morsetti I O 7 Codice prodotto P N e numero di serie S N 8 Connettore di rete 9 Uscita audio 10 Ingresso audio Non utilizzato per varianti esterne 63 ITALIANO ...

Страница 64: ...à Andare su Setup System Options Maintenance Configurazione Opzioni di sistema Manutenzione LED di stato Indicazione Verde Luce verde fissa condizioni di normale utilizzo Giallo Fissa durante l avvio e quando si ripristinano le impostazioni Rosso Lampeggia in rosso se l aggiornamento del firmware non è andato a buon fine LED di rete Indicazione Verde Luce fissa per connessione di rete a 100 Mbit s...

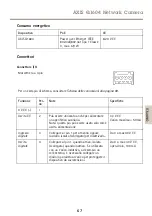
Страница 65: ...Compatibility EMC on page 2 Connettore I O Utilizzare con dispositivi esterni in combinazione con ad esempio allarmi antimanomissione rilevazione del movimento attivazione di eventi registrazione temporizzata e notifiche di allarme Oltre al punto di riferimento 0 V CC e all alimentazione uscita CC il connettore I O fornisce l interfaccia per Uscita digitale Per collegare dispositivi esterni come r...

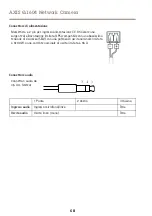
Страница 66: ...e essere scollegata prima della rimozione Per scollegare andare a Setup System Options Storage SD Card Configurazione Opzioni di sistema Archiviazione Scheda SD e fare clic su Unmount Smonta Questo dispositivo supporta schede di memoria SD SDHC SDXC scheda di memoria non inclusa Per i consigli sulla scheda SD visitare il sito Web www axis com Pulsante di comando Per l ubicazione del pulsante di co...

Страница 67: ...e per alimentare una periferica ausiliaria Nota questo pin può essere usato solo come uscita alimentazione 3 3 V CC Carico massimo 50 mA Ingresso digitale 3 Collegare al pin 1 per attivarlo oppure lasciarlo isolato scollegato per disattivarlo Da 0 a max 40 V CC Uscita digitale 4 Collegare al pin 1 quando attiva isolata scollegata quando inattiva Se utilizzata con un carico induttivo ad esempio un ...

Страница 68: ...ne limitata LPS compatibile con una bassissima tensione di sicurezza SELV con una potenza di uscita nominale limitata a 100 W o una corrente nominale di uscita limitata a 5 A Connettore audio Connettori audio da 3 5 mm stereo 1 2 3 1 Punta 2 Anello 3 Guaina Ingresso audio Ingresso microfono linea Terra Uscita audio Uscita linea mono Terra 68 ...

Страница 69: ...essario collegare gli altri dispositivi esterni come i sistemi di allarme Per informazioni sui pin del connettore terminale consultare pagina 67 2 Se necessario collegare l altoparlante attivo e o il microfono esterno 3 Collegare la telecamera alla rete mediante un cavo di rete schermato 4 Collegare l alimentazione mediante uno dei metodi elencati di seguito PoE Power over Ethernet PoE è rilevato ...

Страница 70: ...ià aperto 3 Se la messa a fuoco è già stata impostata fare clic su Reset Reimposta per reimpostare la messa a fuoco 4 Allentare le levette di regolazione dello zoom e della messa a fuoco consultare Panoramica dell hardware alla pagina 62 sull obiettivo ruotandole in senso antiorario Spostare le levette per impostare lo zoom e la messa a fuoco quindi controllare la qualità dell immagine nella fines...

Страница 71: ...evetta di regolazione della messa a fuoco e ruotando la ghiera di messa fuoco in senso orario fino in fondo 4 Premere e rilasciare velocemente il pulsante di comando Se l indicatore di stato inizia a lampeggiare in verde significa che Focus Assistant è abilitato Se l indicatore di stato lampeggia in rosso o giallo prima che si sia riusciti a regolare l obiettivo passare al punto 7 per uscire da Fo...

Страница 72: ...gare e avvitare il nuovo obiettivo Nota Se si seleziona un file di configurazione DC iris per un obiettivo P Iris verrà visualizzato un messaggio di errore sotto il tipo di configurazione del diaframma nella pagina Camera Settings Impostazioni telecamera Per obiettivi DC Iris personalizzati selezionare l opzione Generic DC Iris DC Iris generico Per modificare la configurazione del diaframma 1 Anda...

Страница 73: ...nite di fabbrica 1 Scollegare l alimentazione dal dispositivo 2 Tenere premuto il pulsante di controllo e ricollegare l alimentazione Consultare Panoramica dell hardware alla pagina 62 3 Tenere premuto il pulsante di controllo per 15 30 secondi fino a quando l indicatore LED di stato lampeggerà in giallo 4 Rilasciare il pulsante di comando Il processo è completo quando il LED di stato diventerà ve...

Страница 74: ...conoscere la versione del firmware installata andare su Setup About Impostazioni Informazioni su Visitare il centro di apprendimento Axis alla pagina www axis com academy per servizi di formazione utili webinar tutorial e guide Informazioni sulla garanzia Per informazioni sulla garanzia del dispositivo Axis e informazioni ad esso relative consultare la pagina www axis com warranty 74 ...

Страница 75: ...ENCIA Indica una situación peligrosa que si no se evita puede provocar lesiones graves o la muerte ATENCIÓN Indica una situación peligrosa que si no se evita puede provocar lesiones moderadas o leves A A AVISO VISO VISO Indica una situación peligrosa que si no se evita puede provocar daños materiales Otros niveles de mensaje Importante Indica información importante que es fundamental para que el p...

Страница 76: ...uesto proporcionadas o recomendadas por Axis No intente reparar el producto usted mismo Póngase en contacto con el servicio de asistencia técnica de Axis o con su distribuidor de Axis para tratar asuntos de reparación La fuente de alimentación se enchufará a una toma de conector instalada cerca del producto y a la que se podrá acceder fácilmente Transporte A A AVISO VISO VISO Cuando transporte el ...

Страница 77: ...ión incorrecta de la batería implica riesgo de explosión Sustituya la batería por una batería idéntica u otra batería recomendada por Axis Deseche las baterías usadas de conformidad con la normativa local o las instrucciones del fabricante 77 ESPANÕL ...

Страница 78: ...78 ...

Страница 79: ...formación general del hardware Vea página 80 3 Estudie las especificaciones Vea página 85 4 Instale el hardware Vea página 87 5 Acceda al producto Vea página 89 6 Establezca el enfoque Vea página 88 Contenido del paquete Cámara de red AXIS Q1604 Soporte de la cámara Conector del bloque de alimentación Bloque de conector de dos pines para entrada de alimentación Conector del bloque de terminales Bl...

Страница 80: ...AXIS Q1604 Network Camera Información general del hardware 1 2 3 4 1 Ranura para tarjetas SD 2 LED de estado 3 Palanca de zoom 4 Palanca de enfoque 80 ...

Страница 81: ...n 2 LED de red 3 Botón de control 4 Conector de iris 5 Conector de alimentación 6 Conector del terminal de E S 7 Número de producto N P y número de serie N S 8 Conector de red 9 Salida de audio 10 Entrada de audio No utilizada para variantes para exteriores 81 ESPANÕL ...

Страница 82: ...em Options Maintenance Configuración Opciones del sistema Mantenimiento LED de estado Indicación Verde Verde fijo para indicar un funcionamiento normal Ámbar Fijo durante el inicio y al restaurar valores de configuración Rojo Parpadea en rojo si se produce un error durante la actualización del firmware LED de red Indicación Verde Fijo para indicar una conexión a una red de 100 Mbits s Parpadea cua...

Страница 83: ...rmación sobre los requisitos normativos vea Electromagnetic Compatibility EMC on page 2 Conector de E S Se utiliza con dispositivos externos combinados por ejemplo con alarmas antimanipulación detección de movimiento activación de eventos grabación de intervalos de tiempo y notificaciones de alarma Además del punto de referencia de 0 V CC y la potencia salida de CC el conector de E S ofrece la int...

Страница 84: ...e datos Antes de retirar la tarjeta SD es preciso desmontarla para evitar que los datos resulten dañados Para desmontarla vaya a Setup System Options Storage SD Card Configuración Opciones del sistema Almacenamiento Tarjeta SD y haga clic en Unmount Desmontar Este producto admite tarjetas SD SDHC SDXC no incluidas Para conocer las recomendaciones de tarjeta SD consulte www axis com Botón de contro...

Страница 85: ...gina 87 Función Pin Notas Especificaciones 0 V CC 1 Salida de CC 2 Se puede utilizar para conectar el equipo auxiliar Nota Este pin se puede usar solo como salida 3 3 V CC Carga máx 50 mA Entrada digital 3 Conéctela al pin 1 para activarla o bien déjela suelta desconectada para desactivarla 0 a 40 V CC máx Salida digital 4 Conectada al pin 1 cuando se activa y suelta sin conectar cuando está desac...

Страница 86: ...da LPS que cumpla los requisitos de tensión muy baja de seguridad SELV con una potencia nominal de salida limitada a 100 W o una corriente nominal de salida limitada a 5 A Conector de audio Conectores de audio de 3 5 mm estéreo 1 2 3 1 Punta 2 Anillo 3 Manguito Entrada de audio Entrada de línea micrófono Tierra Salida de audio Salida de línea mono Tierra 86 ...

Страница 87: ...ivos de entrada salida externos como dispositivos de alarma Para obtener información sobre los pines del conector del terminal vea página 85 2 Si es necesario conecte un altavoz activo y o un micrófono externo 3 Conecte la cámara a la red mediante un cable de red blindado 4 Conecte la alimentación utilizando uno de los métodos enumerados a continuación Alimentación a través de Ethernet PoE El sist...

Страница 88: ... está abierto 3 Si el enfoque se ha establecido en alguna ocasión anterior haga clic en Reset Restablecer para restablecer el enfoque anterior 4 Afloje las palancas de zoom y enfoque vea Información general del hardware en la página 80 del objetivo girándolas en el sentido contrario a las agujas del reloj Mueva las palancas para establecer el zoom y el enfoque y compruebe la calidad de la imagen e...

Страница 89: ...jas del reloj 4 Presione y suelte rápidamente el botón de control Cuando el indicador de estado parpadea en verde el Asistente de enfoque está activado Si el indicador de estado parpadea en rojo o ámbar antes de que pueda ajustar el objetivo omita el paso 7 para salir del Asistente de enfoque y repita los pasos 3 a 7 5 Gire lentamente el anillo de enfoque en el sentido contrario a las agujas del r...

Страница 90: ...ecerá un mensaje de error a continuación del tipo de configuración de iris en la página Camera Settings Configuración de la cámara Para los objetivos de iris de tipo DC personalizados seleccione la opción de iris de tipo DC genérico Para cambiar la configuración del iris 1 Vaya a Setup Video and Audio Camera Settings Configuración Vídeo y audio Configuración de la cámara En Iris configuration Conf...

Страница 91: ...el producto 2 Mantenga pulsado el botón de control y vuelva a conectar la alimentación Vea Información general del hardware en la página 80 3 Mantenga pulsado el botón de control durante 15 30 segundos hasta que el indicador LED de estado parpadee en ámbar 4 Suelte el botón de control El proceso finaliza cuando el indicador LED de estado se pone verde El producto se ha restablecido a la configurac...

Страница 92: ...re instalado actualmente vaya a Setup About Configuración Acerca de Visite el centro de aprendizaje de www axis com academy para consultar guías tutoriales seminarios web y cursos que pueden resultarle útiles Información de garantía Para obtener más detalles sobre la garantía del producto de Axis y la información relacionada con ella consulte www axis com warranty 92 ...

Страница 93: ... レベ ベ ベル ル ル 危 危 危険 険 険 回避しない場合 死亡または重傷につながる危険な状態を示します 警 警 警告 告 告 回避しない場合 死亡または重傷につながるおそれのある危険な状態を 示します 注 注 注意 意 意 回避しない場合 軽傷または中程度の怪我につながるおそれのある危険 な状態を示します 注 注 注記 記 記 回避しない場合 器物の破損につながるおそれのある状態を示します そ そ その の の他 他 他の の のメ メ メッ ッ ッセ セ セー ー ージ ジ ジレ レ レベ ベ ベル ル ル 重要 製品を正しく機能させるために不可欠な重要情報を示します 注意 製品を最大限に活用するために役立つ有用な情報を示します 93 ò ò ...

Страница 94: ...水に浸した清潔な布を使用してください 製品の技術仕様に準拠したアクセサリーのみを使用してください これらの アクセサリーは Axisまたはサードパーティから入手できます Axisが提供または推奨する交換部品のみを使用してください 製品を自分で修理しないでください 修理については Axisサポートまたは 販売代理店にお問い合わせください 電源は 製品の近くで簡単に手の届く場所にあるコンセントに接続して ください 輸 輸 輸送 送 送 注 注 注記 記 記 本製品を運搬する際は 製品が損傷しないよう 元の梱包か同等の梱包を 使用してください バ バ バッ ッ ッテ テ テリ リ リー ー ー バッテリーが低電力状態になると RTCの動作に影響し 電源を入れるたびにRTCが リセットされます バッテリーの交換が必要になると 製品のサーバーレポートに ログメッセージが表示されます サーバーレポート...

Страница 95: ...AXIS Q1604 Network Camera 警 警 警告 告 告 バッテリーは 正しく交換しないと爆発する危険があります 交換用バッテリーとしては 同一品またはAxisが推奨するバッテリーのみを 使用してください 使用済みバッテリーは 地域の規制またはバッテリーメーカーの指示に 従って廃棄してください 95 ò ò ...

Страница 96: ...96 ...

Страница 97: ...手順 順 順 1 パッケージの内容 ツールなど 設置に必要な物がそろっているかを確認 します 97ページを参照してください 2 ハードウェアの概要を確認します 98ページを参照してください 3 仕様を確認します 103ページを参照してください 4 ハードウェアを設置します 105ページを参照してください 5 製品にアクセスします 107ページを参照してください 6 フォーカスを設定します 106ページを参照してください パ パ パッ ッ ッケ ケ ケー ー ージ ジ ジの の の内 内 内容 容 容 AXIS Q1604ネットワークカメラ カメラスタンド 電源ブロックコネクター 電源入力用の2ピンのターミナルコネクター ターミナルブロックコネクター 外部デバイスをI Oターミナルコネクターに 接続する4ピンコネクターブロック 印刷物 インストールガイド 本書 予備のシリアル番号ラベル 2 ...

Страница 98: ...AXIS Q1604 Network Camera ハ ハ ハー ー ード ド ドウ ウ ウェ ェ ェア ア アの の の概 概 概要 要 要 1 2 3 4 1 SDカードスロット 2 ステータスLED 3 ズーム調節レバー 4 フォーカス調節レバー 98 ...

Страница 99: ...AXIS Q1604 Network Camera 8 9 7 4 1 2 3 10 5 6 1 電源LED 2 ネットワークLED 3 コントロールボタン 4 アイリスコネクター 5 電源コネクター 6 I Oターミナルコネクター 7 製品番号 P N およびシリアル番号 S N 8 ネットワークコネクター 9 音声出力 10 音声入力 屋外用モデルでは使用されません 99 ò ò ...

Страница 100: ...きます ステータスLEDを点滅させ 本製品を識別できるように設定することがで きます 設定は Setup Setup Setup System System System Options Options Options Maintenance Maintenance Maintenance 設 設 設定 定 定 シ シ シス ス ステ テ テ ム ム ムオ オ オプ プ プシ シ ショ ョ ョン ン ン 保 保 保守 守 守 で行います ス ス ステ テ テー ー ータ タ タス ス スLED LED LED 説 説 説明 明 明 緑 正常動作であれば緑色に点灯します 黄 起動時 設定の復元時に点灯します 赤 ファームウェアのアップグレードに失敗すると 赤色 で点滅します ネ ネ ネッ ッ ット ト トワ ワ ワー ー ーク ク クLED LED LED 説 説 説明 明 明 緑 100 ...

Страница 101: ...てネットワークに接続してく ださい ネットワーク装置がメーカーの指示どおりに設置されていることを 確認します 法的要件については Electromagnetic Compatibility EMC on page 2を参照してください I O I O I Oコ コ コネ ネ ネク ク クタ タ ター ー ー 外部装置を接続し カメラに対するいたずらの警報 動体検知 イベントトリ ガー 低速度撮影 アラーム通知などを使用することができます I Oコネクター は 0 V DC基準点と電力 DC出力 に加えて 以下のインターフェースを提供します デ デ デジ ジ ジタ タ タル ル ル出 出 出力 力 力 リレーやLEDなどの外部デバイスを接続します 接続され たデバイスは VAPIX アプリケーションプログラミングインターフェース API Live View ライブビュー ページの出力ボタン ...

Страница 102: ...と取り外しの際には 鋭 利な工具を使用したり 過剰な力をかけないでください データ損失の危険があります データが破損しないように SDカードは マウント解除してから取り外す必要があります SDカードをアンマウン トするには Setup Setup Setup 設 設 設定 定 定 System System System Options Options Options シ シ シス ス ステ テ テム ム ムオ オ オプ プ プシ シ ショ ョ ョン ン ン Storage Storage Storage ス ス スト ト トレ レ レー ー ージ ジ ジ SD SD SD Card Card Card SD SD SDカ カ カー ー ード ド ド を選択し Unmount Unmount Unmount ア ア アン ン ン マ マ マウ ウ ウン ン ント ト ト をクリックします ...

Страница 103: ...コネ ネ ネク ク クタ タ ター ー ー I O I O I Oコ コ コネ ネ ネク ク クタ タ タ 4ピンターミナルブロック 4 3 2 1 接続例の図については 105ページの 接続図 を参照してください 機 機 機能 能 能 ピ ピ ピン ン ン 備 備 備考 考 考 仕 仕 仕様 様 様 0 V DC 1 DC出力 2 補助装置の電源供給に使用できます 注 このピンは 電源出力としてのみ 使用できます 3 3 V DC 最大負荷 50 mA デジタル入 力 3 動作させるにはピン1に接続し 動作 させない場合はフロート状態 未接続 のままにします 0 40 V DC 最大 デジタル出 力 4 動作させるにはピン1に接続し 動作 させない場合はフロート状態 未接続 にします 誘導負荷 例 リレー とと もに使用する場合は 過渡電圧から保 護するため ダイオードを負荷と並列 に接...

Страница 104: ...ク ク クタ タ タ DC電源入力用2ピンターミナルブロック 定格出力が100 W以 下または5 A以下の安全特別低電圧 SELV に準拠した有限電 源 LPS を使用してください 音 音 音声 声 声コ コ コネ ネ ネク ク クタ タ タ 3 5 mm音声コネク タ ステレオ 1 2 3 1 チップ 2 リング 3 スリー ブ 音 音 音声 声 声入 入 入力 力 力 マイクロフォン ライン入 力 グランド 音 音 音声 声 声出 出 出力 力 力 ライン出力 モノラル グランド 104 ...

Страница 105: ...0 40 V DC 最大 オープンドレイン 100 mA ハ ハ ハー ー ード ド ドウ ウ ウェ ェ ェア ア アの の の設 設 設置 置 置 ケ ケ ケー ー ーブ ブ ブル ル ルの の の接 接 接続 続 続 1 必要に応じて 警報装置などの外部入力 出力装置を接続します ターミナ ルコネクタのピンの詳細については 103ページを参照してください 2 必要に応じて アクティブスピーカー 外部マイクを接続します 3 シールドネットワークケーブルを使用して カメラをネットワークに接 続します 4 以下のどちらかの方法で 電源を接続します PoE Power over Ethernet PoEは ネットワークケーブルを接続 すると自動的に検出されます 105 ò ò ...

Страница 106: ...は使用できない状態になっています 3 以前にフォーカスを設定している場合は Reset Reset Reset 元 元 元に に に戻 戻 戻す す す をクリック してバックフォーカスのリセットを行います 4 レンズのズーム調節レバーとフォーカス調節レバー 98ページの ハード ウェアの概要 を参照 を 反時計回りに回してゆるめます レバーを動かし てズームとフォーカスを調節し 映像ウィンドウで画質を確認します 映像を見ながらレバーを動かせるようにカメラが設置されていない場合 は フォーカスアシスタントを使用します 5 ズーム調節レバーとフォーカス調節レバーを締め直します 6 Focus フォーカス ページで Fine Fine Fine tune tune tune focus focus focus automatically automatically automatically ...

Страница 107: ...ます 4 コントロールボタンを押して すぐに離します ステータスLEDが緑色に点 滅して フォーカスアシスタントが有効になります レンズの調節が可能に なる前にステータスLEDが赤または黄色に点滅する場合は 手順7に従って フォーカスアシスタントを終了してから 手順3 7を繰り返してください 5 フォーカスリングを反時計方向にいっぱいまでゆっくりと回します 6 最後に ステータスLEDが緑または黄色 赤以外 に点滅するまでフォーカス リングを時計方向にゆっくりと回します 7 コントロールボタンを押し フォーカスアシスタントを終了します フォー カスアシスタントは15分後に自動的にオフになります 8 フォーカス調節レバーを締め直します 9 Webブラウザーで Live View ライブビュー ページを開き 映像の質を確 認します 10 106ページの手順6 8に従います 製 製 製品 品 品...

Страница 108: ... ビデ デ デオ オ オと と と音 音 音声 声 声 Camera Camera Camera Settings Settings Settings カ カ カ メ メ メラ ラ ラの の の設 設 設定 定 定 を選択します Iris Iris Iris configuration configuration configuration 絞 絞 絞り り り設 設 設定 定 定 に 現在設定 されている絞りのタイプが表示されています 2 Edit Edit Edit 編 編 編集 集 集 をクリックします 3 装着されているアイリスレンズをドロップダウンリストから選択し OK OK OK をクリックします ドロップダウンリストに表示されないPアイリスレンズの絞り設定を変更する手順 は以下のとおりです 1 www axis comから絞り設定ファイルをダウンロードします 2 Setup ...

Страница 109: ...ールが用意されています 本製品を工場出荷時の設定にリセットするには 以下の手順を実行します 1 本製品の電源を切ります 2 コントロールボタンを押し続けながら電源を再投入します 98ページ の ハードウェアの概要 を参照してください 3 ステータスLEDインジケーターが黄色に点滅するまで コントロールボ タンを15 30秒間押し続けます 4 コントロールボタンを離します プロセスが完了すると ステータスLEDが 緑色に変わります これで本製品は工場出荷時の設定にリセットされまし た ネットワーク上に利用可能なDHCPサーバーがない場合 デフォルトの IPアドレスは192 168 0 90になります 5 インストール 管理ソフトウェアツールを使用して IPアドレスの割り当 て パスワードの設定 ビデオストリームへのアクセスを行います 6 本製品のフォーカスを調節します Webインターフェース...

Страница 110: ...ください 現在インストールされて いるファームウェアのバージョンを確認するには Setup Setup Setup About About About 設 設 設定 定 定 バ バ バー ー ージ ジ ジョ ョ ョ ン ン ン情 情 情報 報 報 を参照してください Axisラーニングセンター www axis com academy にアクセスしてください 役に立 つトレーニング ウェブセミナー チュートリアル ガイドをご用意しています 保 保 保証 証 証情 情 情報 報 報 Axisの製品保証と関連情報については www axis com warranty をご覧ください 110 ...

Страница 111: ...111 ...

Страница 112: ...Installation Guide Ver M1 3 AXIS Q1604 Network Camera Date August 2015 Axis Communications AB 2011 2015 Part No 1494270 ...

Отзывы: