background image

OSD Menu

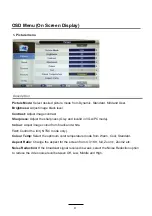
2. Sound menu

Description

Sound Mode: 

Select your desired sound mode from Standard, Movie, Music, Speech and User.

Bass:

 Adjust the level of the lower-pitched sounds.

Treble:

Adjust the level of the higher

pitched sounds.

Balance:

 Adjust the audio output between left and right speakers.

Surround:

Turn on/off the surround sound function.

Auto Volume Level (AVL):

 The volumes of all sources will be maintained when th

LV

 function

L

s on.

SPDIF:

 Select the 

'LJLWDO,QWHUIDFH

 mode for the TV from off, PCM and Auto.

Содержание AX-1524

Страница 1: ......

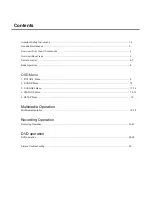
Страница 2: ...LHV 2YHUYLHZ DFN 9LHZ Remote control Basic Operation 1 PICTURE Menu 2 SOUND Menu 4 FEATURE Menu 5 SETUP Menu 3 CHANNEL Menu Contents OSD Menu Recording Operation Recording Operation Multimedia Operation Multimedia Operation 1 DVD operation DVD operation Simple Troubleshooting ...

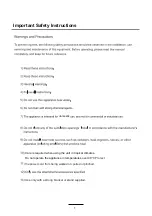
Страница 3: ...e unit in tropical climates Do not Rperate the appliance in temperatures over 40 C Protect the power cord from being walked on pulled or pinched Use only with a strong bracket or stand supplied domestic Important Safety Instructions ...

Страница 4: ...Important Safety Instructions listen through headphones at high volumes Excessive sound SUHVVXUH IURP HDUSKRQHV out of direct sunlight it gently with should be placed buttons buttons or ...

Страница 5: ... Use and Maintenance ...

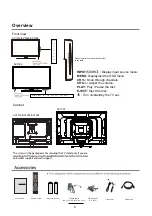
Страница 6: ...crews in the package are for securing the TV stand only If you are on bracket support and wall support INPUT SOURCE MENU Display exit the OSD menu CH Scan through channels VOL Adjust the volume PLAY Play Pause the disc EJECT Eject the disc Display input source menu Turn on standby the TV set Please insert a 12cm disc with the label to the back SOURCE MENU CH CH VOL VOL EJECT PLAY SOURCE MENU CH CH...

Страница 7: ...able 75 Ohm coaxial to receive TV signal USB USB jack for Recording and Media YPbPr Connect them to the YPbPr video output terminal of DVD USB COAX COAX Y Pb Pr USB Y Pb Pr Model AX15 POWER Connect to the power HEADPHONE Connect it to your headphone or other audio equipment Video Connect it to video output terminal of DVD L R in Connect them to audio output terminals of DVD shared with YPbPr PC AU...

Страница 8: ......

Страница 9: ......

Страница 10: ...you input the matching signal Note 2 Please operate the OSD menu according to the message displayed Hint Operate the OSD menu according to the message shown 8 Power on off 1 Connect to the power supply with an adaptor 2 To turn on the TV Press button on the TV or remote control To turn off the TV Press button on the TV or remote control Input Source select Press SOURCE button on the TV set or remo...

Страница 11: ...rHy and invalid in VGA PC mode Colour Adjust image colour from black and white Tint Control the tint NTSC mode only Colour Temp Select WKH optimum color temperature mode from Warm Cool Standard Aspect Ratio Change the aspect for the screen from 4 3 16 9 full Zoom1 Zoom2 etc Noise Reduction If the broadcast signal received is weak select the Noise Reduction option to reduce the video noise level be...

Страница 12: ...ower pitched sounds Treble Adjust the level of the higher pitched sounds Balance Adjust the audio output between left and right speakers Surround Turn on off the surround sound function Auto Volume Level AVL The volumes of all sources will be maintained when thLV function Ls on SPDIF Select the LJLWDO QWHUIDFH mode for the TV from off PCM and Auto ...

Страница 13: ...enable Feature Lock Lock enable at ON to active this function QWHU WKH password to view the program Skip Press YELLOW button to skip the channel or cancel the setting Swap Press BLUE button to sign the channel 3ress button to move and press OK button to VZDS WKH SRVLWLRQ Favorite Management Add or remove favourite channels by the colour buttons Up to 4 favourite lists are available RED FavoXrite1 ...

Страница 14: ... the frequency Current Channel Select the current channel for manual search Search Press OK button to enter the search menu 0anualO search the frequency Color Sound System Select the Color Sound system for the program by button by button Note 1 ALL Auto search channels for DTV ATV and Radio DTV Auto search channels for DTV and radio ATV Auto search channels for ATV 2 When the TV is auto tuning pre...

Страница 15: ...ll be asked for a password As default it is 0000 Lock Enable Turn on off the Lock Channel function Note When it is be turned on the functions of Parental Guidance and Change Pin code below will be locked and the functions Lock in Channel Management Auto Search DTV Manual Search ATV manual Search in Channel menu will also be locked Parental Guidance Select the Parental Guidance mode or turn off the...

Страница 16: ... menu Hotel Lock Turn on off the Hotel Lock function Channel Lock Disable the Channel menu in OSD Picture Lock Disable the Picture menu in OSD Sound Lock Disable the Sound menu in OSD Feature Lock Disable the Feature menu in OSD Setup Lock Disable the Setup menu in OSD Key Lock Disable the buttons on the TV set Source Lock Disable the input source desired Set Source Select the default source when ...

Страница 17: ...to the television Further details of how to do this will be issued with the firmware 5 SETUP menu Description OSD Timer 7R adjust the amount of time the On Screen Menu stays on the screen PC Setup Change the PC Settings in PC mode Auto Adjust Setup the parameterV of the screen automatically H V Position Adjust the transverse vertical position of the screen Phase Adjust the phase of the ADC samplin...

Страница 18: ...e input source menu select Media source by the buttons and press OK button to enter the Multimedia menu as shown below Preview Hints for operation Return to device list File list Informations Hints Press Exit again to return to the root MENU Then press button to program the files be signed selected Press button to stop and exit the full screen program P lease note the hints shown Multimedia Operat...

Страница 19: ...cture 7he picture FDQ EH PRYHG by WKH Cursor left right up down button in Zoom mode Display the information of the current file Display the photo setup menu and select the Repeat mode Background Music Slide Time Effect Display the play list Stop and exit the music playing Play fast back or forwDrd Play the previous or next file directly Select the repeat mode for playing music ALL Switch the windo...

Страница 20: ...de Play the movie in step mode Set the A B repeat playing mode AB Play the previous or next file directly Display the play list Display the information of the current file Display the movie setup menu 6etup the Program Subtitle Audio Repeat mode Go to mode Input the time and start playing directly Play Pause the movie Stop and exit the full screen program Press button to select the option on the t...

Страница 21: ... Record File Format Select Record File Format mode from TS and PS for storDJH in the USB device 2 Partition Select Recording Operation Set Timeshift Buffer mode auto 30Mins 1hr 2hr 3 Timeshift Buffer 4 Timer Enter the Timer menu to set up the timer recording settings Press yellow button to add Recorder Turn on off the recorder function Type Select the type of the program to record Channel Select t...

Страница 22: ...n to change the EPG display mode Daily mode shows the information of the programs to be broadcast in daily mode Weekly mode shows the information of the programs to be broadcast in weekly mode Reminder Press GREEN button once to remind the program for watching and press GREEN button again to remind the program for recording heck it in Timer menu 7he TV will DXWRPDWLFDOO record the program accordin...

Страница 23: ...a mode appears Select OK and press OK to exit recording Press button on the remote control to start timeshift in DTV mode Note a 3OHDVH PDNH VXUH D 86 GHYLFH LV DWWDFKHG WR WKH 79 b 3OHDVH HQVXUH WKH VSHHG DQG IUHH VSDFH RI WKH 86 LV VXIILFLHQW c Press button to pause the program EHLQJ ZatchHG and the timeshift will start d Timeshift time menu on the corner shows the time between the current pictu...

Страница 24: ... button to select DVD mode If there is no disc in the DVD player the screen will show NO DISC Insert Disc ZLWK WKH ZRUGHG VXUIDFH IDFLQJ RX Do not touch the playing surface Hold the disc around the outside with your fingers and place the disc into the slot The player will automatically draw the disc into the player To Eject the disc press the EJECT button on the TV or the button on the remote cont...

Страница 25: ...WKH SOD HU FDQ UHWDLQ PHPRU RI WKH ODVW SRLQW RI SOD EDFN 6HOHFW 2Q KHQ WKH GLVF LV UH LQVHUWHG LQWR WKH SOD HU GLVF SOD EDFN ZLOO UH FRPPHQFH IURP ODVW SRLQW 6HOHFW 2II KHQ WKH GLVF LV UH LQVHUWHG LQWR WKH SOD HU GLVF SOD EDFN ZLOO FRPPHQFH IURP EHJLQQLQJ 2 ...

Страница 26: ...Operation A disc recorded with multi channel soundtracks The output signal will recognise left and right channels A disc recorded with multi channel soundtracks The output signal will be stereo Spdif Setup ...

Страница 27: ...DVD Operation If a language listed is recorded on the disc the sound can be played in that language 3UHVV 6723 WZLFH WR HQWHU 3UHIHUHQFH 3DJH RU 1R GLVF Volume 2 ...

Страница 28: ...age listed is recorded on the disc the subtitles can be displayed in that language 2 If a language listed is recorded on the disc the 0HQX can be displayed in that language I QRW WKH ODQJXDJH UHFRUGHG ZLOO EH WKH GHIDXOW XVHG ...

Страница 29: ... KHQ SOD LQJ GLVFV ZLWK D SDUHQWDO ORFN IXQFWLRQ VHOHFW DQ JH RQWURO UDGH DFFRUGLQJ WR DYDLODEOH JUDGHV DQG RXU RZQ SUHIHUHQFH RU H DPSOH LI 3 LV VHOHFWHG 9 9LGHR GLVFV UDWHG KLJKHU WKDQ WKH 3 JUDGH FDQQRW EH SOD HG ...

Страница 30: ...DVD Operation 7R UHVWRUH WKH RULJLQDO IDFWRU VHWWLQJV FKRRVH 5 6 7 DQG SUHVV 2 EXWWRQ ...

Страница 31: ... program Poor picture quality Check the aerial connections Check that the channel is tuned in properly Adjust the picture settings brightness colour sharpness contrast hue Make sure that the TV is not located close to electrical appliances that emit radio frequency interference No colour Adjust the colour setting Check that the programme is broadcast in colour Check that the cKannel is tuned prope...

Страница 32: ......

Отзывы: