background image


USER MANUAL 

35


_________________________________________________________________________________________________________________


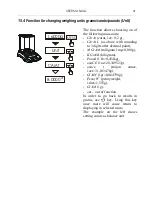
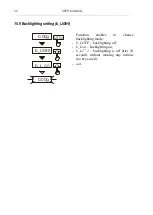
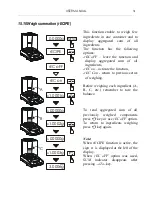
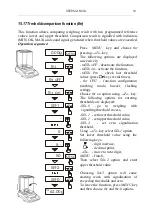
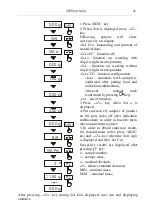
15.14 Function for maximum value indication (UP) 


This function allows holding on display maximum value shown by the scale in a 
while


Before measurement the scale should 
be tared.  
After using 

MENU key

, choosing 

UP 

function

  , 

and  then 

UP_on,

  the 

highest  mass  result  will  be  hold  on 
display.  
Pressing 

T

 key will cause result 

zeroing.


If we choose 

Up dW

 option function 

will  display  the  minimum  mass 
result.


ATTENTION: 

Autozeroing 

function 

and 

the 

stabilisation 

indicator 

are 

deactivated  when  UP  function  is 
running. 

Weighing 

result 

is 

continuously 

averaged 

from 

measurements.


0.00 g

UP

UP  oFF

UP  on

0.00g

9.90g

9.90g

MENU

T

T

MAX

MAX

MAX


Содержание AGN/C Series

Страница 1: ...USER MANUAL AGN C SERIES File 2014 11 20 ER AGNC 109 AGC073 GB ...

Страница 2: ...arats pounds UnIt 21 15 5 Percent function PErCEnt 22 15 6 Function for calibration with external weight calibration options CALIbr 23 15 7 Function for setting serial ports mode and parameters Port 27 15 8 Printout configuration PrInt 28 15 9 Backlighting setting b_LIGHt 30 15 10 Weigh summation rECIPE 31 15 11 Function for weighing animals LOC 32 15 12 Tare memorizing function tArE 33 15 13 Forc...

Страница 3: ...are marked with the following legal and securing items green metrological mark placed on the balance name plate notified body stamp number of notified body on the balance name plate protective seals placed on an edge of balance name plate the casing mounting screw and in the place of access to adjustment switch In order to renew legal verification please contact authorized service of AXIS Balance ...

Страница 4: ... type supplied with the balance and supply voltage have to be compatible with specified technical data Do not use the balance when its cover is opened Do not use the balance in explosive conditions Do not use the balance in high humidity environment If the balance seems not to operate properly switch it off and do not use until checked by authorised service According to current acts of low about p...

Страница 5: ...t e 1mg 1mg 1mg 1mg Tare range 50g 100g 200g 220g Accuracy class I Working temperature 18 33 C Weighing time 6s Pan dimension 90mm Balance dimension with legs 215 235 with legs x345x350mm Weighing chamber dimensions 175x140x230mm Power supply 230V 50Hz 6VA 12V 1 2A Balance weight 6 5kg Recommended calibration weight OIML E2 50g E2 100g E2 200g E2 200g Caution E2 is international symbol of calibrat...

Страница 6: ...____________________ 5 General balance description Balance view 1 pan 2 pan support 3 pan ring 4 floor of weighing chamber 5 keys 6 rotating legs 7 water level 8 LCD display 9 weighing chamber Back view 7 6 1 2 8 9 4 5 3 ON OFF Adjust switch RxD receiver TxD transmitter GND Case RS232C Feeder 1 2 3 4 5 6 7 8 9 ...

Страница 7: ... function weighing MENU enter to special function menu I switch on switch off standby indicator shows stabilization of weighing result linear indicator indicator of balance load 0 100 OFF indicator appears after the balance is switched off with I key distinction of last digit informs that reading unit value is lower than acceptable indication error balances with legal verification d e Max Min d e ...

Страница 8: ...can interrupt working balance This location has to maintain proper temperature for working balance and necessary space for its operating The balance should stay on stable table made of material that does not influence magnetically on the balance Rapid air blasts vibrations dust rapid temperature changes or air humidity over 75 are not allowed in balance surrounding The balance should be far from h...

Страница 9: ... that the air bubble in water level 7 at the back of the balance is in the middle 4 Place tin 4 of weighing chamber 5 Place ring 3 protecting the pan against hit from a side 6 Gently insert the mandrel of pan support 2 into balance mechanism socket through the pan ring 3 and the pan 1 on 7 Take feeder off the box If the balance was taken from a lower temperature surrounding to a room with higher t...

Страница 10: ... key and wait until the balance is zeroed and zero indicator appears In other balances the key does not operate 5 When the balance is not used but should be ready to work immediately it can be switched off by pressing I key The backlight of balance reading system is then switched off and the balance enters into standby mode in which the balance maintains internal temperature and ability to start w...

Страница 11: ...recommended before making measurements to wait until internal temperature of balance stabilize To accomplish that the balance should be turned on for more than 2 hours before measurements From the perspective of measurements accuracy continuous balance operation is beneficial 11 Internal calibration The balance is equipped with internal calibration system which general task is to maintain required...

Страница 12: ...to perform internal calibration proceed with the following Empty the pan Press key twice double pressing the key helps to avoid accidental starting calibration procedure During calibration internal weight is put three times on and obtained results are compared Discrepancy of results is signalled with a message and causes the balance being blocked Until calibration process is finished do not perfor...

Страница 13: ...he balance Recommended external calibration weight to buy for additional charge is given in technical data table In order to calibrate the balance with external weight in legally verified balances verification seals should be removed and another legal verification should be performed In this case it is recommended to contact authorized service centre Calibration with external weight is described i...

Страница 14: ...I CR LF 53h 49h 0Dh 0Ah Balance Computer weighing result according to the following format 16 Bytes transmission parameters 8 bits 1 stop no parity 4800 bps Description of particular bytes Byte 1 mark or space 2 space 3 4 digit or space 5 9 digit decimal point or space 10 digit 11 space 12 k l c p or space 13 g b t c or 14 space 15 CR 16 LF WK 1 connecting wire connects the balance with a computer...

Страница 15: ...ons put load on the pan take load off press a key when indication on the picture is displayed forced change automatic change 14 1 Simple weighing If indication different from zero is shown for empty pan T key should be used Note In balances for direct sale option 0 key is used to zero balance without load and T key works only for balance with a load which is taken as a tare Weighing result should ...

Страница 16: ..._____________________________________________________________________________ 14 2 Weighing with tare The balance allows taring in the whole measurement range Taring operation decrease weighing range for net mass of tare value 1 0203g 0 0000g 2 0004 g T ...

Страница 17: ...LIGHt recipe weighing function rECIPE animal weighing LOC entering tare function tArE force measurement nEWton maximum and minimum value indication UP anti disturbance filter FILtEr average calculating function AVErAGE determining solids and liquids density function dEnsity statistics StAt print out language selection LAnGUAG paperweight calculation function PAPEr initial settings dEFAULt function...

Страница 18: ...e longer Operation sequence shown in the pictures on the left causes adding function for setting serial interface RS232C parameters Port to function menu After switching on ACTIV function a dot is displayed on the right side to distinguish from regular menu Chosen functions are displayed with a dot on the left side In every moment it is possible to restore primary manufacture settings choosing dEF...

Страница 19: ...U following options appear Aut off function off Aut on function on Aut Set changing zero leakance speed which is corrected by function We confirm selected options by clicking on T when it s displayed on the screen If we choose Aut Set the speed correction is possible Click T when the speed is displayed and then insert new speed using T chapter 6 keys Confirm by clicking MENU key Diagram on the lef...

Страница 20: ...ibility to insert amount of pieces by choosing PCS option or to insert single piece weight PCS uM Use the following keys increase digit decimal point T next position MENU finish second phase counting pieces in weighed portion It is advised that mass of single piece is greater than reading unit and mass of sample used in first phase is bigger than 100 reading units In order to temporarily return to...

Страница 21: ...rAt L as above with rounding to 3 digits after decimal point M GrAM miligram 1mg 0 001g K GrAM kilogram Pound 1 lb 0 454kg ounCE 1oz 28 349523g ounce t trojan ounce 1ozt 31 103476g GrAIN 1gr 0 064798g PennyW pennyweight 1dwt 1 555g GrAM 1g out out of function In order to go back to results in grams use key Using this key once more will cause return to displaying in selected units The example on th...

Страница 22: ...or reference mass values between 0 3 5 of balance capacity format of weighing result is 100 0 for values between 3 5 35 it is 100 00 and above 35 100 000 The function has the following options PEr oFF deactivate the function PEr on save current indication as 100 start weighing in percents out exit without changes In order to go back to indication in mass units use key Using this key once more will...

Страница 23: ...cessary to contact a service or notified body In legally verified balances performing calibration requires changing adjustment switch position which is placed behind protecting mark sticker of a notified body An access to the switch is possible only after removing the mark Therefore balance calibration causes lost of legal verification and in consequence the necessity of renew legal verification i...

Страница 24: ...ibration report CAL tM set time interval for internal calibration CAL C set temperature difference for internal calibration When CAL on option appears press T key to select function for calibration with external weight Press key several times to select calibration weight value which will be used for calibration Confirm pressing T key When LOAD message appears put calibration weight on the pan and ...

Страница 25: ... function menu and choose CALIbr function by pressing T key when it is displayed The following options will appear CAL oFF switch internal calibration off CAL on perform calibration with external weight CAL Prn printout of calibration report CAL tM set time interval for internal calibration CAL C set temperature difference for internal calibration Press T key when CAL tM option is displayed Predef...

Страница 26: ..._______________ The form of calibration report printout Date Time Calibration report Date of production Scale type Serial number Program version Adjustation no Date of adjustation Temperature of adjust Factory external weight Factory internal weight Current external weight Current internal weight Weight difference ...

Страница 27: ...its in a byte bit 7 8 parity control PArItY 0 1 Odd 0 1 data transmission protocol Prot Long Short Farb Fis_E Fis_A Pr_CC Eltron out ustawienie trybu pracy portu szeregowego SendInG After choosing SendInG butt P transmission after using key without stabilization b P Stb transmission after using key and indication stabilization Auto after taking on and off the load without using key Cont about 10 r...

Страница 28: ... Id2 SEt Id3 inserting Id3 out After choosing HEAdEr following printout options are displayed HEA Lin displays empty line HEA Md working mode HEA dAt date and hour HEA bAL scale type HEA SEr serial number HEA Id1 Id1 displayed HEA Id2 Id2 displayed HEA Id3 Id3 displayed HEA SGn displays signature sign out Using T during one of the options is displayed activates this option A sign shows on the left...

Страница 29: ...t VAL GSS gross weight VAL Lcd LCD result out On the left we see how to activate header and how to display measurement number on the printout After choosing FOOtEr from PrInt function menu following options display FOO Lin empty line FOO Md working mode FOO dat date and hour FOO bal scale type FOO SEr serial number FOO Id1 displays Id1 FOO Id2 displays Id2 FOO Id3 displays Id3 FOO SGN signature FO...

Страница 30: ..._______________________________________ 15 9 Backlighting setting b_LIGHt Function enables to choose backlighting mode b_L OFF backlighting off b_L on backlighting on b_L 1 2 backlighting is off after 30 seconds without making any actions no keys used out 0 00g b_LIGHt b_L on 0 00g MENU T T ...

Страница 31: ...ingredients rEC on activate the function rEC Con return to previous series of weighing Before weighing each ingredient A B C etc remember to tare the balance To read aggregated sum of all previously weighed components press key or use rEC oFF option To return to ingredients weighing press key again Note When rECIPE function is active the sign o is displayed at the left of the display When rEC oFF ...

Страница 32: ...il the weighing result is averaged scale display will be blinking Then scale will show stable averaged result and will send it through serial port Final result is displayed on the display and send via serial port to computer or printer The result remains on display for about 10 second If we choose LOC CFG option can choose from LOC SPL inserting number of samples LOC tM inserting sample time LOC t...

Страница 33: ...rting tare value using keypad After pressing MENU key and choosing tArE function using T key functions below are displayed tAr OFF function off tAr on function on with tare inscribed earlier tAr SET tAr PAn actual mass on pan setting as tare tAr inscribing tare using T i MENU Choose tare inscribing function using T key After inscribing scale works with new tare value The scale will show nett mass ...

Страница 34: ...__________________________________________________ 15 13 Force measurement function nEWton Function activation casues displaying measurement results in force units mN Press MENU key Using T key choose nEWton and then nEW on Attention 1mN 0 1019g 0 00 g 0 000 nEWton nEW on MENU T T ...

Страница 35: ...ent the scale should be tared After using MENU key choosing UP function and then UP_on the highest mass result will be hold on display Pressing T key will cause result zeroing If we choose Up dW option function will display the minimum mass result ATTENTION Autozeroing function and the stabilisation indicator are deactivated when UP function is running Weighing result is continuously averaged from...

Страница 36: ...ions air blasts base vibrations on measurement result Press MENU key and select FILtEr pressing T key The following options will be shown successively on display FIL OFF filter off FIL 10 filter I weak FIL 20 filter II medium FIL 30 filter III sharp FIL 40 filter IV very sharp Select on of four filters This will cause starting weighing with selected filter In order to go back to normal weighing us...

Страница 37: ...tivate date printout using key dAt SEt change date and time dAt PIn inserting safety code to avoid changing the date by unwanted personnel Insert the code using T and MENU look chapter 6 keys After code confirmation before each entering into dAtE function the user will be asked to inscribe the code To cancel the pin enter dAt Pin option and write code 0 dAt For selection of date and time format ou...

Страница 38: ...choose dAt FOr following options will appear FOr TM change of time format tM12h tM24h For dAt change of displayed data year month day y M d month day year M d y and day month year d M y out The example on the left presents how to change data format 0 00g dAtE dAt SEt dAt oFF dAt For For tM For dAt y M d 0 0000g M d y out MENU T T T T T ...

Страница 39: ...ctivate the function trESh on activate the function trESh Prn check last threshold values press key several times thr CFG function configuration working mode buzzer flashing setting Choose thr on option using T key The following options for entering thresholds are displayed SEt 0 go to weighing with signalling threshold excess SEt 1 set lower threshold value SEt 2 set upper threshold value SEt 3 s...

Страница 40: ...CFG option following options will appear thr Out working mode setting thr buZ buzzer work settings EHC buzzer turns on after exceeding threshold STB signal on after result stabilization in OK section thr FLA flashing on when lower or upper threshold is exceeded out User can choose from 3 working modes for thr out After choosing thr Out option following options display Out off Out IPL batching mode...

Страница 41: ... 25mA 24V Transmitter inputs must be protected with diodes e g 1N4148 It is advised to use MS3K P electronic board sold separately consisting of RM96P transmitters with DC24V input voltage and AC250V 3A output Important notes 1 After switching the scale on both thresholds are set to maximum values 2 When setting upper threshold value pay attention that its value is not below lower threshold value ...

Страница 42: ...ng total register report printout and leaving the function tot working with receipt printout after each measurement tot working without receipt printout tot CFG working mode change between Auto weighing results automatically added to register and Manual key used for saving to register Press T key when tot is displayed Perform measurement series pressing key for storing results into total register ...

Страница 43: ...rnal clock Date and Time do not appear on printout Maximum number of measurements 99 999 Maximum total load 99 999 000d The weighing unit of the total value from the register Total is the same as the weighing unit stated on the keypad or is 1000 times greater what is signalled by o indicator at the left of the display If the registered value is too big to be displayed E communicate appears on the ...

Страница 44: ...eigh in air m2 weight in water L density of liquid If distilled water is used enter its exact temperature accurate to 0 5 C the balance will calculate its density automatically To enter the value use the following keys digit increase decimal point T next digit MENU end When using liquid other than distilled water or ethanol choose OTHER instead of H2O and Ethanol option and enter its density accor...

Страница 45: ...cessary measurements connect a printer to the balance and press key A sample for solid mass density determination is shown below Date Time MEASUREMENT NO WEIGHT in air g WEIGHT in a liquid g DENSITY Liquid density Liquid temperature g cm3 g cm3 o C Operation sequence weighing in air and in liquid for below balance weighing Phase I measurement in air Phase II measurement in liquid ...

Страница 46: ...ume using the formula below where m1 plunger weight in air m2 plunger weigh in a liquid V plunger volume Plunger volume is stored on its hanger To enter the value use the following keys digit increase decimal point T next digit MENU end Phase I measurement in air Phase II measurement in liquid To print measurement result and begin next measurement press key V m m 2 1 MENU MENU T T T T 0 000g Liqui...

Страница 47: ...________________________ To print a density determination report after all necessary measurements connect a printer to the balance and press key A sample for liquid density determination is shown below Date Time MEASUREMENT NO WEIGHT in air g WEIGHT in a liquid g LIQUID DENSITY PLUNGER VOLUME g cm3 g cm3 ...

Страница 48: ...to register is automatic and it occur after the scale is loaded and its indications stabilize After each loading printout is made with number of measurements result date and time Next measurement is made after taking off earlier load For the obtained measurements series the scale evaluates n number of samples sum x sum of all samples n x x sum _ x average value sum x n min minimal value from n sam...

Страница 49: ...tabilization ManuAL manual work confirmed by pressing key out out of function 3 Press T key when StA o is displayed 4 Put successively samples of product on the pan take off after indication stabilization in order to inscribe them into measurement register 5 In order to obtain statistical results for measurement series press MENU key and T key when the StAt sign is displayed and then StA Prn Succe...

Страница 50: ... interval measurement is in B interval if it is bigger or equal to B interval threshold and smaller than C interval threshold Thresholds are printed under histogram NG amount of measurements under allowable lower value NG amount of measurements above allowable upper value To finish work with this function and zeroing result register press F key then during StAt and F is displayed press T key This ...

Страница 51: ...rAIn CZECH SPAnISH out Choose the proper language and press T while it s displaying Example of printouts in polish and English language calibration report RAPORT Z KALIBRACJI NUMER FABRYCZNY NUMER PROGRAMU MASA KALIBRACYJNA PIERWOTNA MASA KALIBRACYJNA RÓŻNICA MAS CALIBRATION REPORT FACTORY NUMBER PROGRAM NUMBER CALIBRATION PRIMARY MASS CALIBRATION MASS DIFFERENCE MASS total function report UWAGA W...

Страница 52: ...y to access Function Menu To enter the function press T key when PAPEr is displayed PCS is the number of samples placed on the pan To choose previously used value select old option ArEA is the area of a single sample It is possible to choose standard values 0 02 or 0 1g m2 or enter specific value A option To enter the value use the following keys digit increase decimal point T next digit MENU end ...

Страница 53: ... in guarantee card 6 Balances can be sent for repair as messenger delivery only in original package if not there is a risk of damaging the balance and loosing guarantee Failure messages Message Possible cause Recommendation C 1 6 more than 1 min negative result in one of autotests if message still remains contact service centre L no pan on the balance put the pan on mechanical damage contact servi...

Страница 54: ...atibility Moreover scales with the following markings on the name plate 15 the number of the Notified Body responsible for EC verification 1443 two digit number of the year of EC verification a green metrology sticker with M mark a protective seal affixed by the Notified Body comply with the requirements on the Type Approval Certificate No TCM 128 07 4511 and are verified to comply with 2 EN 45501...

Отзывы: