MANO831 Mini ITX Board
26
Hardware Installation
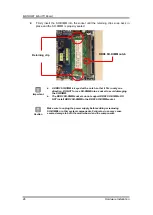
2.
Firmly insert the SO-DIMM into the socket until the retaining clips snap back in
place and the SO-DIMM is properly seated.
Important
A DDR3 SO-DIMM is keyed with a notch so that it fits in only one
direction. DO NOT force a SO-DIMM into a socket to avoid damaging
the SO-DIMM.
The DDR3 SO-DIMM sockets do not support DDR2 SO-DIMMs. DO
NOT install DDR2 SO-DIMM to the DDR3 SO-DIMM socket.
Caution
Make sure to unplug the power supply before adding or removing
SO-DIMMs or other system components. Failure to do so may cause
severe damage to both the motherboard and the components.
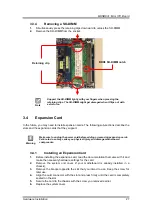
DDR3 SO-DIMM notch
Retaining clip
Содержание Mano831 Series
Страница 1: ...MANO831 Series Intel AtomTM D2550 Mini ITX Motherboard User s Manual ...
Страница 10: ...MANO831 Mini ITX Board 4 Introduction 1 4 Block Diagram ...
Страница 12: ...MANO831 Mini ITX Board 6 Board and Pin Assignments Bottom View ...
Страница 26: ...MANO831 Mini ITX Board 20 Board and Pin Assignments This page is intentionally left blank ...
Страница 36: ...MANO831 Mini ITX Board 30 Hardware Installation This page is intentionally left blank ...
Страница 39: ...MANO831 Mini ITX Board Hardware Description 33 ...
Страница 41: ...MANO831 Mini ITX Board Hardware Description 35 ...
Страница 42: ...MANO831 Mini ITX Board 36 Hardware Description ...
Страница 43: ...MANO831 Mini ITX Board Hardware Description 37 4 6 Memory Map The memory mapping list is shown as follows ...
Страница 44: ...MANO831 Mini ITX Board 38 Hardware Description This page is intentionally left blank ...

