background image

Loading Paper

3

Connecting the Cables

Caution: Connect the cables to the printer before plugging in the

power supply. If power is received from the host computer,
turn it off before connecting any cables.

4

1. Tear off the end of the roll so that the edge is loose.

2. Place the roll into the paper bucket with a few inches of paper

extending over the cabinet front (or top, if printer is mounted
vertically).

Warning: Be sure the paper unrolls from the bottom of the roll.

Otherwise, the paper will jam.

Back of

Printer

Communication

Connector

Pass Through

Connector

(Optional)

Power

Connector

Cash

Drawer

Connector

Strain

Relief

Strain

Relief

Содержание A794

Страница 1: ...A794 Thermal Printer Setup Guide TM ...

Страница 2: ...that the materials shipped with the printer match what is shown in the illustration To report any missing materials or to report a printer that was damaged during shipping call your Axiohm representative at 1 800 732 8950 Paper Printer Power Supply Optional Setup Guide Communication Cable Optional ...

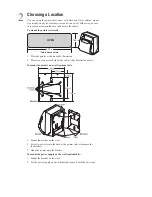
Страница 3: ...learance for the bracket 3 Hang the printer onto the bracket To mount the power supply on the wall optional kit 1 Mount the bracket on the wall 2 Set the power supply on the bracket and secure it with the tie wraps 5 00 in 1 50 in Cable Access Hole OPEN 2 Choosing a Location You can set up the printer three ways set it flat on any level surface mount it vertically on any level surface or mount it ...

Страница 4: ... the end of the roll so that the edge is loose 2 Place the roll into the paper bucket with a few inches of paper extending over the cabinet front or top if printer is mounted vertically Warning Be sure the paper unrolls from the bottom of the roll Otherwise the paper will jam Back of Printer Communication Connector Pass Through Connector Optional Power Connector Cash Drawer Connector Strain Relief...

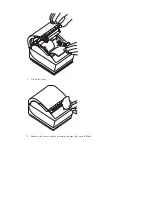
Страница 5: ...3 Close the cover 4 Remove the excess paper by tearing it against the tear off blade ...

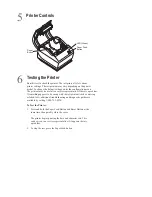
Страница 6: ...s to be wrong with the test printout such as missing or faded text additional troubleshooting and diagnostic guides are available by calling 1 800 732 8950 5 To Test the Printer 1 Press and hold the Paper Feed Button and Reset Button at the same time then quickly close the cover The printer begins printing the data and character sets This can be given to a service representative if it appears ther...

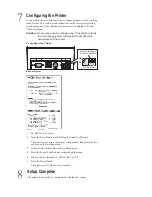
Страница 7: ... To Configure the Printer 1 Set DIP Switch 1 to On 2 Press the Reset Button while holding the Paper Feed Button The printer beeps prints the current configuration then prints the first question on the scrolling menu 3 Follow all the instructions on the scrolling menu 4 Press the Paper Feed Button as instructed on the menu 5 When you have finished set DIP Switch 1 to Off 6 Press the Reset Button Th...

Страница 8: ... power supply with SELV Secondary Extra Low Voltage non energy hazard output limited energy source input rated 100 240 Vac 1 5 0 8 A 50 60 Hz output rated 24 Vdc 2 3 A Use of this product with a power supply other than the Axiohm power supply will require you to test the power supply and Axiohm printer for FCC and CE mark certification Communication Interface Cable A shielded 360 degree interface ...

Отзывы: