

Step 4A:
Fahrzeug starten • Stellen sie sicher, dass das Symbol im LCD Info Fenster beleuchtet und der Ladestand
des Starthilfegerätes wenigstens 80% ist. Starten Sie das Fahrzeug. Falls die Starthilfe fehl schlägt, wiederholen
Sie Step 3A.
Sollten mehr als 5 Starthilfe-
versuche vergeblich sein,
benötigen Sie ander-
weitige Hilfe.
Step 4B:
YY Sicherheitsprüfung durchlaufen. Bereit für Starthilfe.
Bei Falschanschluss (Warnton) Polarität korrigieren.
Falls der Starthilfeversuch misslingt, wiederholen Sie Step 3B.
Step 3A:
Starthilfe geben • Starthilfe Taste betätigen um den Ausgang frei zu schalten. Die rote Taste leuchtet.
Anzeige: Das Symbol ist beleuchtet.
Weiter mit Step 4A
Step 4A:
Starting the vehicle • Make sure the YY is highlighted. Start the vehicle. If start failed repeat Step 3A process
again.
Seek for other help if start
process has been repeated
ineffi cient >5 times.
Step 4B:
YY Safety check passed; then power will be ready
for starting. Correct the polarity if it is wrong. If start failed
repeat Step 3B process again.
Seek for other help start process has been repeated ineffi cient >5 times.
Step 3A:
Ready to crank the vehicle • Press JUMP START button to initiate the boost function.
Button will stay solid RED.
Got to Step 4A
Step 3B:
This applies to DEAD Battery (<9V) situation ONLY.
Hold & press JUMP START and LIGHT buttons for 3 sec. to initiate „phantom“ Polarity check. If polarity is wrong
the alarm will sound. Correct the connection.
D
Diese Bedienungsanleitung ist eine Publikation der axhess GmbH & Co. KG, Industriestrasse 11, 56589 Rheinbrohl. www.axhess.de . Alle Rechte einschließlich
Übersetzung vorbehalten. Reproduktionen jeder Art, auch auszugsweise, z. B. Fotokopie, Mikroverfi lmung, oder die Erfassung in EDV-Anlagen, bedürfen der aus-
drücklichen schriftlichen Genehmigung der axhess GmbH & Co. KG. Der Nachdruck, auch auszugsweise, ist verboten. Diese Bedienungsanleitung entspricht dem
technischen Stand bei Drucklegung. Änderung in Technik, Ausstattung und Design vorbehalten. © Copyright 2015 axhess GmbH & Co. KG
Diese Kurzanleitung ersetzt nicht die Bedienungsanleitung. Achtung! Lesen Sie vor Gebrauch des Gerätes unbedingt die Bedienungsanleitung! Diese kön-
nen Sie unter www.axhess.de aufrufen und herunterladen. Steht Ihnen keine Download-Möglichkeit zur Verfügung, senden wir Ihnen auf Anforderung eine
gedruckte Version per Post zu.
GB
This user´s manual is published by axhess GmbH & Co. KG , www.axhess.de . All rights, including translation reserved. No reproduction , even partial, eg . as photo-
copying, microinsurance lmung , or storage in computer equipment, without the express written approval of axhess GmbH & Co. KG. Reproduction, even partial, is
prohibited . The operating instructions refl ect the current technical specifi cations at time of print . Changes in technology, equipment and design reseved.
© Copyright 2015 axhess GmbH & Co. KG
This quick guide does not replace the complete manual. Caution! Read before using the device the complete manual! You may access and download the manual
at www.axhess.de. Is there now download option available, we will send you upon request a printed version by post.
F
Ce MANUEL DE L‘UTILISATEUR est publié par axhess GmbH & Co. KG, www.axhess.de . Tous droits, y compris la traduction réservés. Aucune reproduction, même
partielle, par exemple. la photocopie, la microassurance lmung, ou le stockage dans le matériel informatique, sans. l‘ autorisation expresse écrite de axhess GmbH & Co. KG
permis. Toute reproduction, même partielle, est interdite. Le mode d‘emploi refl éter les spécifi cations techniques en vigueur au moment de l‘impression. Changements dans
la technologie, l‘équipement et la conception Réservés. © Copyright 2015 axhess GmbH & Co. KG
Cette mini guide ne remplace pas le manuel. Attention! A lire avant d‘utiliser l‘appareil, assurez-vous au manuel d‘instructions! Vous pouvez consulter et téléchar-
ger à www.axhess.de. Vous n‘existe aucune option de téléchargement possible nous vous ferons parvenir sur demande une version imprimée par la poste.
I
Questo d‘Istruzioni manuale è pubblicato da axhess GmbH & Co. KG, www.axhess.de . Tutti i diritti, compresa la traduzione sono riservati. Nessuna ripro-
duzione, anche parziale , per esempio. come fotocopie, microassicurazione lmung, o la conservazione in attrezzature informatiche, senza l‘espressa autorizzazione
scritta di axhess GmbH & Co. KG permesso. La riproduzione, anche parziale, è vietata. Le istruzioni per l‘uso rifl ettere le caratteristiche tecniche attuali al momento della stampa.
Cambiamenti nella tecnologia, attrezzature e design Réservés. © Copyright 2015 axhess GmbH & Co. KG
Questa guida rapida non sostituisce il manuale. Attenzione! Leggere prima di utilizzare l‘apparecchio, assicurarsi che il manuale di istruzioni! È possibile
accedere e scaricare a www.axhess.de. Si è alcuna opzione di download disponibile vi invieremo su richiesta una versione cartacea per posta.
NL
Deze gebruikershandleiding aandachtig wordt uitgegeven door axhess GmbH & Co. KG, www.axhess.de. Alle rechten, inclusief vertaling, voorbehouden. Geen
enkele reproductie, zelfs gedeeltelijk, bijvoorbeeld. als fotokopie, microverzekeringen lmung, of opslag in computer -apparatuur, zonder de uitdrukkelijke schriftelijke
toestemming van axhess GmbH & Co. KG niet toegestaan. Reproductie, zelfs gedeeltelijk, is verboden. De gebruiksaanwijzing weerspiegelen de huidige technische
specifi caties op het moment van afdrukken. Veranderingen in de technologie, apparatuur en design reseved. © Copyright 2015 axhess GmbH & Co. KG
Deze beknopte handleiding vervangt niet de Manual. Let op! Lees voor gebruik Unit noodzakelijkerwijs de handleiding! U kunt onder bekijken en downloa-
den www.axhess.de. Als je niet downloaden Optie beschikbaar is, zullen we sturen Out op aanvraag een gedrukte Version per post .
E
Este Manual del Usuario es publicado por axhess GmbH & Co. KG, www.axhess.de . Todos los derechos, incluida la traducción reservados. Queda prohibida la
reproducción, incluso parcial , por ejemplo. como fotocopia, lmung microseguros, o el almacenamiento en los equipos informáticos, sin la aprobación por escrito de
axhess GmbH & Co. KG permitido. La reproducción, incluso parcial, está prohibido. Las instrucciones de uso refl ejar las especifi caciones técnicas vigentes en el momento
de la impresión. Los cambios en la tecnología, equipamiento y diseño Reseved. © Derechos de Autor 2015 axhess GmbH & Co. KG
Esta guía de referencia rápida no sustituye al Manual . ¡Atención! Leer antes de usar Unidad necesariamente el manual! Usted puede bajo Vista y descarga
www.axhess.de . Si no descargar Opción disponible , le enviaremos Sale a petición de una impresa Versión por correo.
„Power Punch“
12V
DC Jump Start
D
12V Starthilfe
GB
12V starting aid
F
12V démarrage
I
12V avviamento
NL
12V starthulp
E
12V ayuda inicial
JSF 4000
JSF 4000 mit
12V
4000mAh Lithium Ionen Akku
D
|
Geräte Funktion und Starthilfe Kurzbeschreibung
9 Steckdose für
Starthilfekabel Set
10 Ladea Warnlicht
11 Ladespannungs- und
Starthilfe Anzeige
12 Ladestandsanzeige in %
13 Starthilfe Bereit Anzeige
14 Anschluss Prüfung
Nur für
12V
Fahrzeug-Bordsysteme
Leistungs-Tabelle
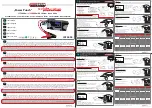
Step 1:
Verbinden Sie den Stecker des Starthilfegerätes.
Der Stecker muss einrasten.
Dazu ist eine gewisse Kraft erforderlich da die Steckverbin-
dung eng ausgelegt ist.
Betätigen Sie den AN / AUS Schalter
Die Ladespannung des Starthilfegerätes
muss wenigstens im Bereich 80% oder
höher sein um beste Ergebnisse zu erzielen.
Step 2:
Mit der Fahrzeugbatterie verbinden
Klemmen Sie die schwarze Polklemme (B) an den negativ
( - ) Pol der Batterie an.
Dann klemmen Sie die rote Polklemme (A) an den Pluspol
( + ) der Batterie an.
Bei Falschanschluss gibt das Gerät einen Warnton ab.
Die Starthilfe Taste ( rot ) blinkt.
Im LCD Info Fenster blinkt die Anzeige „V“.
Bei „toter Fahrzeugbatterie“ machen Sie weiter mit Step 3B
Step 3B:
Nur bei „toter Fahrzeugbatterie“ Betätigen Sie gleichzeitig
die Starthilfe Taste und die Licht Taste, halten Sie diese 3 Sekunden lang gedrückt. Der Polarity Check wird in
dieser Funktion „überbrückt“. Bei Falschanschluss ertönt das Warnsignal. Anschlüsse korrigieren.
Achtung! Kein Kurzschluss-Schutz in dieser Funktion! Polklemmen nicht zusammen bringen!
Step 5:
Wenn Fahrzeug erfolgreich gestartet wurde.
schaltet sich die Starthilfefunktion
nach 3 Sekunden ab.
Bitte Schalten Sie das Gerät AUS.
B
A
B
A
2
1
B
A
B
A
B
A
2
1
B
A
Step 6:
Polklemmen abnehmen.
Stellen Sie sicher, dass das Gerät AUS
geschaltet ist.
1 Klemmen Sie die schwarze Polklemme (B)
vom negativ (-) Batteriepol ab.
2 Klemmen Sie die rote Polklemme (A)
vom Pluspol (+) der Batterie ab.
JSF 4000 mit
12V
4000mAh Lithium Ionen Akku
Funktionen und Ausstattung
1 Ladegerät (12V/1A)
2 USB Ausgang 2fach 5V 2,1A
3 12V Steckdose
4 AN / AUS Schalter
5 Starthilfe Schalter
6 Wahlschalter Arbeits-
und Warnlicht
7 LC Display Info Fenster
8 LED Arbeitslicht
Der Batteriestatus, tief entladen, 50% geladen, wie in der Tabelle unten gezeigt bezieht sich auf die jeweilige
Fahrzeugbatterie. Die Testresultate beziehen sich auf 25°C / 1 atm.
9 Connector Bosster Cable
10 Charging LED & S.O.S.
11 Jump Start. Vehicle or
Charging Voltage
12 Battery Status
(built in Battery )
13 Jump Start ready Icon
14 Polarity Check Icon
For
12V
Systems only
Product function and Features
performance-chart
Step 1:
LCD displays the voltage and capacity of the device battery.
Must be 80% for best results. Firmly insert the end of the
cable into the Jump Start.
(First time use might feel some resistance to be pushed in
all the way).
Step 2:
Hook up the vehicle battery
Put the black clip (-) terminal attach to the battery negative
post or chassis ground. Put the red clip (+) terminal attach
to the battery positive post.
Alarm will beep if polarity is wrong conneted. Button will
fl ash in RED and LCD Icon POLARITY CHECK will fl ash
.
** If car battery is completely dead go to Step 3B.
Step 5:
Once vehicle stated successfully.
Once vehicle started JUMP START
will turn off within 3 sec.
Step 6:
Remove the clamps.
Make sure the JUMP START is OFF.
Then 1 First remove the BLACK clip (-),
2 Next remove the RED clip (+)
JSF 4000
12V
with built in 4000mAh Lithium Ion Battery
1 Charger Input (12V/1A)
2 Dual USB Power Outlet 5V
2,1A both
3 12V Port
4 Power Button ON/OFF
5 Jump Start Button
6 Light Mode Selector
7 LC Display
8 LED Work Light
The battery status, completely discharged , 50 % load, as shown in the table above refers to the respective original
vehicle battery. The test results relate to 25 ° C / 1 atm.
Using the Booster Funtion. Short cut manual.
Damages cause by inproper use will solely be
uses responsibiliies.
GB
|
KURZANLEITUNG • QUICK START GUIDE • AUX • GUIDA DI AVVIO RAPIDO • SNELSTARTGIDS • INDEPENDIENTES
Anschluß / Bedienung in Einzelschritten:
Falls die Fahrzeugbatterie unzugäglich verbaut ist, schließen Sie
das Starthilfegerät an die meist im Motorraum befi ndlichen Lade-/
Starthilfe Kontaktstifte an. Die Vorgänge sind mit den hier im weiteren beschriebenen Schritten identisch.
Connection / operation step by step:
If the vehicle battery is installed inaccessible, connect the device
to jump-start the most in the engine compartment situated
charging / jumper pins on. The operations are the here described below Steps identical.
V
10.0
V
14.1
G A S O L I N E E N G I N E
D
GB
F
I
NL
E
Startvermögen
Benzin Motor
Hubraum
Performance
Fuel Engine
Eninge size
Capacité de
démarrage
Motor Diesel
Cylindrée
Performance
Motore
Benzina
Cilindrata
Startvermogen
Benzinemotor
Cilinderinhoud
Potencia
Motor
Gasolina
Cilindrada
Engine Size
3 CYL + 4 CYL ≤ 2600 ccm
4 CYL + 6 CYL ≤ 3400 ccm
6 CYL + 8 CYL ≤ 4500 ccm
Batt 50%
Batt 0%
Batt 50%
Batt 0%
Batt 50%
Batt 0%
JSF 4000
JSF 6000
D I E S E L E N G I N E
D
GB
F
I
NL
E
Startvermögen
Benzin Motor
Hubraum
Performance
Fuel Engine
Eninge size
Capacité de
démarrage
Motor Diesel
Cylindrée
Performance
Motore
Benzina
Cilindrata
Startvermogen
Benzinemotor
Cilinderinhoud
Potencia
Motor
Gasolina
Cilindrada
Engine Size
4 CYL ≤ 1900 ccm
4 CYL + 6 CYL ≤ 3000 ccm
8 CYL ≤ 5900 ccm
Batt 50%
Batt 0%
Batt 50%
Batt 0%
Batt 50%
Batt 0%
JSF 4000
JSF 6000
V
10.0
V
14.1
A
2
1
B
A
B
A
Ansicht rechte Seite
Ansicht linke Seite
11
13
14
V
88.8
12
C H A R G I N G
A
2
1
B
A
B
A
Ansicht rechte Seite
Ansicht linke Seite
11
13
14
V
88.8
12
C H A R G I N G
G A S O L I N E E N G I N E
D
GB
F
I
NL
E
Startvermögen
Benzin Motor
Hubraum
Performance
Fuel Engine
Eninge size
Capacité de
démarrage
Motor Diesel
Cylindrée
Performance
Motore
Benzina
Cilindrata
Startvermogen
Benzinemotor
Cilinderinhoud
Potencia
Motor
Gasolina
Cilindrada
Engine Size
3 CYL + 4 CYL ≤ 2600 ccm
4 CYL + 6 CYL ≤ 3400 ccm
6 CYL + 8 CYL ≤ 4500 ccm
Batt 50%
Batt 0%
Batt 50%
Batt 0%
Batt 50%
Batt 0%
JSF 4000
JSF 6000
D I E S E L E N G I N E
D
GB
F
I
NL
E
Startvermögen
Benzin Motor
Hubraum
Performance
Fuel Engine
Eninge size
Capacité de
démarrage
Motor Diesel
Cylindrée
Performance
Motore
Benzina
Cilindrata
Startvermogen
Benzinemotor
Cilinderinhoud
Potencia
Motor
Gasolina
Cilindrada
Engine Size
4 CYL ≤ 1900 ccm
4 CYL + 6 CYL ≤ 3000 ccm
8 CYL ≤ 5900 ccm
Batt 50%
Batt 0%
Batt 50%
Batt 0%
Batt 50%
Batt 0%
JSF 4000
JSF 6000


