AWS AIRBAR Скачать руководство пользователя страница 17

AWS AirBar Operator’s Manual


13 


BELT / SHEAVE / IDLER CONDITION 

Inspect all belts, sheaves and idlers for good condition. 
Belts  should  appear  supple  with  no  shiny  appearance  on  the 
drive surface or cracks on the inner or outer surface. 
Belts should not sit in the bottom of the sheave grooves or the 
inner  ribs  between  grooves  should not be worn to  a  point.    If 
either of these cases exist, the sheave is worn excessively and 
should be replaced. 
Idler  pulleys  should  be  in-line  with  the  belt  running  path  and 
parallel  with  the  sheaves.    If  the  idler  is  not  inline  or  parallel, 
inspect  the  idler  bearing  condition  or  the  bronze  bushings  on 
which the idler pivots for wear.  Replace as required. 
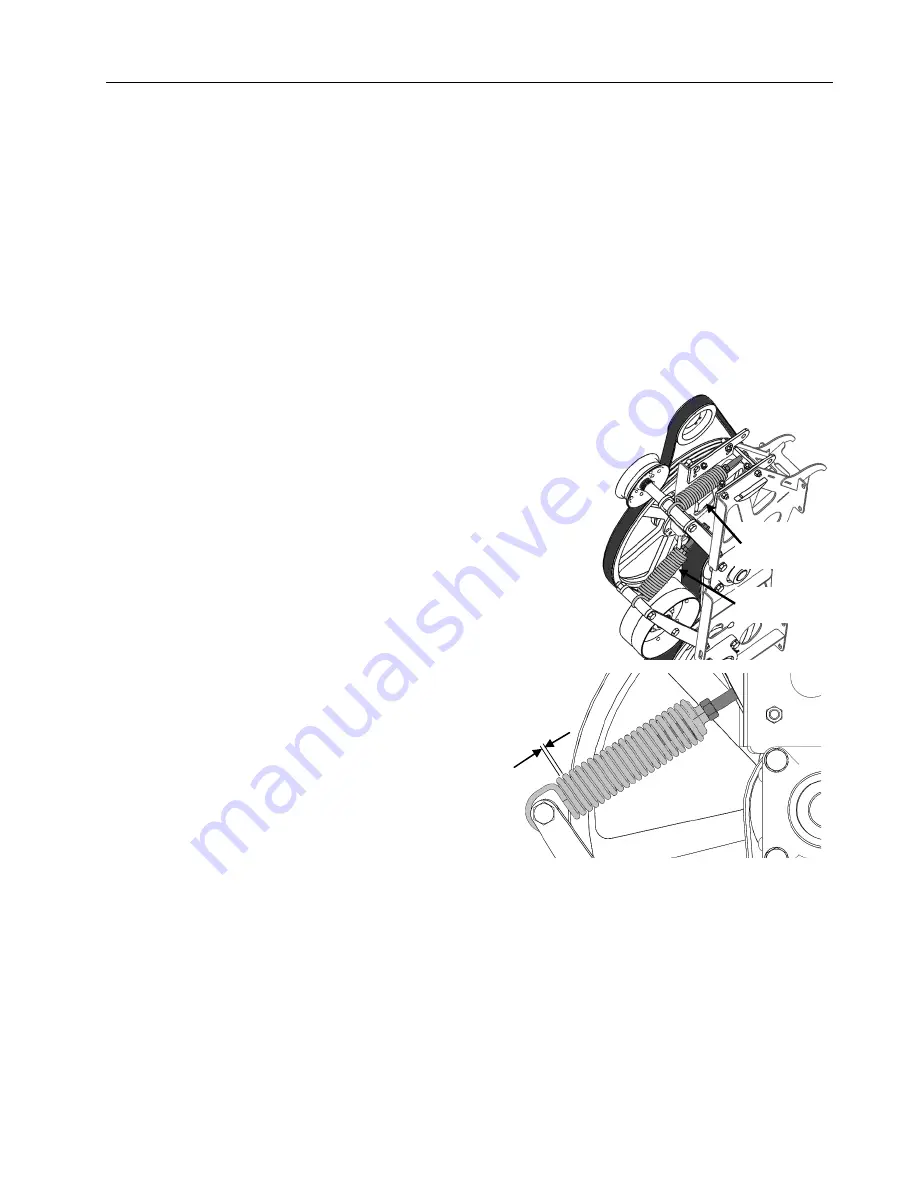
BELT TENSION 

Proper belt tension is critical to both optimum performance and 
long life of your AirBar system.  Loose belts will create excessive 
heat  and  ultimately  fail.    Belts  that  are  too  tight  can  lead  to 
accelerated bearing failure. 
Belt  tension  is  set  using  a  draw-bolt  to  extend  a  spring.    The 
extended spring maintains tension. 
On initial tensioning of new belts, tighten the draw bolt until a 
quarter  can  fit  between  the  coils.    Once  initial  run-in  is 
completed, maintain a dime-thickness gap in the spring. 
It is important to set the secondary belt tension first, then the 
primary.  Double-check the secondary belt tension after setting 
primary tension. 


Quarter

 Thickness 

 Initial 

Dime

 Thickness 

 Run-In 

Primary Tensioner 

Secondary 
Tensioner 

Содержание AIRBAR

Страница 1: ...OPERATOR S MANUAL AWS Airbar Systems Header Mount Fan Version 20200325 ...

Страница 2: ......

Страница 3: ...ECAUTIONS 4 POWER UNIT SAFETY 5 OPERATING EQUIPMENT SAFELY 5 SAFETY DECALS 6 SYSTEM SETUP FOR OPERATION 7 WHEN CONNECTING THE HEADER 7 WHEN DISCONNECTING THE HEADER 7 OPERATING THE SYSTEM 8 DAILY CHECKS 8 REEL POSITION 8 MANIFOLD HEIGHT ADJUSTMENT 8 ELECTRICAL CONTROLS 8 NOZZLE ROTATION ADJUSTMENT 9 AIR FLOW ADJUSTMENT 10 MAINTENANCE 10 LUBRICATION 11 NOZZLE INSPECTION 12 BELT SHEAVE IDLER CONDITI...

Страница 4: ......

Страница 5: ...ded by the system improve crop in flow past the knife and reduce shatter related losses at the knife Features Belt driven fan powered from the combine header drive system Optimized nozzle configurations based on reel design Adjustable air flow and nozzle position In cab adjustment controls Applications Dry Beans Soybeans Lentils Peas Cereals ITEMS INCLUDED WITH AIRBAR KITS Operator s Manual Instal...

Страница 6: ...rs about the misuse of the equipment whenever knowledge of misuse becomes known whether the act has is or could occur Such acts include but not limited to riding upon use of non OEM parts operating in fire hazard areas modifications that alter the original system specifications or use other than originally intended etc PRODUCT DESIGN If any person employee agent dealer or distributor becomes aware...

Страница 7: ...RACKET BLOWER ASSEMBLY Figure 1 View A ROTARY SCREEN THROTTLE W ACTUATOR BELT DRIVE INPUT PTO SHAFT W STORAGE HANGER Figure 3 Manifold Tilt Mechanism 1 pc Reel MANIFOLD TILT ACTUATOR Figure 4 Manifold Tilt Mechanism Multi piece Reel MANIFOLD TILT ACTUATOR Figure 2 Control Switch Box Installed in Cab MANIFOLD TILT CONTROL THROTTLE CONTROL ...

Страница 8: ...roduct or property damage GENERAL SAFETY PRECAUTIONS The operator of this system must have sufficient knowledge and instructions in the care and operation of this system and the power unit being used before he she uses the system Do not allow unauthorized persons or children to operate the system It is the obligation of the operator to make sure that all guards and shields are in place on the syst...

Страница 9: ... PTO adapters to connect implements OPERATING EQUIPMENT SAFELY Make sure PTO shaft is properly locked If the PTO shaft comes off during operation personal injury or equipment damage could result Never disconnect PTO shaft at fan drive Always disconnect at feeder house end and stow in supplied hanger Keep all bystanders well away from the machine when it is operating Always maintain a safe operatin...

Страница 10: ...problem Replace bent or damaged parts do not attempt to straighten a bent fan blade Before disconnecting from power unit always lower equipment to the ground place controls in neutral set park brake turn engine off and wait for all moving parts to stop Relieve hydraulic pressure per power unit manufacturer s instructions SAFETY DECALS PN AWS0062 PN AWS1052A John Deere CaseIH Combines PN AWS1052B N...

Страница 11: ...h collar fully locks Secure shield safety chain to feeder house ELECTRICAL CONNECTIONS There is a single connection to be made between the combine and AirBar system Locate the 4 pin connector on the header harness and connect to mating connector on feeder house WHEN DISCONNECTING THE HEADER DISCONNECTING THE PTO Disconnect telescoping PTO shaft from the feeder house shaft Place shaft in the storag...

Страница 12: ...s not used When entering the crop begin with the reel the normal height and begin to raise the reel until you see a decrease in performance MANIFOLD HEIGHT ADJUSTMENT The manifold height can be adjusted in accordance with the desired reel position In most applications the mid height adjustment hole is appropriate It is important that the heel of the nozzle area of the bend is 2 4 higher from the g...

Страница 13: ...ind the knife This position will allow for loose crop material to be swept into the header as well as aid in lifting the crop mat into the infeed system on the header auger or canvas The crop mat should float on a cushion of air similar to an air hockey puck Indicators of improper nozzle adjustment are Tilt Too Far Rearward in Material bunching on knife excessive knife losses Tilt Too Far Forward ...

Страница 14: ...is is the most efficient setting for those conditions This setting should be checked periodically through the day as well as from field to field Plant moisture content yield and plant population will affect where the throttle should be positioned MAINTENANCE Ensure the combine controls are in the park position the engine is turned off head is in the parked position the parking brake is engaged and...

Страница 15: ...ponent failure Specification NLGI GL 2 Grease Type Mineral Oil Lithium Soap Thickener Grease of this type is considered general purpose It can be used on all components of the AirBar system Notes 1 Do not use high temperature greases Normal operating conditions of this system will not exceed the recommended temperature range of conventional grease High temperature greases may use thickeners not co...

Страница 16: ...an additional bearing that requires greasing NOZZLE INSPECTION Opening It is critical that the nozzle opening be set to 3 8 They can become collapsed or opened during use from contact with rocks and other debris and wear To check set the opening a 3 8 bolt can be used To set the opening insert the bolt and pinch using pliers as shown U Bolt Vibrations from normal use can cause the gasket between t...

Страница 17: ...e bronze bushings on which the idler pivots for wear Replace as required BELT TENSION Proper belt tension is critical to both optimum performance and long life of your AirBar system Loose belts will create excessive heat and ultimately fail Belts that are too tight can lead to accelerated bearing failure Belt tension is set using a draw bolt to extend a spring The extended spring maintains tension...

Страница 18: ...ure nothing has loosened To remove the collar Loosen the setscrew then tap the collar in the direction opposite the shaft rotation BELT SERVICE From 2021 all AWS AirBar systems are delivered with the new ServiceMaster chassis This chassis design allows for primary belt change out in up to 70 less time than the previous designs It is not required to remove the bearings from the shaft to change the ...

Страница 19: ...lex hose for signs of weather cracking wear To maximize flex hose life ensure even wear rotate the hose 45 before the start of each season MANIFOLD ROTATION The manifold is supported by 2 saddles which allow it to rotate via the electrical actuator This must be kept lubricated for proper operation Apply a dry film graphite or PTFE lubricant to the lock sleeve end cap areas annually or before use i...

Страница 20: ... torque unless otherwise specified in this manual SAE Grade 5 fasteners are used in the assembly of the system unless otherwise specified in this manual Bolt Grade Class Identification SAE Gr 2 SAE Gr 5 SAE Gr 8 No Dashes 3 Dashes 6 Dashes Bolt Diameter Std Nut Recommended Torque Stover Lock Nut Recommended Torque 1 4 86 in lb 93 144 in lb 5 16 178 in lb 192 251 in lb 3 8 26 ft lb 28 37 ft lb 1 2 ...

Отзывы: