background image

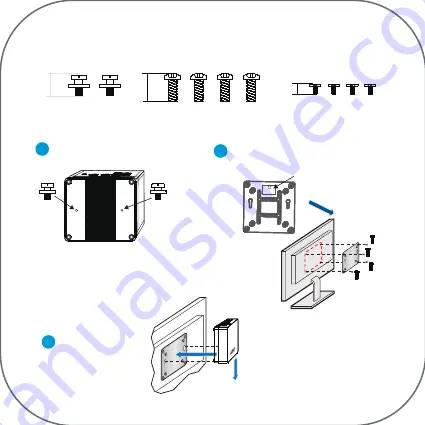
Mount Installation

1

Install #1 screws into Mini PC

#1 screw -- 2 pcs

9mm

2

Install the VESA Mount with #2 screws

#2 screw -- 4 pcs

12.6mm

This side out

3

Mount the Mini PC

R

4.3mm

#3 screw -- 4 pcs

(for HDD installation)

#1 screw

#1 screw

#2 screw

This side out

UP

Содержание NYi3

Страница 1: ...NYi3 Quick Guide R MINI PC R ...

Страница 2: ...t Information R R R Power button Headphone Audio Microphone jack USB DC IN HDMI USB LAN Security Slot MicroSD Slot Package Contents Mini PC HDMI cable SATA cable Power Adaptor VESA Mount Quick Guide R Screws ...

Страница 3: ...tor Connect the Mini PC NYi3 to the HDMI connector of the TV or monitor with HDMI cable Connect the power adaptor into the wall socket and the other end into the power input port of Mini PC NYi3 Push the power button then the device starts ...

Страница 4: ...nstall 1 screws into Mini PC 1 screw 2 pcs 9mm 2 Install the VESA Mount with 2 screws 2 screw 4 pcs 12 6mm This side out 3 Mount the Mini PC R 4 3mm 3 screw 4 pcs for HDD installation 1 screw 1 screw 2 screw This side out UP ...

Страница 5: ...e right mouse button to click the sound icon on the bottom right of the desktop choose Sounds on the pop up box to change the sound playback settings Change sound playback settings Choose Playback choose current connected TV Monitor Click set default Click OK setting finished The sound will come out from the connected TV Monitor If you want to connect headphone to hear the sound please choose Spea...

Страница 6: ...tel Inside and the Intel Inside logo are trademarks of Intel corporation in the US and or other countries Windows is either a registered trademark of Microsoft corporation in the US and or other countries AWOWLIFE R Mini PC Model NYi3 Intel Broadwell U i3 5005U 2 00 GHz Intel HD Graphics 8GB DDR 128GB 256GB SSD Extend Storage 2 5 SATA HDD SSD 1TB Optional ...

Отзывы: