

Bluetooth Version
5.0
...................................................................................
- BASS/TREBLE: -7, -6, ~, 1, 0, +1,~, +6, +7
- BALANCE: L7, L6,~, L1, 0, R1,~,R6, R7
- FADER: R7, R6, ~, R1, 0, F1, ~ ,F6, F7
- EQ(Equalizer) Setting: OFF, CLASS, ROCK, POP, FLAT
- Loudness: LOUD ON/OFF
- DX/LOCAL: Enables or disables the local broadcast mode (LOCAL).
- Stereo/Mono: Switches between MONO and STEREO reception mode
for radio frequencies.
- CLOCK 12/24: Select between 12 hours and 24 hours display.
Note: If 12 hour display is selected , AM= Morning; PM= Afternoon
• Press and hold
SEL
button to access more settings options as follows:
- AF ON/OFF: Enables or disables the alternative frequency search mode.
ON: This function allows a radio to re-tune to a different frequency of the
same station when the first signal becomes too weak (e.g. when moving
out of range).
OFF: The function is deactivated.
- TA ON/OFF: Enables or disables the TA function (traffic information).
ON: TA is displayed if this function is activated. In the TA mode, once a
traffic message is received, the unit switches to the radio station from a
different mode (e. g. USB mode). The volume level will be raised during
a traffic bulletin.
OFF:
The function is deactivated.
- REG OFF / REG ON: At certain times, some stations are segmenting their
programs in regional programs with different content.
ON: Only the regional programs of the radio station will be played, or
suggested as preferences when tuning to a selected station.
OFF: Play nationwide programs as well.
- EON ON / OFF: The unit can receive RDS EON data. EON means the
transmission of additional station information within a station group.
In the event of a traffic announcement (TA) it will switch within a station
group from a non-traf-fic broadcast to the corresponding traffic radio
station of the station group.
• ON: The unit attempts to receive the EON TA information from a station
within range and thus to improve the reception quality.
• OFF: Prevents switching over to a station with too weak a signal level.
• Rotate the
VOL
knob to adjust the selected item.
Setting the Clock
Press the
CLK
button to display time. Press and hold the
CLK
button, the
hours digits start flashing on the display. Rotate the
VOL
knob to adjust the
General Operation
General Operation
General Operation
hours.Then briefly press the
CLK
button. The minute digits start flashing.
Rotate the
VOL
knob to adjust the minutes.
Finally press the
CLK
button to confirm your settings.
LCD Display
Mute On/Off
In power on mode, briefly press the
MUTE
button to toggle mute on or off.
Hands-free Microphone
Auxiliary Input Jack
SD Card
This SD card slot is designed for media playback from SD card
USB Port
The USB port of this car radio is designed for media playback from flash
memory devices and charging for iPhone / android mobile phone.
The charging current consumption is 1 ampere.
Reset
Push the
RESET
button with a thin object with a pointed end to reset all
parameters to factory default settings.This function may be used when the
LCD does not display normally or sound is distorted, or when any of controls
are disabled.
Radio Operation
Adjust the volume (VOL)
Rotate the
VOL
knob to increase or decrease the volume level.
Adjust Menu Options (SEL)
• Press
SEL
button repeatedly to cycle through the following adjustable
audio functions:
Change Bands
In radio mode, shortly press the
BAND
button to switch between the
FM1(F1), FM2(F2), FM3(F3) AM1(A1), AM2(A2) bands.
To Store / Recall Preset Stations
The radio can be stored 6 preset stations for each band (FM1, FM2, FM3,
AM1 and AM2) for a total of 30 preset stations.
- To memorize a station:
Press and hold the desired preset buttons (1-6) to save a radio station.
- To recall a preset station:
Briefly press the respective station button (1-6) to recall the corresponding
preset station.
Manual Tuning
In the radio mode:
Press and hold the or button to enter the manual tuning mode.
In manual tuning mode, briefly press the or button to search the next
or previous frequency step by step.
Seek Tuning
In radio mode, press the or button, the automatic search will start, it
will search upward or downward for the strong signal radio station within the
cuttent band. The auto searching will stop until find a station.
Automatic Store Preset station (AMS)
Press and hold the
AMS
button to store 18 FM preset stations automatically.
Automatic Preset Scan
Briefly press the
AMS
button to recall each preset station that stored in the
memories in each band.
Selecting the program type
Using the PTY function, user can select specific stations of a certain program
type. The program types are divided into two categories: Music and Speech.
• Press and hold the
PTY/MUTE
button to access PTY mode, then rotate the
VOL
knob to select the category “Music”, “Speech” or “PTY OFF” .
• Press the
SEL
buton to enter the “Music” or “Speech”, then rotate the
VOL
knob to select the PTY choice, such as News, Pop M.
• Finally press SEL button to confirm the PTY choice. If PTY is selected, the
radio starts to search for respective PTY information and stops when the
desired PTY information is found. If the desired program type is not found,
the message “NO FOUD” appears on the display.
If the PTY information does not exist, the PTY function will automatically
switch to normal mode.
USB/SD Card Operation
If you would like to playback files inside a USB stick or inside an SD card,
please insert the stick into the USB port or insert an SD card into the SD card
slot. The MP3/WMA files will be played automatically.
Note: The USB port of this car radio also supports charging for iPhone /
android mobile phone. The maximum charging ability is 5V/1A.
Select Next Track or Previous Track
In the USB
/
SD car mode, briefly press the or button to play the
next or previou track.
Faste Forward/Reverse
Press and hold the or button to fast forward or reverse a track.
Play / Pause
Press the button to interrupt the playback of a music (pause function).
Press this button again to continue the playback.
Introduction Scan
Press the
INT
button to play the first 10 seconds of all track.
Press again to stop the introduction scan, and play the current tracks.
Repeating the track
Press the
RPT
button to toggle between RPT ALL (Play all track), RPT ONE
(Continuously repeats current track) and RPT FLR (Continuously repeats all
tracks in current folder).
Playing all tracks in random
Press
RDM
once, play all tracks randomly.
Press
RDM
once again, exit from random playback.
Track/Folder Navigation
- Press the
-10
/
+10
buttons to jump 10 tracks backward or forward.
It only works when there are more than 10 tracks inside the USB stick.
- Press and hold the
-10
/
+10
button to select the previous or the next folder.
(If there are folders on the storage medium.)
Select the track or file for playback in MP3 format
a) Press and hold the
AMS
button to enter track search mode.
First “TRK0000“ will appear on the display.
b) Rotate the volume knob and select the “first number”. Then press the
button to move the “first number” to the left and enter the next number.
c) When the desired track number appears, confirm your selection by
pressing
SEL
button. If no any operation in 5 seconds,it will play the current
track.
Using this socket, it is possible to hear the sound of other playback devices
such as MP3 players, CD players etc. through the car loudspeaker.
1. Please connect the external device with a 3.5 mm stereo jack plug to the
AUX socket.
2. Press the
MODE
button repeatedly until “AUX IN” appears in the display.
3. You hear the playback from the external device via the loudspeakers.
You can adjust the volume of the external device to a comfortable level with
the volume control of this device.
Auxiliarly Operation
Bluetooth Operation
Answer a Call
When the mobile phone is called, the incoming telephone number displays
on the LCD display. press the button to answer the incoming phones.
Redial Last Dialed Number
Press and hold the button to redial the last dialed phone number.
Reject or End a Call
Press the button to reject or end the call.
Switch Audio Between Car Audio and mobile Phone
During a call, press the
VOL
knob/button to switch the audio source from the
car audio system back to your mobile phone.
Adjust Call Volume
During a talk, use
VOL
knob to adjust the call volume level.
Audio Streaming (A2DP)
This head unit supports A2DP (advanced audio distribution profile) wireless
streaming audio from a Bluetooth mobile device directly to your head unit.
The following functions can be used to control the music playback.
•
Skip to Next music
Press the button to play the next music in the mobile phone.
•
Skip to Previous music
Press the button to previous music in the mobile phone.
•
PLAY/PAUSE
Press the button to pause or restore the music playback.
Bluetooth Operation
Pair and Connect
Before using a Bluetooth device for the first time, it must be paired and
connected.
1. This head unit broadcasts the pairing signal constantly when no devices
are connected. User can complete the pairing steps from your Bluetooth
device. Refer to owner’s manual for your device for more details.
2. When the phone finds the car audio system, the “AWAVE AWP-200” name
will be displayed. Choose the “AWAVE AWP-200” from the device list to
pair and connect with the car audio system. Upon confirming, the BT logo
will stop flashing.
Making a Call
To make a call, dial the call directly from the paired mobile phone.
Specifications
General
Power Supply Requirement ..................................................DC 12 V
Chassis Dimensions.............................178(W) x 108(D) x 50(H) mm
Current Consumption ...........................................................10A MAX
Maximum Power Output .................................................. 50W x 4CH
Radio
FM
Frequency Range
..........................87.5 - 108.0 MHz (
100 KHz/Step
)
Usable Sensitivity ....................................................................30 dBu
I.F. Frequency ......................................................................10.7 MHz
AM
Frequency Range
............................... 531 - 1602 MHz (
9 KHz/Step
)
Usable Sensitivity ................................................................... 20 dBu
I.F. Frequency .......................................................................450 KHz
USB/SD
Usable Audio Formats ........................................................MP3/WMA
Pre-amp Output
..........................................................Front and Rear
Frequency Response ................................................ 20 Hz - 20 KHz
S/N Ratio ....................................................................................60dB
BT
BT Profile supports
Range of frequency
A2DP, AVRCP, HFP
2.4GHz
.................................................
......................................................................
USB Port Type................................................................................2.0
USB Charging............................................................................5V/1A
Card Type..............................................................................SD Card
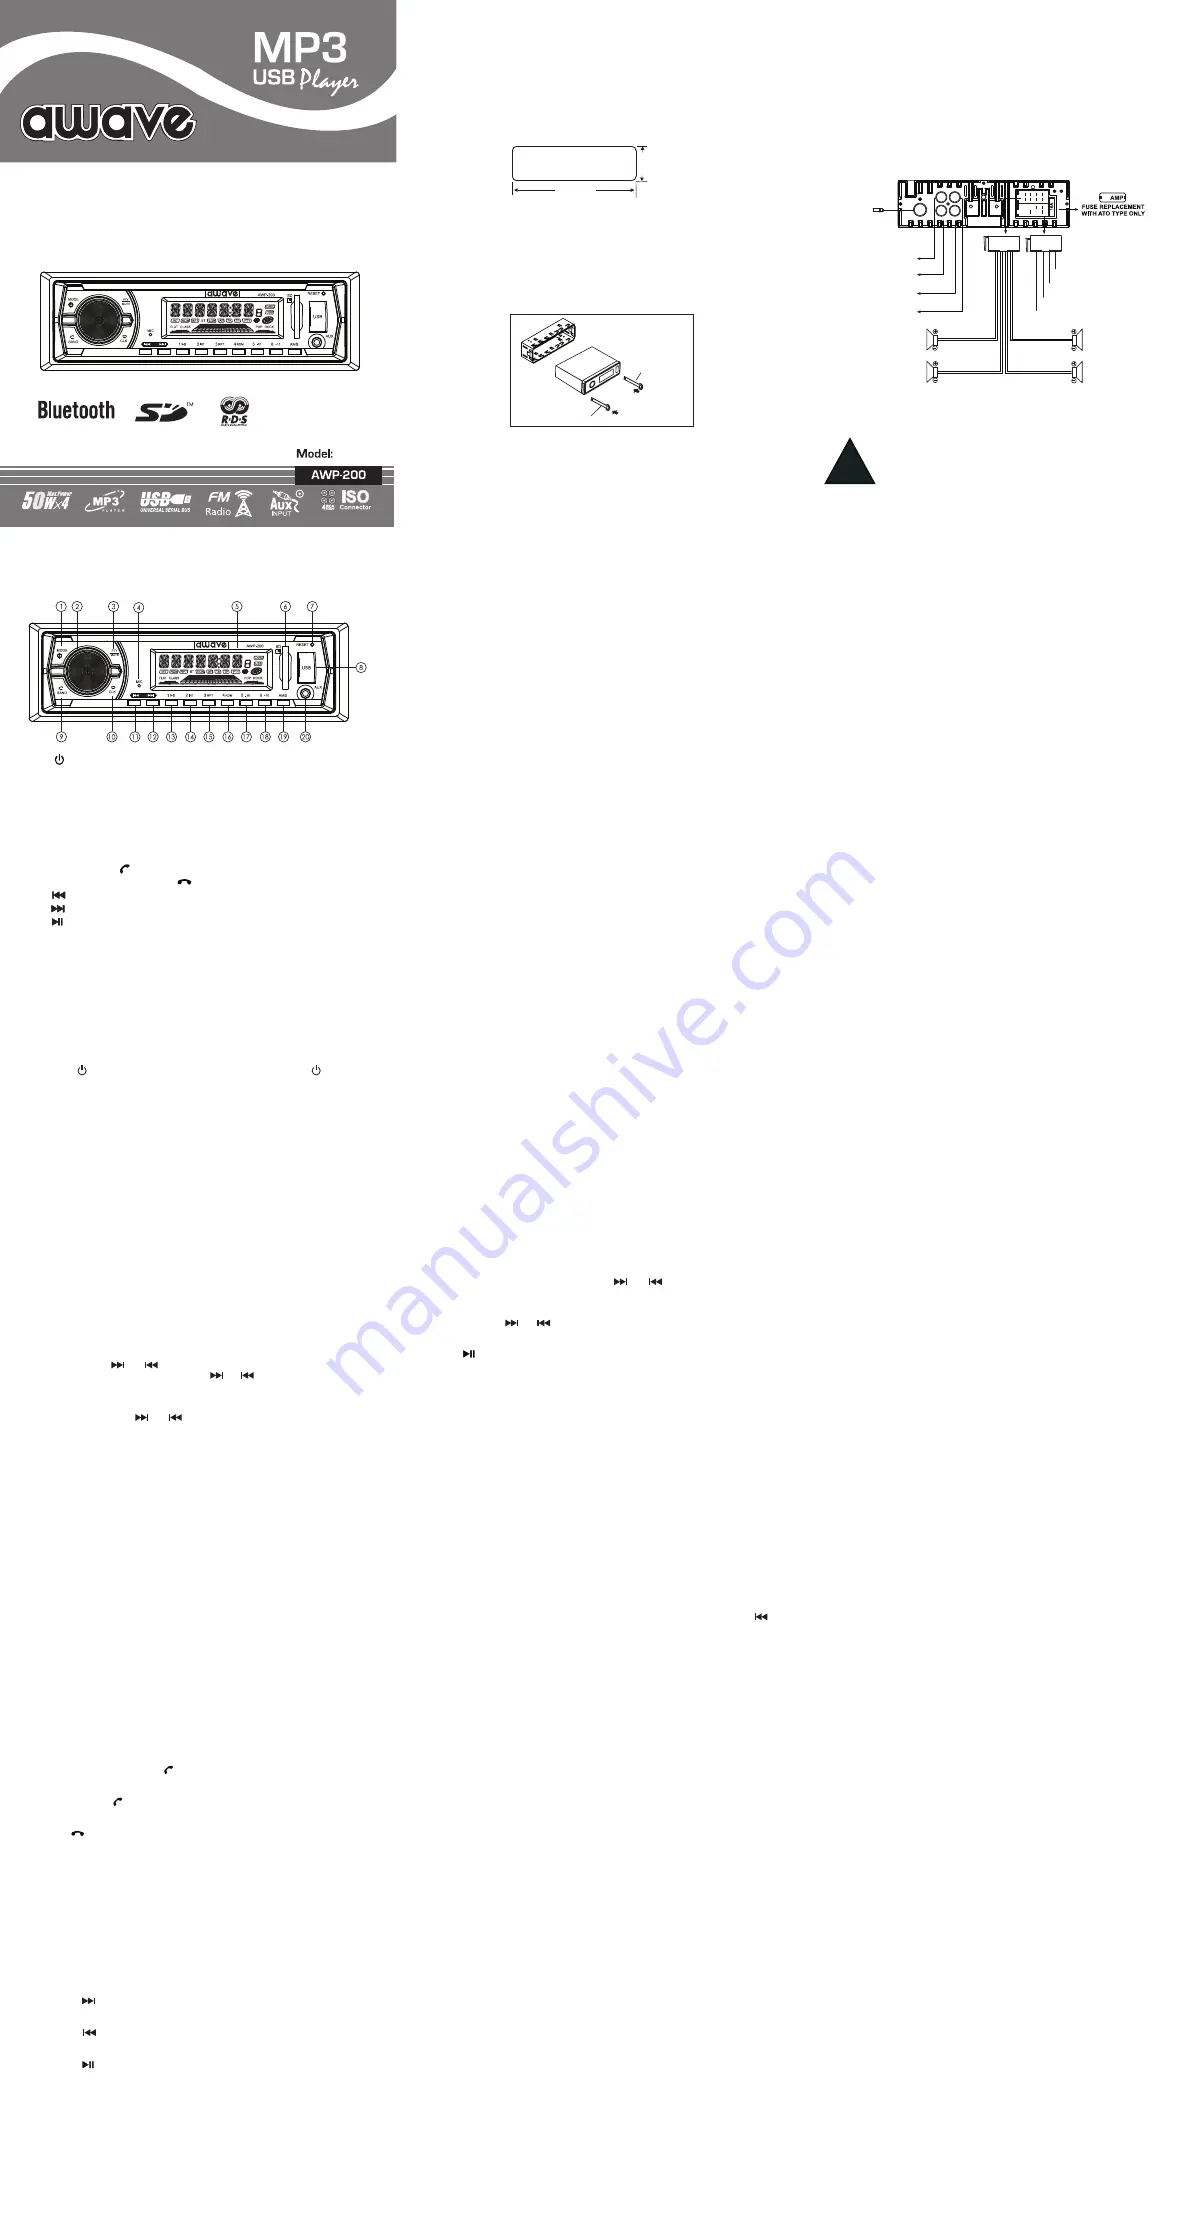
1. (Power on/off) / MODE (Mode selector) button
2. VOL(volume) Knob, SEL(Audio/menu) button
3. MUTE button, PTY(Program Type) button
4. Hands-free Microphone
5. LCD Display
6. SD Card Slot
7. Reset button
8. USB Port
9. BAND button, (Answer Call) button
10. CLK (clock setting) button, (End call) button
11. (tune/seek down, previous track, fast reverse) button
12. (tune/ seek up, next track, fast forward) button
13. (pause/play), Preset station 1 button
14. INT (intro), Preset station 2 button
15. RPT (repeat), Preset station 3 button
16. RDM (random), Preset station 4 button
17. -10(previous 10 tracks), previous folder, Preset station 5 button
18. +10(next 10 tracks), next folder, Preset station 6 button
19. AMS(auto store / preset station scan, auto music search) button
20. AUX IN (auxiliary input) jack
Installation
Installation
Installation Procedures
First complete the electrical connections and then check for correctness.
Connect all wiring harness and slide the head unit into the mounting
collar until it clicks into place.
Installation Opening
This unit can be installed in any dashboard Having an opening as shown
below.
To Install the Car Radio
Be sure you test all connections first, and then follow these steps to install this
unit.
1. Make sure the ignition is turned off, and then disconnect the cable from the
vehicle battery’s negative (-) terminal.
2. Disconnect the wire harness and the antenna.
3. Insert the two bracket keys into the left and right side of the chassis, as
shown the below figure to separate the chassis from the housing.
53 mm
182 mm
- Only use speakers with 4 ohms impedance.
- +12V DC Negative Ground.
- The maximum current of the Amp remote trigger is 200mA.
!
Wiring Connections
10
Red: Front Right PRE-AMP Output
White: Front Left PRE-AMP Output
White: Rear Left PRE-AMP Output
Red: Rear Right PRE-AMP Output
Radio Antenna
ACC + (Red)
GND - (Black)
ANT + (Blue)
Power B + (Yellow)
Purple
Rear Right Speaker
Front Right Speaker
Rear Left Speaker
Front Left Speaker
Purple/Black
Green/Black
White
White/Black
Gray
Gray/Black
Green
Bracket key
Bracket key
4. Insert mounting sleeve into the dashboard and bend the mounting tabs out
with a screwdriver. Make sure that the lock lever is flush with the mounting
sleeve and is not projecting beyond.
5. Insert car radio into the mounting sleeve.
6. Make wiring connections, as illustrated in the “Wiring Diagram.”
7. Install the plastic outer trim ring.
ANT
F-R
R-R
F-L
R-L
Overview of the Controls
Turn Unit on/off, Change the Source
• Press the button to turun on the unit. Press and hold the
button to
turn off the unit.
• Press the
MODE
button to select the different modes: Radio, USB(with USB
device inserted), SD(with SD card inserted), AUX-IN(auxiliary input) and
BT(Bluetooth) modes.
CAR STEREO AM/FM RADIO, MP3/USB/SD CARD PLAYER
USER’S MANUAL