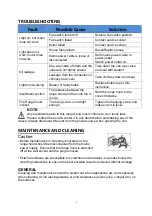
Award CS1-903S Скачать руководство пользователя страница 9


TROUBLESHOOTING


Fault 

Possible Cause 

Solution 

Light on, but motor 
does not work 

Fan switch turned off 

Select a fan switch position. 

Fan switch failed 

Contact service center. 

Motor failed 

Contact service center. 

Light does not 
work, motor does 
not work 

House fuses blown 

Reset/Replace fuses. 

Mains power cable is loose or 
disconnected 

Refit mains power cable to 
power outlet. 
Switch power outlet on. 

Oil leakage 

One way valve (if fitted) and the 
outlet are not tightly sealed 

Take down the one way valve 
and seal with sealant. 

Leakage from the connection of 
chimney and cover 

Take chimney down and seal. 

Lights not working 

Broken or faulty bulbs 

Replace blubs as per this 
instruction. 

Insufficient suction 

The distance between the 
range hood and the cook top is 
too far 

Refit the range hood to the 
correct distance. 

The Range hood 
inclines 

The fixing screw is not tight 
enough 

Tighten the hanging screw and 
make sure it is level. 

NOTE:  

Any electrical repairs to this range hood must conform to your local, laws. 
Please contact the service center if in any doubt before undertaking any of the 

above. Always disconnect the unit from the power source when opening the unit. 


MAINTENANCE AND CLEANING


Caution:


• Before maintenance or cleaning is carried out, the 

range hood should be disconnected from the mains 
power supply. Ensure that the range hood is switched 
off at the wall socket and the plug removed. 


• External surfaces are susceptible to scratches and abrasions, so please follow the 

cleaning instructions to ensure the best possible result is achieved without damage. 


GENERAL 

Cleaning and maintenance should be carried out when appliances are cold especially 
when cleaning. Avoid leaving alkaline or acid substances (lemon juice, vinegar etc.) on 
the surfaces. 


Содержание CS1-903S

Страница 1: ...1 CS1 903S Range Hood Instruction Manual ...

Страница 2: ...2 Version No V20200710 Content 1 Safety instructions 2 Installation 3 Start using your range hood 4 Troubleshooting 5 Maintenance and cleaning 6 Environment protection ...

Страница 3: ... range hood is located above a gas appliance this distance shall be at least 65 cm The air must not be discharged into a flue that is used for exhausting fumes from appliances burning gas or other fuels Always to do Important Always switch off the electricity supply at the mains during installation and maintenance such as light bulb replacement The range hood must be installed in accordance with t...

Страница 4: ...ts Children younger than 8 years old should stay away unless they are under permanent supervision There shall be adequate ventilation of the room when the range hood is used at the same time as appliances burning gas or other fuels There is a fire risk if cleaning is not carried out in accordance with the instructions Regulations concerning the discharge of air have to be fulfilled Clean your rang...

Страница 5: ... the outlet 2 The range hood should be placed at a distance of 65 75cm above the cooking surface for the best effect 3 Install the hook on a suitable place once the installation height is set and keep it level The fixed position of the inside chimney bracket is the location of chimney See pic 2 4 Install the expansion pipe on the outlet as shown below Fix the expansion pipe on the outlet with a ca...

Страница 6: ... Install the chimney on the range hood and lead the expansion pipe to the outside See Pic4 6 Adjust the height of the inside chimney to the position of the inside chimney bracket and fix on it with 2pcs ST4 8mm screws after adjusting the position fix the body with safety screws Note The two safety vents are positioned on the back housing with a diameter of 6mm See Pic4 5 ...

Страница 7: ...lation system which is being used for any other appliance such as warmer tube gas tube and hot wind tube The angle of the bend of the expansion pipe should not be less than 120º you must direct the pipe horizontally or alternatively the pipe should go up from the initial point and should be led to an outer wall After the installation make sure that the range hood is level to avoid grease collectio...

Страница 8: ...play will indicate as 1 2 3 1 2 circularly 3 Press Lamp button the light is on press this button again the light is off Please note the Lamp is not controlled by the on off button 4 When the range hood is working press the Timer button and the range hood will start counting down for 9 minutes LED display show 9 8 7 6 etc then stops automatically and the lamp will extinguish When pressed Timer butt...

Страница 9: ...he range hood to the correct distance The Range hood inclines The fixing screw is not tight enough Tighten the hanging screw and make sure it is level NOTE Any electrical repairs to this range hood must conform to your local laws Please contact the service center if in any doubt before undertaking any of the above Always disconnect the unit from the power source when opening the unit MAINTENANCE A...

Страница 10: ...rgents or products containing abrasives as this will affect the appearance of the range hood and potentially remove any printing of artwork on the control panel and will void manufactures warrantee GREASE MESH FILTERS The mesh filters can be cleaned by hand Soak them for about 3 minute in water with a mild detergent and then brush gently with a soft brush Do not apply too much pressure so as to av...

Страница 11: ... socket NOTE Make sure the filter is securely locked Otherwise it would loosen and cause danger When activated carbon filter attached the suction power will be lowered BULB REPLACEMENT Important The bulb must be replaced by the manufacturer its service agent or similarly qualified persons Always switch off the electricity supply before carrying out any operations on the range hood When handling bu...

Страница 12: ...ing wire out and dismantle the terminal of the light connecting wire See pic 2 Way 2 Use straight screwdriver to prize up the LED light bottom edge see pic 3 then slightly pull out the LED light and light connecting wire See pic 2 Apply the reverse procedure to install the light back ILCOS D code for this lamp is DSS 1 5 65 S 120 33 LED modules rectangle lamp Max wattage 2 1 5 W Voltage range DC 1...

Страница 13: ...r more information please contact your local or regional authorities NOTE The following shows how to reduce total environmental impact e g energy use of the cooking process 1 Install the range hood in a proper place where there is efficient ventilation 2 Clean the range hood regularly so as not to block the airway 3 Remember to switch off the range hood light after cooking 4 Remember to switch off...

Страница 14: ...dential dwelling shall reduce the warranty period to three 3 months from date of purchase 4 That the product was purchased and installed in the North or South Islands of New Zealand This Warranty does not extend to a Lamps LED filters blockages restrictions incorrect detergents incorrect or poor installations incorrect use b Back feeding from waste disposal units vermin insect damage or transit pr...

Страница 15: ...15 ...

Отзывы: