background image

#

Accessory

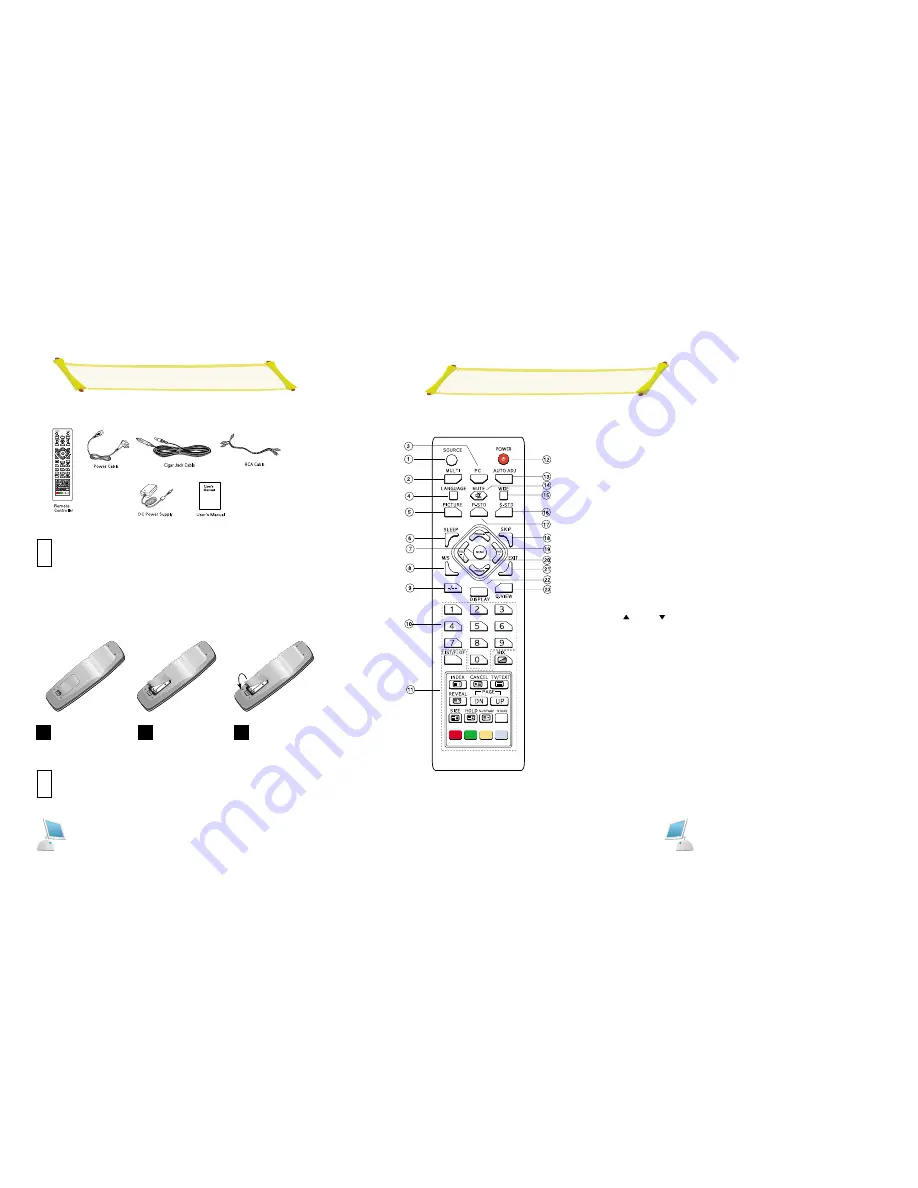
Remote Control Unit

"$

1. 

SOURCE

Button

2. 

MULTI

Button

3. 

PC

Button 

4.

LANGUAGE 

Button

5. 

PICTURE 

Button 

6. 

SLEEP

Button

7. 

MENU

Button

8. 

M/S

Button 

9. 

Two digit 

Button

10. 

Numeric

Buttons  

11.  

Teletext

Buttons

12. 

POWER

Button 

13. 

AutoADJ 

Button 

14. 

MUTE

Button

15. 

WIDE 

Button(Not available)

16. 

S-STD

Button 

17. 

P-STD

Button

18. 

SKIP

Button

19.  

PROGRAM

Up(

) / Down( 

)Button

20. 

VOLUME

Up(+) / Down(-) Button

21. 

EXlT

Button

22. 

DISPLAY

Button

23. 

Q-VIEW

Button 

You must insert or replace the batteries in the remote controller when you:

Purchase the set.
Find that the remote controller is no longer operating correctly.

Remove the cover of the
remote controller by pressing
the symbol and pulling the
cover space in the direction
of the arrow.

Insert 2 batteries(AAA size),
taking care to respect the
polarities.

Replace the cover by put in
it in the direction of the
arrow.

You can use your remote controller within a distance of 7-10m and an angle of 30
degrees from the left and right sides of the remote controller receptor of your monitor. 

1

2

3

!

Power Sources-This product should be operated only from the type of power source
indicated on the marking label. If you are not sure of the type of power supply to 
your car, consult your product dealer.

!

Содержание LT20D

Страница 1: ...TFT LCD TV User s Manual Part No 51cm TFT LCD TV LT20D ...

Страница 2: ... ...

Страница 3: ...djusting the Picture Settings 18 SOUND SELECTION Changing the Sound Standard 19 Adjusting the Sound settings 19 Selecting the Sound mode depending on TV mond 20 Adjusting the Volume Switching the Sound off Temporarily 20 SETUP SELECTION Setup Setting Auto Program 21 Setup Setting Manual Program 22 Setup Setting Program Edit 23 TIME SELECTION Time Setting 24 FUNCTION SELECTION Function Setting 25 P...

Страница 4: ...r that clean it with dry cloth to remove any stain Thank you for purchasing our product Before using it please read this user s manual carefully and apply it correctly and safely Please keep this manual close to you so you can refer to it anytime after reading it Also for the transportation of the product please attach this manual without fail Please observe the notes below 1 Use at the rated powe...

Страница 5: ...ly with S VIDEO 7 S VIDEO S Video signal from an S VHS VCR or laserdisc player 8 ANTENNA JACK Connect to an antenna or a cable TV system Rear Front Panel Front 1 TV VIDEO Display a menu of the available input sources 2 MENU Display the main on screen menu Exit from sub menu 3 VOL Press the increase or decrease the volume Also used to increase or reduce the value of a menu option 4 PROG Press PROG ...

Страница 6: ...ou Purchase the set Find that the remote controller is no longer operating correctly Remove the cover of the remote controller by pressing the symbol and pulling the cover space in the direction of the arrow Insert 2 batteries AAA size taking care to respect the polarities Replace the cover by put in it in the direction of the arrow You can use your remote controller within a distance of 7 10m and...

Страница 7: ...utton Sound Selection Basic Remote Control Operation 9 Tow digit Button 1 key selects one digit 0 to 9 or two digit program number 10 to 99 2 or is displayed by turns on the upper right position if you press this key repeatedly 3 You can choose one digit program number if is shown and two digit program number if shewn ex1 Press 7 if you d like watch program number 7 ex2 Press 1 7 if you d like to ...

Страница 8: ...rogram number will change from yellow to red 3 If you want to watch the skipped program number use 10 digit key to view it then press SKIP button or operate AUTO PROGRAM in setup 19 Program up down Button 1 It is used to select the channel you want to watch on either upward or downward direction 2 It makes the cursor to move while in main MENU 20 Volume up down Button 1 It adjusts the volume level...

Страница 9: ...T Make sure that the set s MAIN POWER is switched OFF before connecting it to power After use the AC Adapter should be unplugged from the AC supply and detached from the set Home Power connecter AC ADAPTER TO DC INPUT JACK Connecting to Home Power To view television channels directly a signal must be received by the set from one of following sources An outdoor aerial An indoor aerial not recommend...

Страница 10: ...t The PICTURE MODE menu is active 3 Use the PROG or PROG button to select setting menu 4 Press the VOL button Result The Contrast menu is displayed Result The Brightness menu is displayed Result The Colour menu is displayed Result The Sharpness menu is displayed 5 Adjust to satisfy your preference by pressing the VOL or VOL button 6 Press the TV MENU button twice to exit and save the changes Chang...

Страница 11: ...djusting the Sound settings Selecting the Sound Mode depending on TV mode The M S button displays controls the processing and output of the audio signal When power is switched ON the mode is automatically preset to either Dual or Stereo depending on the current transmission If the receiving conditions deteriorate listening will be easier if the mode is set to the Mono position using the M S button...

Страница 12: ...tically 9 When searching and storing is complete AUTO PROGRAM menu is displayed 10 Press the PROG button Result The Color System menu is displayed 11 Press the VOL or VOL to select the broadcast color system which you want AUTO PROGRAM Setup Setting When storing Channels manually you can choose whether or not store each of the channels found The number by which you wish to identify each stored cha...

Страница 13: ...ROG button to select ON CHANNEL settingON TIME and OFF TIME Result About clock setting menu is completed 9 Press the PROG or PROG button to select ON VOLUME Result About clock setting menu is completed A Au ut to om ma at ti ic c P Po ow we er r O Of ff f F Fu un nc ct ti io on n Turned off automatically after minutes in the absence of picture signal Setup Setting You can create channel list at th...

Страница 14: ...he number of pixels Phase Sets the focus of screen Adjusts when some noise exists or the character lines are seen overlapped H Position V Position Adjusts the horizontal Vertical focus of screen When you are satisfied with the settings press the MENU button repeatedly to return to normal viewing Language Setting 1 Press the Menu button 2 Press the PROG or PROG buttons to select FUNCTION 3 Press th...

Страница 15: ...g a PC 1 Turn off your computer and LCD TV 2 Connect a PC D sub DVI cable between your PC and PC VIDEO IN of the LCD TV And then fasten the screws of both sides of the cable 3 Connect a PC Audio cable between the sound output jack of the sound card on a PC and the PC AUDIO IN of the LCD TV 4 Power on the computer before turning on the LCD TV 1 Power on your LCD TV by pressing the POWER but ton on ...

Страница 16: ...ay Both teletext information and the normal broadcast Hidden text answers to quiz games for example The normal screen The next page The previous page FLOF LIST select Press the TV TEXT REVEAL REVEAL again PAGE UP PAGE DOWN FLOF LIST Displaying Teletext Information NOTE The teletext feature dose work with TV AV S Video signals You can watch teletext information at any time but sig nal reception mus...

Страница 17: ...olored buttons on the remote control 1 Display the teletext contents page by pressing the TV TEXT button 2 Press the colored button corresonding to the topic that you wish to select The available topics are listed on the status information line Result The page is displayed with additional color coded information that can be selected in the same way 3 To display the Press the Previous page Red butt...

Страница 18: ...is too light or too dark Vertical bars appear to flicker jitter or shimmer on the image Horizontal bars appear to flicker jit ter or shimmer on the image Screen is blank Image is not stable and may appear to vibrate Image is not centered on the screen Suggested Actions Ensure that the power cord is firmly connected and the LCD TV is on Ensure that the signal cable is firmly connected to the PC or ...

Страница 19: ...ension Panel In Out TV Signal Others 20 1 TFT Color LCD 408 0mm x 306 0mm 16 7 million 0 6375 x 0 6375 x RGB mm 640 x 480 Analog RGB 15 pin D sub PC Audio Input Composite Input S Video In DVD Y Pb Pr Input Composite Input PC Input Component Y Pb Pr RCA 75 ohm Coaxial cable PAL SECAM B G D K I NICAM A2 TELETEXT CE 50W 3W x 3W DDC 2 B On Screen Display Menu Net 9Kg Gross 11Kg AC 100 250V Yes with st...

Страница 20: ... ...

Отзывы: