background image

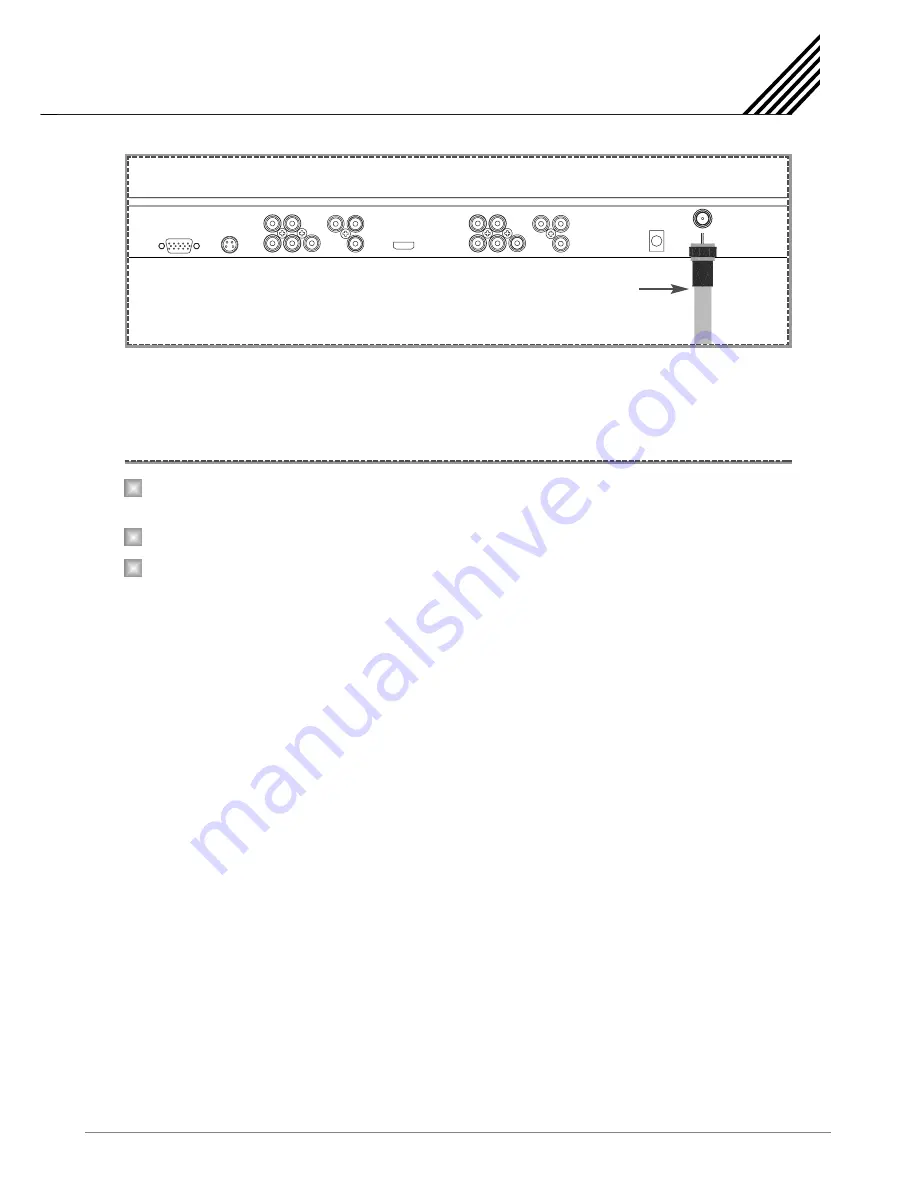
Connecting the TV Cable

17

Connect the TV Antenna cable to the TV input jack. Press TV/AV button on the remote control and select
TV on OSD.

Use 

‚›

button or numeric button to change TV programme for your programme selection. 

Also, you can tune to cable service provided programmes using the cable box. For further information 
regarding cable TV service, contact cable TV service provider(s). 

TV Antenna Cable

Connection the TV Cable

1

2

3

Содержание CM-P42PCN

Страница 1: ...Operation Manual CM P42PCN 42 Plasma 12 Months Warranty 2007 07 28 Ver1 0 ...

Страница 2: ...User S Manual 106cm PDP TV ...

Страница 3: ...AWA Hot Iine 1300 366 144 ...

Страница 4: ...ng the TV Cable 17 Connecting the VCR 18 Connecting the DVD 19 Connecting the Set Top Box 20 Connecting the PC D Sub 21 Displayable TV Specification 22 Basic Operation 23 Turning TV On Off 23 Select Source 23 Changing Picture Mode 24 Color Temperature Setting 25 DNR Digital Noise Reduction Setting 26 Advance Setting 26 Adjusting the Equalizer 27 Editing the Channels 28 Searching and Label 28 Progr...

Страница 5: ...ting 31 Other Signal Source Setting AV S VIDEO 32 Other Signal Source Setting HDMI COMPONENT 32 Other Signal Source Setting VGA 33 Specification 42 PDP 35 Timer Setting Function Setting Other Signal Source Setting Troubleshooting 34 Specification ...

Страница 6: ...es cause harmful interference to radio or television reception which can be determined by turning the equipment off and on the user is encouraged to try to correct the interference by one or more of the following measures Reorient or relocate the receiving antenna Increase the separation between the equipment and receiver Connect the equipment into an outlet on a circuit different from that to whi...

Страница 7: ... plug does not fit into your outlet consult an electrician for replacement of the obsolete outlet 10 Protect the power cord from being walked on or pinched particularly at plugs convenience receptacles and the point where they exit from the apparatus 11 Only use the attachments accessories specified by the manufacturer 12 Use only with a cart stand tripod bracket or table specified by the manufact...

Страница 8: ...g electrodes and requirements for the grounding electrode Setting CAUTION Follow all operating and use instructions Do not use the TV where contact with or immersion in water is a possibility such as near bath tubs sinks washing machines swimming pools etc Avoid overhead power lines An outside antenna system should not be placed in the vicinity of overhead power lines or other electric light or po...

Страница 9: ...ntilation to protect it from overheating Do not block these openings with any object and do not place the TV on a bed sofa rug or other similar surface Do not place it near a radiator or heat register If you place the TV on a rack or bookcase ensure that there is adequate ventilation and that you ve followed the manufacturer s instructions for mounting NO This TV is designed to be mounted horizont...

Страница 10: ...e a damp cloth do not use liquid or aerosol cleaners Unplug the TV from the wall outlet and disconnect the antenna or cable system during a lightning storm or when left unattended and unused for long periods of time This will prevent damage to the unit due to lightning and power line surges NO AC100 125V AC200 240V AC240 SAA TYPE NO Protect the power cord Power supply cords should be routed so tha...

Страница 11: ...d by the manufacturer or those that have the same characteristics as the original part Unauthorized substitutions may result in additional damage to the unit If you make adjustments yourself adjust only those controls that are covered by the operating instructions Adjusting other controls may result in damage and will often require extensive work by a qualified technician to restore the TV to norm...

Страница 12: ...y use the specified batteries This make cause damaged the TV or could give an electric shock More than two people are necessary to move or take off the package due to the product s weightiness Otherwise it can cause personal injury Keep the batteries out of reach of children when exchanged Seek urgent medical advice if child swallows a battery The distance between eyes and the screen should be abo...

Страница 13: ... multiple input sources such as TV SCART S VIDEO AV COMPONENT VGA and HDMI StTAND BY ON OFF Turn the TV on and off MENU SET Call the OSD Menu Front Panel OSD Button CH CH VOL VOL MENU INPUT POWER 1 2 3 4 5 6 7 Remote Control Power Cord Alkaline Batteries Owner s Manual Accessories Composite Cable ...

Страница 14: ...12 Viewing the Connecting Panel Back Panel and Jacks VGA S VIDEO COMPONENT 1 AV 1 HDMI 7 8 6 9 1 2 3 4 5 COMPONENT 2 AV 2 PC AUDIO IN TV ANTENNA Back panel of the TV ...

Страница 15: ...tive pages fast which are indicated in the last row of current teletext page 16 9 Adjust aspect setting TXT CC Display TELETXT signal mixing teletext page with TV signal close teletext PICTURE Call out picture mode menu and adjust the picture mode Channel up Channel down Volume up Volume down SOUND Call out sound mode menu and adjust the sound mode INDEX Request index page LUCIDITY Switch to the T...

Страница 16: ... mode BUTTON Switch to the last channel DISPLAY Call out info menu MENU The button to enter into or exit from menu OK to confirm that what made choice EXIT Exit the menu SUBPAGE Some page attach sub page Press SUB PAGE button to view the sub pages SIZE Remove the Teletext program REVEAL Show the hidden words 15 16 17 18 19 20 21 22 23 24 25 26 Button Description ...

Страница 17: ...er and slide in the direction of the arrow Load two AAA batteries taking care that the and ends face the correct direction Close the cover until it clicks Loading the Batteries Reception Range of Remote Control 1 2 3 Left 5m Front Right Upper Lower ...

Страница 18: ...an be installed on the desk as shown above Table stand mount minimum allowable clearances for adequate ventilation 1 18 inch Min 3cm The TV can be installed on the wall as the picture above 1 18 inch Min 3cm Install this TV a only in a location where adequate ventilation is available 4 inch 10 16cm 2 36 inch 5 99cm 4 inch 10 16cm 4 inch 10 16cm ...

Страница 19: ...trol and select TV on OSD Use button or numeric button to change TV programme for your programme selection Also you can tune to cable service provided programmes using the cable box For further information regarding cable TV service contact cable TV service provider s TV Antenna Cable Connection the TV Cable 1 2 3 ...

Страница 20: ...acks of the VCR and the TV Press TV AV button on the remote control and select video sources Insert a video tape into the VCR and press the PLAY button on the VCR Connecting the VCR 1 2 Watching VCR AV Input S VIDEO Input S VIDEO SOUND of S VIDEO AV AV Input Notes To avoid picture noise interference leave an adequate distance over 3m between the VCR and TV When connecting the TV with external equi...

Страница 21: ... picture quality if you connect DVD player with component input sockets as below How to Use Connecting the DVD 1 2 HDMI COMPONENT 1 2 COMPONENT 1 2 Notice Normal DVD source is based on 480i which should be through normal Y Pb Pr of component signal It may occur screen noise blank screen in case of using HDMI Cable unauthorized by ATC It may easily occur as specially HD signal 720p or 1080i input S...

Страница 22: ... component cables to the component jacks of the STB and the TV Connect L White and R Red sound cables Composite to the sound jacks of the STB and the TV With HDMI Connect a HDMI cable to the HDMI jacks of the STB and the TV With RGB Connect a D Sub cable to the AV video jacks of the STB and the TV Connect L White and R Red sound cables Composite to the sound jacks of the STB and the TV 480i 60Hz 4...

Страница 23: ...Turn on the PC and check for the PC requirement Adjust the PC screen in Position menu See 22 page 1 2 3 D Sub 15pin VGA from PC 1 2 3 4 5 6 7 8 9 10 11 12 13 14 15 Red R Green G Blue B Grounding Grounding DDC Red R Grounding Green G Grounding Blue B Grounding Reserved Sync Grounding Grounding Data DDC Horizontal sync Vertical sync Clock DDC Pin No Description Connecting a PC to the TV Pin Configur...

Страница 24: ...y Hz Notes Synchronization input form separate The TV recognizes 640 x 480 60Hz signal as 480p DTV signal So the signal is expanded please try other signals like 640 x 480 75Hz The TV operates abnormally if a non standard video format is selected Depending on the manufacturer your PC screen might appear differently and depending on your particular version of Windows Check your PC instruction book ...

Страница 25: ...trol to display main menu Press button to highlight the desired menu item Press button to enter into selected menu itm Press MENU button to go back Press button to change the settings Press MENU or EXIT button to exist menu Select DVB to watch DTV and refer to operation on page 34 optional Turning the TV On Off Select Source 1 2 3 4 TV AV1 AV2 SVIDEO COMPONENT1 COMPONENT2 VGA HDMI Source Select 5 ...

Страница 26: ... MENU button to exit and press again to go back to the previous menu The operation of Brightness Saturation and Sharpness takes same step with Contrast Contrast sets difference between bright and dark area of picture Brightness sets brightness of picture Saturation sets richness of color Sharpness sets vividness of picture PICTURE Contrast Brightness Saturation Sharpness Colour Temp DNR 0 0 0 0 Au...

Страница 27: ...ain to return to the previous menu after adjustment PICTURE Contrast Brightness Saturation Sharpness Colour Temp DNR 0 0 0 0 Auto MENU Return Exit EXIT 1 2 3 4 Color Temperature Setting Normal sets common picture Warm sets picture with strong red Cool sets picture with strong blue User sets user mode Colour Temp Mode Red Green Blue User 8 20 11 MENU Return Exit EXIT Notes Value of Red Green Blue c...

Страница 28: ...f previous menu Press to enter submenu which has 4 items to be selected and turned on off Press Menu button to exit and press again to return to previous menu DNR Digital Noise Reduction Setting 1 2 3 4 High reduces highly noise of picture Mid reduces mid noise of picture Low reduces low noise of picture Auto reduces automatically noise of picture according to picture quality PICTURE Contrast Brig...

Страница 29: ... 3KHz and 10KHz of Audi Please press MENU button to exit after setting is done Other menu can be selected as same way Adjusting the Equalizer 1 2 3 4 SOUND Balance Volume AVL Surround Equalizer 0 30 Off Spatial MENU Return Exit EXIT Balance adjusts audio balance between left an right channel Volume adjusts size of volume AVL is auto volume control Surround adjusts surround sound Equalizer 100Hz 33...

Страница 30: ... you select this item press button to enter submenu Then you press button to add a name for the selected channel SETUP Skip Auto Search Manual Search AFT Label Program Edit MENU Return Exit EXIT Editing the Channels SETUP Channel Colour System Sound Sysytem Skip Auto Search Manual Search 02 Auto D K Off 065 75MHz MENU Return Exit EXIT 1 Channel sets TV channel Color System sets color mode Sounds S...

Страница 31: ...utton to finish the function You can found out that channel 1 and 2 are exchanged Then press MENU to return the previous menu 1 2 Program Edit BCDEFH AAAA Sorting And Favorite Channel Label 1 2 3 4 5 6 MENU Return Exit OK EXIT Select Favorite AAAAA BCDEFH Sorting And Favorite Channel Label 1 2 3 4 5 6 MENU Return Exit OK EXIT Select Favorite 3 AAAAA BCDEFH Sorting And Favorite Channel Label 1 2 3 ...

Страница 32: ...sh every minute Off Time sets off time If off time reaches same as current time TV will be turned off On Time sets on time If on time reaches same as current time TV will be turned on and special channel will be played On Program designates special program to be played from standby Timer Mode can be set 3 modes to be selected off once every If off is selected TIMER function will be closed If once ...

Страница 33: ...ower Manage Panel Lock Transparency Reset On Off Off Off 0 MENU Return Exit EXIT 1 Language sets the OSD language Country sets country which is useful for auto searching and teletext language Zoom sets screen rate 16 9 4 3 etc Blue Screen sets blue screen on off for no signal Low Power Mode sets panel brightness Power Manage sets the time of turning off TV if there is no action for long time Panel...

Страница 34: ...button to select source of HDMI and COMPONENT1 COMPONENT2 Press MENU button to display main and find out SETUP menu by pressing button SETUP Colour System Auto MENU Return Exit EXIT Other Signal Source Setting AV S VIDEO 1 2 3 1 2 TV AV1 AV2 SVIDEO COMPONENT1 COMPONENT2 VGA HDMI Source Select Other Signal Source Setting HDMI COMPONENT SETUP H Position V Position Reset MENU Return Exit EXIT 0 0 TV ...

Страница 35: ... to switch sound mode You can press POWER button to switch the TV between normal and standby status You can press RECALL button to return to last source You can press DISPLAY button to display current source information You can press numeric button 0 9 to play TV channel Other Signal Source Setting VGA TV AV1 AV2 SVIDEO COMPONENT1 COMPONENT2 VGA HDMI Source Select SETUP H Position V Position Auto ...

Страница 36: ...tlet Plug another product s power cord into the wall outlet where the TV s power cord was plugged in Press the VOL button Check the audio input signal Check to see if there is any object between the Plasma Display and the remote control causing obstruction Check to see if the batteries are installed with the correct polarities Check the digital signal strength and input antenna Keep a certain dist...

Страница 37: ...ue RGB D Sub 15 Pin x 1 HDMI 1 PC AUDIO IN 1 TV Video PAL SECAM Sound B G D K I L MTS NICAM Mono Setero Dual TV Tuning Auto Manual Search Channel Name Edit Sound Setting Bass Treble Balance AVL Surround Teletext Level 2 5 100 Pages Dimension Weight 1050mm W x 360mm H x 800mm D 37 kg Power Consumption AC 100 240V 50 60Hz 360Watt Max Audio Output 10W 10W Features Conrast Brightness Color Sharpness T...

Страница 38: ......

Страница 39: ...Information Label Back View_ Connection Layout ...

Страница 40: ...Back View_ Connection Layout ...

Страница 41: ...Back View_ Connection Layout ...

Страница 42: ...2007 07 28 P2 11 VIDEO MENU User can adjust picture settings in this menu Use UP DOWN keys to scroll between items User LEFT RIGHT keys to adjust the values ...

Страница 43: ...2007 07 28 P3 11 AUDIO MENU User can adjust audio settings in this menu Use UP DOWN keys to scroll between items User LEFT RIGHT keys to adjust the values ...

Страница 44: ...2007 07 28 P4 11 SEARCH MENU User can perform auto or manual search in this menu Use UP DOWN keys to scroll between items User LEFT RIGHT keys to adjust the values or starts searching ...

Страница 45: ...2007 07 28 P5 11 SCREEN MENU PC MODE User can fine tune monitor settings in this menu Use UP DOWN keys to scroll between items User LEFT RIGHT keys to adjust the values ...

Страница 46: ...2007 07 28 P6 11 SCREEN MENU HDMI MODE User can fine tune monitor settings in this menu Use UP DOWN keys to scroll between items User LEFT RIGHT keys to adjust the values ...

Страница 47: ...2007 07 28 P7 11 TIME MENU User can set current time and set on off timers in this menu Use UP DOWN keys to scroll between items User LEFT RIGHT keys to adjust the values ...

Страница 48: ...2007 07 28 P8 11 SETUP MENU s User can set various settings in this menu Use UP DOWN keys to scroll between items User LEFT RIGHT keys to adjust the values ...

Страница 49: ...2007 07 28 P9 11 PROGRAM EDIT MENU s User can rearrange and edit programs in this menu Use UP DOWN LEFT RIGHT keys to scroll between items Use the color keys to perform the labeled operations ...

Страница 50: ...2007 07 28 P10 11 INPUT SELECTION MENU User can change between difference input sources in this menu Use UP DOWN keys to scroll between inputs Use OK LEFT RIGHT keys to select the input mode ...

Страница 51: ...2007 07 28 P11 11 NO SIGNAL OSD AUTO POWER OFF MENU Volume control OSD s ...

Страница 52: ...AL1 2 8 P M Switch the picture status Sport Vivid Hi Bright User 9 SYS Display previous inputsource VGA VIDEO SVIDEO YPbPr TV HDMI 10 CH CH Increase and decrease TV channel 11 VOL VOL Adjust the volume 12 MENU Select a menu 13 INPUT Switch the input source 14 ENTER When you make sure one function please press this key 15 PICTURE SIZE You can press the key to select picture size 4 3 16 9 NORMAL FUL...

Страница 53: ...TV mode by INPUT button then you can select a program with the CH CH or number buttons Volume adjustment Press VOL VOL button to adjust the volume Mute function Press the MUTE button the sound is switch off You can cancel it by pressing MUTE or VOL VOL button Select the fuction Display Note Setting the picture Select the picture mode 1 Press MENU button to enter the menu 2 Press to select Picture ...

Страница 54: ...dly to return to normal viewing Advance picture adjust 1 Press MENU button to enter the menu 2 Press to select Advance picture adjust and press menu to select to enter it then adjust correlative function Blue mute 1 Press MENU and to select Blue screen 2 Press button to control blue screen Setting the time 1 Press MENU and button to select the Auto sleep 2 Press to cycle through the preset time in...

Страница 55: ...n auto search of channels 5 To stop auto search press the MENU button Teletext language 1 Press the MENU to enter the menu 2 Press and button to select Teletext language and then press to select Program edit 1 Press the MENU and button to select the Program edit 2 Press the ENTER to edit the current channel Manual scan of channels 1 Press the MENU and button to select the Manual scan 2 Press the M...

Страница 56: ...the MENU and button to select Bass Treble Balance Surround Reverb Equalizer and press to adjust them 2 When you are satisfied with the settings press the MENU button repeatedly to return to normal viewing Setting the PC Adjust the screen position 1 Press INPUT button to switch the input source to VGA 2 Press MENU and button select H position or V position then press to adjust the screen position ...

Страница 57: ...s to select the kinds of color USER COOL MIDDLE WARM 2 Press the ENTER button and button to adjust Auto setting 1 Press MENU and button to select the Auto setting 2 Press the ENTER to auto adjust DEFAULT Default 1 Press MENU and button to select Default 2 Press the ENTER to reset ...

Отзывы: