background image

2

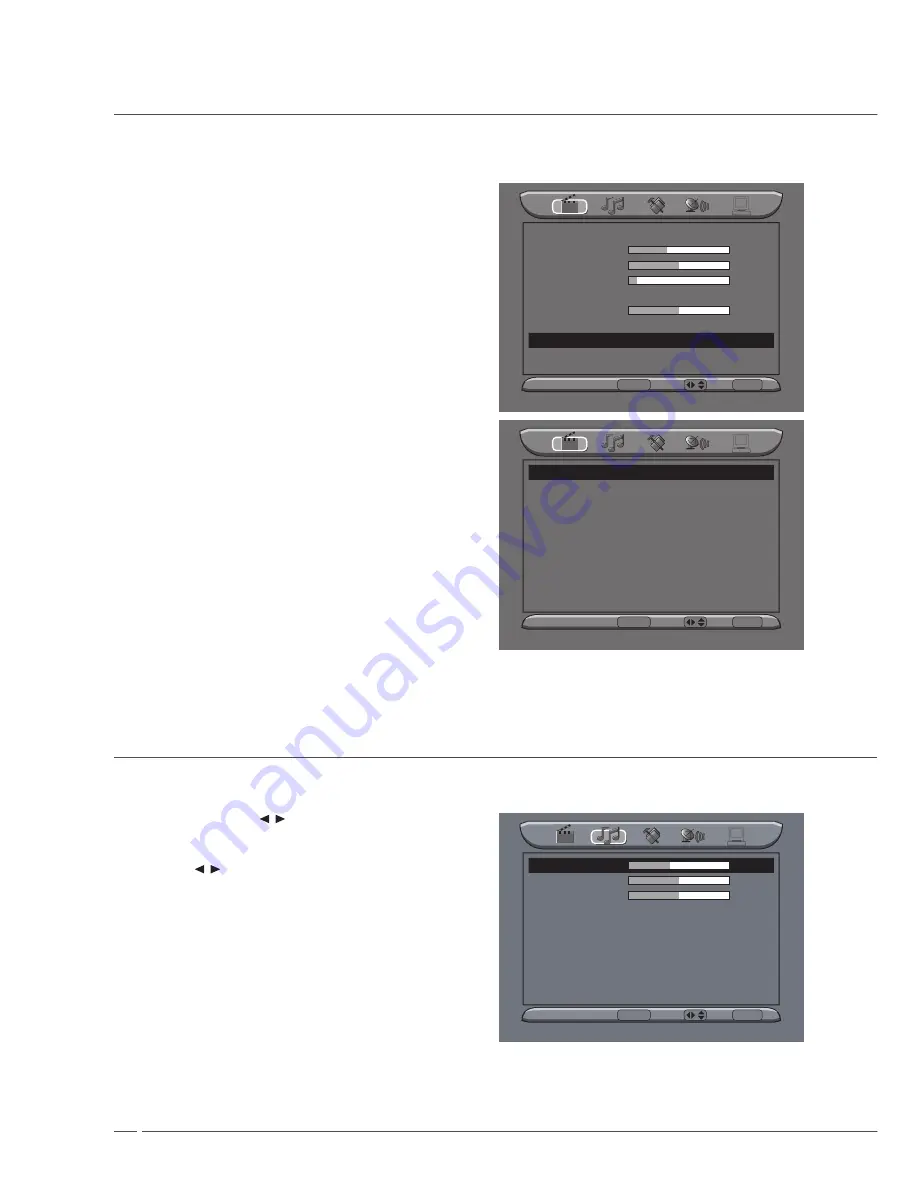
Advance Picture Adjust

.  Press 

MENU

 and ▲/▼ (CH+/CH-) to select 

Ad-

vance Picture Adjust

.

2.  Press 

MENU

 to select to enter it.

3.  Adjust correlative function.

Picture Mode

User

Contrast

37

Brightness

49

Saturation

11

Hue

Sharpness

10

Color Temperature 

User

Advance Picture Adjust

Video 

Enter 

ENTER

 Select  /   Exit 

MENU

Black Level Extender

  DNR (Digital Noise Reduction)

  White Peak Limitator

  CTI

  Flesh Ton

  Adaptive Luma Control

Black Level Extender

On

DNR

Off

White Peak Limitator

Off

CTI

Middle

Flesh Ton

On

Adaptive Luma Control

Off

Video 

Enter 

ENTER

 Select  /   Exit 

MENU

Picture Setting

Audio Setting

You can adjust Bass, Treble, Balance, Surround, Reverb and select equalizer.

.  Press the 

MENU


/


 (VOL-/VOL+) and ▲/▼ 

(CH+/CH-) button to select Bass, Treble, Balance, 

Surround, Reverb and Equalizer.

2.  Press 


/


 (VOL-/VOL+) to adjust them.

3.  Being adjustment done, press 

MENU

 button to exit 

and press again to go back to the previous menu.

Bass

41

Treble

50

Balance

0

Surround

Off

Reverb

Off

Equalizer

Soft

Audio 

Enter 

ENTER

 Select  /   Exit 

MENU

Содержание CM-P32LC2

Страница 1: ...User S Manual 81cm PDP TV ...

Страница 2: ... Source 10 Select Menu Language 10 Program selection 10 Volume Adjustment 10 Mute Function 10 Picture Setting 11 Changing Picture Mode 11 Color Temperature Setting 11 Advance Picture Adjust 12 Audio Setting 12 Setting the TV 13 Region Selection 13 Channel Searching 13 Fine Tuning 13 Program Edit 13 Function Setting 14 Auto Sleep 14 Time Setting 14 Blue Mute 14 Parental 14 Default 14 Setting the PC...

Страница 3: ...tructions should be retained for future reference 3 HEED WARNINGS All warnings on the unit and in the operating instructions should be adhered to 4 FOLLOW INSTRUCTIONS All operating and use instructions should be followed 5 CLEANING Unplug this unit from the wall outlet before cleaning Do not use liquid cleaners or aerosol cleaners 6 ATTACHMENTS The manufacturer of this unit does not make any reco...

Страница 4: ...pose of the grounding type plug 12 POWER CORD PROTECTION Power supply cords should be routed so that they are not likely to be walked on or pinched by itemsplaced upon or against them paying particular attention to cords at plugs convenience receptacles and the point where they exit from the appliance 13 LIGHTNING To protect your unit from a lightning storm or when it is left unattended and unused...

Страница 5: ...service technician uses replacement partsspecified by the manu facturer or those that have the same characteristics as the original part Unauthorized substitutions may result in fire electric shock or other hazards 21 SAFETY CHECK Upon completion of any service or repairs to this unit ask the service technician to perform safetychecks to determine that the unit is in proper operating condition 22 ...

Страница 6: ...nt Back Panel Diagram OSD Button Position Back Panel and I O Ports HDMI INPUT VGA INPUT PC INPUT EVRPHONE ANT 75 Y2 AV2 Pb2 R2 Pr2 L2 INPUT R R L L AV S VIDEO INPUT Y Pb Pr INPUT AV R L OUTPUT Power Socket ...

Страница 7: ...ous input source VGA VIDEO SVIDEO YPbPr TV HDMI 10 INPUT Switch the input source 11 CH CH Increase and decrease TV channel 12 MENU Select a menu 13 VOL VOL Adjust the volume 14 PICTURE SIZE You can press the key to select picture size 4 3 16 9 NORMAL FULL 15 ENTER When you make sure one function please press this key Teletext Functions 16 Teletext Page Up 17 Teletext Page Down 18 Teletext Function...

Страница 8: ...NT 75 110V 60Hz 160W Y2 AV2 Pb2 R2 Pr2 L2 INPUT R R L L AV S VIDEO INPUT Y Pb Pr INPUT AV R L OUTPUT V R S Y Pb Pr Component Input AV Output S Video and AV1 Input Press the SOURCE button select INPUT mode POWER ON OFF HDMI INPUT VGA INPUT PC INPUT EVRPHONE ANT 75 110V 60Hz 160W Y2 AV2 Pb2 R2 Pr2 L2 INPUT R R L L AV S VIDEO INPUT Y Pb Pr INPUT AV R L OUTPUT R L AV1 L R S VIDEO AV1 Input S VIDEO AUD...

Страница 9: ... button select INPUT mode POWER ON OFF HDMI INPUT VGA INPUT PC INPUT EVRPHONE ANT 75 110V 60Hz 160W Y2 AV2 Pb2 R2 Pr2 L2 INPUT R R L L AV S VIDEO INPUT Y Pb Pr INPUT AV R L OUTPUT Y Pb Pr R L AV2 Y Pb Pr OUTPUT AV2 Audio Input Systems Connection ...

Страница 10: ... AV S VIDEO INPUT Y Pb Pr INPUT AV R L OUTPUT PC AUDIO OUTPUT DVD VGA OUTPUT VGA OUTPUT HDMI INPUT and EARPHONE Output Press the SOURCE button select INPUT mode POWER ON OFF HDMI INPUT VGA INPUT PC INPUT EVRPHONE ANT 75 110V 60Hz 160W Y2 AV2 Pb2 R2 Pr2 L2 INPUT R R L L AV S VIDEO INPUT Y Pb Pr INPUT AV R L OUTPUT HDMI OUTPUT Stereo Earphone Systems Connection ...

Страница 11: ... Language 1 Press MENU to enter menu 2 Press VOL VOL to select language then press CH CH and VOL VOL button to select language Language English Auto Sleep Off Timer Out Off Blue Mute On Parental Time Default Misc Enter ENTER Select Exit MENU Program selection Preset to the TV mode by INPUT then you can select a program with CH CH or number button Volume Adjustment Press VOL VOL to adjust the volum...

Страница 12: ... between bright and dark area of picture Brightness sets brightness of picture Saturation sets richness of color Sharpness sets vividness of picture Picture Mode User Contrast 37 Brightness 49 Saturation 11 Hue Sharpness 10 Color Temperature User Advance Picture Adjust Video Enter ENTER Select Exit MENU Color Temperature Setting Your TV has 4 color temperature mode 1 Press MENU and CH CH to select...

Страница 13: ...tive Luma Control Black Level Extender On DNR Off White Peak Limitator Off CTI Middle Flesh Ton On Adaptive Luma Control Off Video Enter ENTER Select Exit MENU Picture Setting Audio Setting You can adjust Bass Treble Balance Surround Reverb and select equalizer 1 Press the MENU VOL VOL and CH CH button to select Bass Treble Balance Surround Reverb and Equalizer 2 Press VOL VOL to adjust them 3 Bei...

Страница 14: ...H CH button to select Auto Search or Manual Scan 2 Press VOL VOL to search channel 3 Press MENU to stop searching and to return the previous menu Fine Tuning 1 Press the MENU VOL VOL and CH CH button to select Fine Tuning 2 Press ENTER and VOL VOL to fine tune for the best picture and sound effect Program Edit 1 Press the MENU VOL VOL and CH CH button to select Program Edit 2 Press ENTER to edit t...

Страница 15: ...ing 1 Press the MENU VOL VOL and CH CH button to select Time 2 Press ENTER to edit the current channel 3 Press MENU to return the previous menu Timer 02 29 30 Start Time 15 15 15 Stop Time 00 00 00 Channel 001 Activate On Off Confirm On Off Blue Mute 1 Press MENU VOL VOL and CH CH button to select the Blue Mute 2 Press VOL VOL to control blue screen Parental 1 Press MENU VOL VOL and CH CH button t...

Страница 16: ... Temperature Phase or Manual clock 3 Press VOL VOL to adjust and press MENU to return the previous menu Manual Setting Display Adjustment 1 Press MENU VOL VOL and CH CH button to select Display Adjustment 2 Press MENU VOL VOL and CH CH button to select H position or V position then press VOL VOL to adjust the screen position 3 Press MENU to return the previous menu Supporting Resolution VGA Resolu...

Страница 17: ...plugged in and turned on Too light or too dark Adjust the brightness or contrast ratio No sound from one side Adjust balance in the audio menu Strange sound from TV Typical sound due to normal TV operation TV is not faulty Specification Screen Size 81 Cm 16 9 Resolution 852 x 480 Video Input TV PAL B G PAL D K Pal I CVBS Y C PAL SECAM NTSC Component 480i p 576i p 720p 1080i VGA VGA HDMI 480i p 576...

Отзывы: