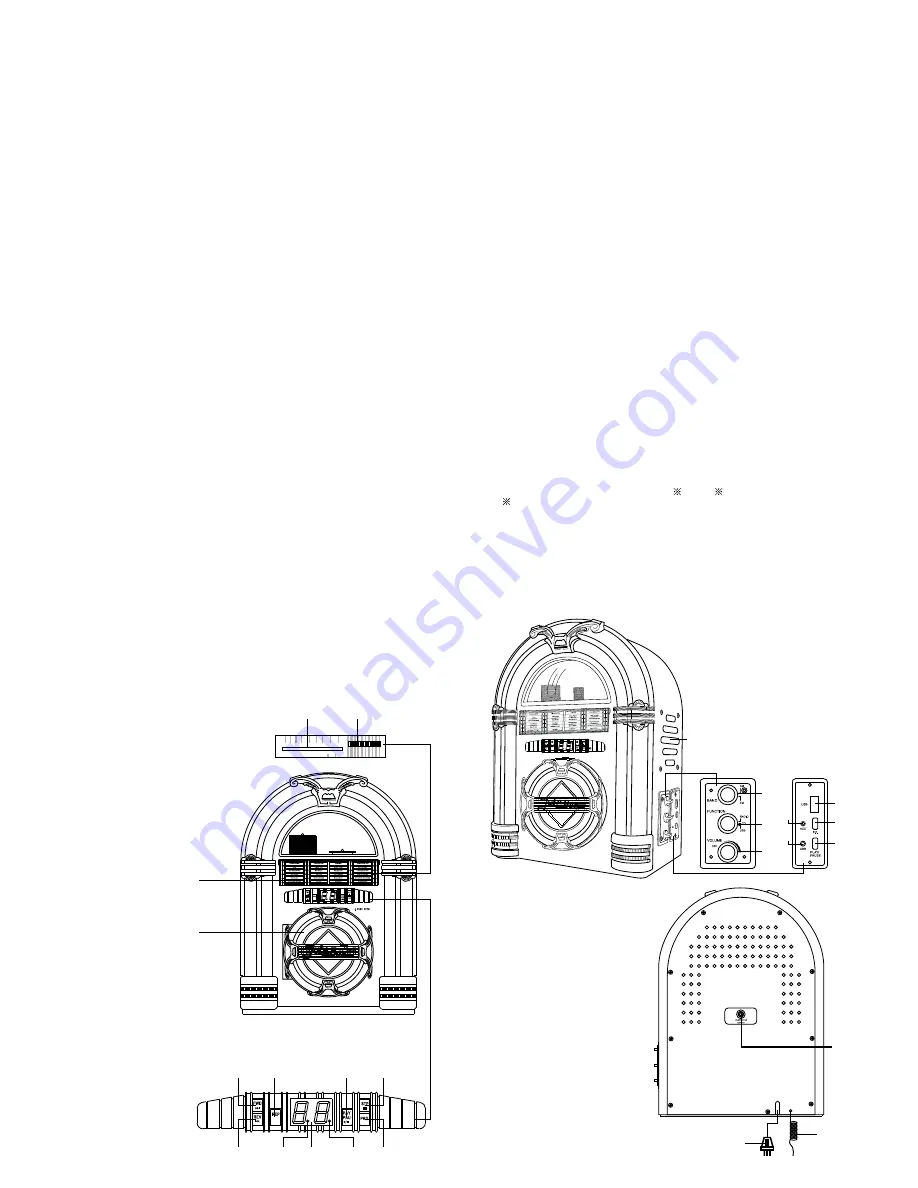
LOCATION OF PARTS
1.
TUNER DIAL
2.
TUNING CONTROL
3.
DIAL DISPLAY DOOR
4.
CD DOOR
5.
FORWARD SKIP BUTTON(CD)
6.
REPEAT BUTTON(CD)
7.
PLAY/PAUSE BUTTON(CD)
8.
STOP BUTTON(CD)
9.
REVERSE SKIP BUTTON(CD)
10.
REPEAT INDICATOR
11. LED DISPLAY
12.
PLAY INDICATOR
13.
PROGRAM BUTTON
14.
SPEAKER
15. AM/FM BAND SWITCH
16. FUNCTION SWITCH
17. VOLUME CONTROL
18. ACC LED
19.
ERR LED
20.
USB JACK
21.
FAST FORWARD
BUTTON(USB)
22.
PLAY/PAUSE
BUTTON(USB)
23. AC POWER CORD
24.
FM ANTENNA
25.
SUBWOOFER
OUTPUT JACK
MHz
KHz
AM
FM
9
11
13
10
12
5
6
7
8
1
2
3
4
REPEAT PLAYBACK
1. To repeat a single track, choose the track you want to repeat and press the
PLAY/PAUSE BUTTON (7) to begin playback. Press the REPEAT BUTTON (6)
once. The REPEAT INDICATOR (10) will flash and the selected track will repeat
at the end of the song.
2. To repeat the whole CD, press the REPEAT BUTTON (6) twice. The REPEAT
INDICATOR (10) will stay on and the CD will start over once finished.
3. To turn off the repeat function, press the REPEAT BUTTON(6) again. The repeat
function will also turn off when the CD DOOR (4) is opened or the STOP BUTTON
(8) is pressed.
PROGRAMMED PLAYBACK
1. Press the PROGRAM BUTTON (13). The LED DISPLAY (11) will read 01 for
a second and then change to 00.
2. Press the FORWARD SKIP BUTTON (5) or the REVERSE SKIP BUTTON (9)
to select the desired track to program into memory.
3. When the desired track number is displayed, press the PROGRAM BUTTON
(13) again to store the selected track. The LED DISPLAY (11) will change to 02,
indicating it is ready for the second track you wish to program into memory.
4. Repeat steps 2-3 to program up to 20 tracks into memory.
5. Once all desired tracks are programmed into memory, press the PLAY/PAUSE
BUTTON (7) to begin playback of programmed tracks.
6. Programming will be erased when the CD DOOR (4) is opened or if the unit is
turned off.
NOTE:
A maximum of 20 tracks can be programmed to play in any order.
USB OPERATION
1. Connect the MP3 device (via its connecting cable - not supplied) or Flash Drive
with MP3 files into the USB JACK (20).
2. Switch on by turning the VOLUME CONTROL (17) from the Off position.
3. Turn the FUNCTION SWITCH (16) to USB Mode.
4. Press the USB PLAY/PAUSE key (22) to play or pause alternately.
5. Press the USB FAST FORWARD BUTTON (21) to go to the next file during Play
Mode.
6. To power off, turn the VOLUME CONTROL (17) to the Off position.
Note:
If there is no USB device or MP3 file connected, the ERR LED light (19) will be on.
The ACC LED light (18) will flash whilst the MP3 data is transferring during PLAY
Mode. Powering Off or switching to another mode will reset the USB if this is not
functioning.
WARNING:
Do not pull the USB device out during USB mode, as this may damage the device
or files. To disconnect the USB device safely, power Off (17) first or move the
Function Switch (16) to another mode.
SUBWOOFER
SOCKET
The subwoofer Socket (25) enables you to attach a subwoofer (not supplied)
which will enhance base response. Please contact your retailer for suitable subwoofer
models.
TROUBLESHOOTING GUIDE
The unit does not operate
* Is the AC power cord connected to a power outlet and fully inserted.
* Is the unit turned on? Rotate the FUNCTION knob from the OFF position to turn
on the unit.
No Radio
* Is the FUNCTION switch in the correct position. Turn FUNCTION switch to Radio.
* Adjust the VOLUME CONTROL (17).
* Rotate the TUNING CONTROL (2) to find a radio station.
CD will not play
* Make sure CD is inserted with labelled side facing out.
* Try playing a different CD. ER will show on the display if the laser cannot read
the CD, this could be the case with copied CDs.
USB Device is not playing:
* An MP3 Player/USB device/Flash Drive may not be recognized if over 2GB.
* Make sure the Function Switch is
not
in USB Mode when connecting the MP3
Player/Flash Drive, as the device may not be read. Only switch to USB Mode
after the device has been connected.
My MP3 Player/Flash Drive has songs on it, but does not play:
* Check File Extension on PC to ensure songs are MP3 and not WMA. The unit
will not play WMA songs (ensure you enable File Extension Viewing in Windows)
USB Specification
Interface
* USB2.0 Full speed, HOST (USB HUB is not supported)
Corresponding Flash memory
* USB1.1 Flash memory
* USB2.0 High speed Flash memory
* minimum memory size : 64MByte
* Maximum memory size : 2GByte
(Only FAT16 corresponds.)
MP3 Decoder
* Compatible with MPEG Audio 1, 2, 2.5
* Compatible with Layer 1, 2, 3
* Compatible with Sampling rate : 8k, 16k, 32k, 11.025k, 22.05k, 44.1k, 12k,
24k,48kHz
* Compatible with Bit rate : 8k ~ 384kbps
* Subfolder nest : 8
* Number of maximum files for playback : unlimited
* File format for playback : *.mp3. *.mp2 , *.mp1
It is possible to select it.
23
24
25
14
17
16
15
21
22
18
19
20


