background image

35


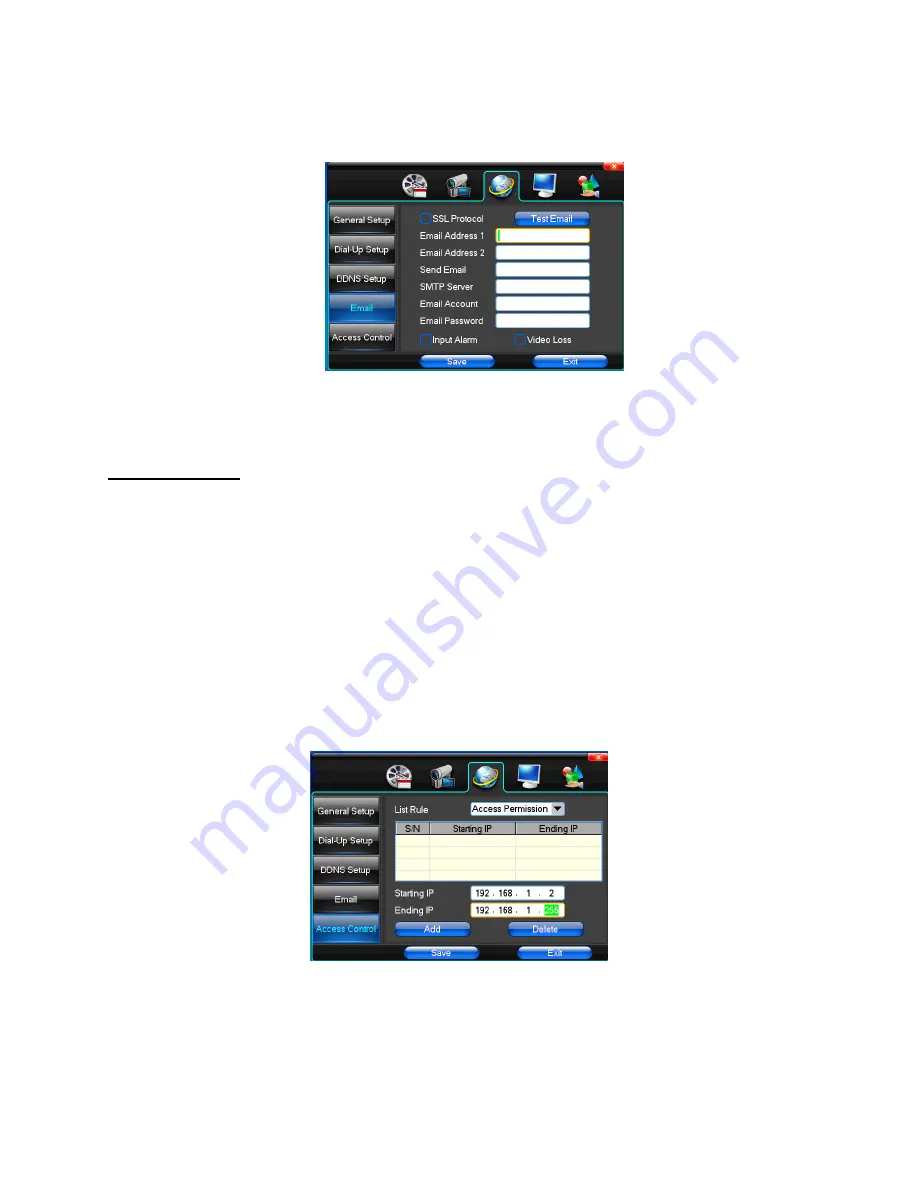
Access Control 

 
Access Control is a list of permission specifies which users IPs or system IPs  are granted access to 
the DVR 
 

List Rule

 – Select from the options: Not Used, Access permission, Access Refuesed 


Starting IP

 – Define the Starting IP address 


Ending IP

 – Define the ending IP Address 


Add 

– Add the IP to the access control list 


Delete

 – Delete the IP to the access control list 


Содержание AD-808Q

Страница 1: ...1 Digital Video Recorder User Manual AD 808Q ...

Страница 2: ...es arising out of the use or inability to use this product or documentation even if advised of the possibility of such damages Video and Audio surveillance may be regulated by laws that vary from state to state and country to country Check the laws in your local region before using the DVR for surveillance purposes We are not liable for damages resulting from corrupted or lost data due to a mistak...

Страница 3: ...ects into the device This could permanently damage the equipment Immediately turn the power off or unplug the power cord and power supply from the power outlet if this happens Contact a qualified service personnel authorized by your equipment distributor Do not attempt to disassemble or alter any part of the equipment that is not expressed in this guide Disassembly or alteration of this device may...

Страница 4: ...e of the power source must be verified before using Use only the recommended power accessories If the device has not been used for a long period of time disconnect the power source Use of power sources not recommended for this equipment may lead to overheating distortion of the equipment fire electrical shock or other hazards Do not attempt to disassemble alter or apply heat to the batteries Do no...

Страница 5: ...id damage of hard disk 1 Stop the recording first 2 Select the logout button on the menu screen to logout 3 Select the Shutdown button on the menu screen to logout 4 Turn off the power switch and then disconnect the power cord 5 Wait for 30 seconds before restarting or moving the equipment Do not use liquid cleaners or aerosol cleaners when cleaning the device Use only a dry cloth for cleaning Do ...

Страница 6: ...llance device The auxiliary features of this device are listed below DVR Feature Advanced H 264 video compression ADPCM audio compression format Dual video out BNC VGA for CRT and LCD monitor connection Pentaplex operation Record Playback Backup Remote viewing at the same time Multiple recording modes Manual Schedule Motion Multiple alarm notification buzzers Video loss Video Blind Motion HDD fail...

Страница 7: ...udio compression ADPCM Simplex duplex triplex triplex Recording Playback LAN Transmission Communication RS485 1 Playback One channel or multi channel playback 8 channel synchronized playback Search mode Time Event search HDD consumption Audio 28 8MB per hour Video 25 450MB per hour Video storage Hard disk network Backup mode Network download USB SATA HDD Video input 8 channel BNC 1 0Vp p 75Ω Video...

Страница 8: ...on Weight 13 x 10 x 2 4 5 5 lb Hard Disk installation For the first use please install the hard disk Remove the screws on both Extracted from the next cover up Connect hard disk and mother board sides of shell Fix the screw of hard disk Close cover Install the screws back on sides of shell ...

Страница 9: ...ternal power to the alarm detector Please parallel connect the Ground of the DVR and the ground of the alarm detector Please connect the NC port of the alarm sensor to the DVR alarm input ALARM Use the same ground with that of DVR if you use external power to the alarm device Use the controllable 12V power to reset the smoke sensor remotely Alarm input circuit ...

Страница 10: ...ing value alarm output is selectable in normally open contact It is also selectable in normally closed contact The external alarm device should need external power For controllable 12V it can be used to provide power to devices such as reset smoke sensor ...

Страница 11: ... B on the DVR rear panel Connect the other end of the cable to the proper pins in the connector on the camera Please follow the instructions of PTZ device for camera configurations To connect PTZ Decoder Ensure the decoder has the same grounding with DVR otherwise you may not control the PTZ Shielded twisted wire is recommended and the shielded layer is used to connect to the grounding Avoid high ...

Страница 12: ...ord Forward Backward Play Forward Pause Search for recorded video files PTZ Pan Tilt Zoom Control MENU Enter Menu Selections Right Down Left Up Enter ESC Escape FN Functions Net Network Indicator REC Start recording manually ...

Страница 13: ...13 Power Infrared sensor for remote control USB USB mouse port ...

Страница 14: ...ction Audio In Channel 1 Audio input Audio In Channel 2 Audio input Audio In Channel 3 Audio input Audio In Channel 4 Audio input Audio In Channel 5 Audio input Audio In Channel 6 Audio input Audio In Channel 7 Audio input Audio In Channel 8 Audio input Audio out Audio output connection to sound box On Off Power Switch LAN RJ45 Ethernet network port VGA VGA connection to VGA monitor USB port ALARM...

Страница 15: ...he polarity and Step3 Replace the battery cover KEY pad Name Operating instruction Keypad Name Operating instruction POWER Power ON OFF ENTER OK OK ENTER key DEV Select DVR SWITCH Switch To Upper Lower Case on soft keyboard MENU Main Menu MODE Switch to IRIS FOCUS ZOOM modes ESC Escape Key PTZ Access Exit PTZ control under preview state ...

Страница 16: ...ork check the following steps 1 Make sure the mouse is plugged properly into the USB mouse port 2 Change to a different mouse port 3 Change the physical mouse Left key single click to enter the function icon Right key single click to open the shortcut Left key double click to execute the selected operation In Main Screen Double click the left button on one of the camera displays to switch to full ...

Страница 17: ...e device is restarted from the power off Power Off Enter Exit select Power Down Before turning off the hard switch see below or disconnecting the power source to turn the system off it is strongly recommended that the user applies these following steps to have the best protection for equipment and user applications A Please confirm that the all of the hard disk HDD activities are properly stopped ...

Страница 18: ...his equipment is designed for the long term security surveillance applications Frequently disconnecting the power source is not recommended Main Screen Display Button Description Button Description Main Menu PTZ control Wizard language Alarm control Multi channel Display setup Recording Control Exit Playback Bake up On Channel camera Displays 1 Channel is Recording 2 Channel is Motion Detection Tr...

Страница 19: ...lect on Recording Control to enter the Recording Control mode Or click on Recording Control Control to enter the Recording Control mode The Recording Control menu contains the following sub selections Automatically Select Recording by pre set conditions to start recording such as Time setting Motion detection and or Alarm Triggered Manual Rec Start Recording by selecting the corresponding channels...

Страница 20: ...ck and Backup Control to enter the Playback and Backup mode Select the highlighted Recording period Select Play Pause to playback Button Description Button Description Synchronous asynchronous play Voice Adjustment Frame by Frame 1 4 8 Screen Display switch Display Mode Slow Speed Hide Display list Normal Speed Recording Date Fast Speed Play Pause Stop Sound Off On Rewind ...

Страница 21: ...ing Adjustment Focus Focal Length Adjustment IRIS IRIS Adjustment Preset Camera Angle Adjustment Setup Setup Please refer to the speed dome user s manual Preset Please refer to the speed dome user s manual Dwell Time Please refer to the speed dome user s manual Pattern Tour Start Stop the Cruise Left right Limit Cruise limit Settings Add Preset Add the cruise lines Delete Preset Delete the cruise ...

Страница 22: ...ttings and reset to the original state Open AUX Please refer to the speed dome user s manual for Aux definition In some cases it can be used for special processes Close AUX Please refer to the speed dome user s manual for Aux definition In some cases it can be used for special processes Limit Scan Boundary scan control Auto Pan Remove the cruise line designated ...

Страница 23: ...n Screen Display to show the short cut list Select on Alarm Control to enter the Alarm Control mode Set Alarm Select the protection channel Clear Alarm Remove protection condition Alarm Output Select the Alarm Output All Select all Channels ...

Страница 24: ...ional Standard Smooth Sharp User Define Default Restore video out to default setting Through the slider to adjust the brightness contrast saturation Chroma Sharpness and De noise Video Monitor Device Optional VGA output TV output Default Restore to default display setting Use the slider to adjust the Brightness Contrast Saturation Chroma Sharpness and De noise ...

Страница 25: ...25 Setup Device Optional VGA output TV output Resolution Setting the resolution of the display device Setup ...

Страница 26: ...ity from the list Frame Rate Select the Frame Rate Frames Per Second from the list Audio Select to turn on off the audio for corresponding channel Pre Alarm Rec select to turn on off the Pre Alarm Recoding for corresponding channel Sub Stream Channel Select the corresponding channel camera for Sub Stream configuration Encoding Type Select the video recording resolution only in whole function model...

Страница 27: ...e for on screen display Recording Schedule Channel Select the corresponding channel camera for recording configuration Normal Schedule Recording Start normal recording per the schedule setup Motion Detection Start recording when motion detection is triggered Alarm Recording Start recording when alarm is triggered Motion and Alarm Recording Start recording when motion detection and alarm are trigge...

Страница 28: ...28 Recording Motion Detection Alarm Recording Note Click to select Right click to deselect ...

Страница 29: ... Please refer the PTZ camera manual Video Setup Video mode Select NTSC for U S standard Channel Select the corresponding channel camera for Video configuration Reserved Section Drag the mouse t o select the privacy area Buzzer Alarm select to enable the buzzer for Video Loss alert Alarm output Select the alarm output for Video Loss alert Note Cameras purchased in U S A are NTSC format Please confi...

Страница 30: ...tection Area Select Setup to enter motion Detection setup for corresponding channel The green square area is the motion detection active region The dark grey square area is the motion detection non active region Click on a square to active the motion detection Right Click on a square to de active the motion detection Click on Save and Exit to save the setting Click on Exit Without Saving to Cancel...

Страница 31: ...hannels cameras to be displayed on screen and define the time interval between each display Start SEQ Display Right Click on main screen to select Start SEQ Display from the shortcut Stop SEQ Display Right Click on main screen to select Stop SEQ Display from the shortcut Time Enter the time interval between each channel camera display Note minimum interval is 5 seconds ...

Страница 32: ...eam port needs to be forwarded on the router over a virtual server for video streaming HTTP Port The HTTP port number is the port for IE browser accessing Note The default value is 80 This port needs to be forwarded on the router or virtual server for remote monitoring If the port value is changed user needs to add the port number when typing the IP address into the IE browser address bar i e set ...

Страница 33: ...vided by the Internet Service Provider PPPoE Account Enter the login user name Password Enter the login password Note The PPPoE needs to be enabled along with the entering of the User Name Password and IP address of ISP if PPPoE login is employed on the DVR Please contact your Internet Service Provider ISP for more information ...

Страница 34: ...dyndns org User Name Enter the user name Password Enter the password Email E mail notification for Video Loss or Alarm input is triggered SSL Protocol Enable Disable SSL Protocol Email address 1 Enter the email address Email address 2 Enter the email address 2 Send Email The sender s email address SMTP Server Enter the name of the SMTP mail server Email Account Enter the sender email account Email...

Страница 35: ...ystem IPs are granted access to the DVR List Rule Select from the options Not Used Access permission Access Refuesed Starting IP Define the Starting IP address Ending IP Define the ending IP Address Add Add the IP to the access control list Delete Delete the IP to the access control list ...

Страница 36: ...nter the name for the DVR Date Mode Select the date format Time Mode Select the rime format System Date Set up the System Date System Time Set up the System time DST Select to enable the Daylight Saving Time DST NTP Setup The Network Time Protocol NTP is used to synchronize the time to a server or reference time source ...

Страница 37: ...ing file in minutes Formatting Format the selected Hard Disk User Management The User Management contains the following parameters for user setup User Select the user to be modified User Right Select Deselect user authority Add User Add user Delete User Delete the selected user Edit User Edit the selected user Edit Password Edit the password of selected user ...

Страница 38: ...for the alarm input setup Input type Select the alarm input type Clear Alarm Select the length to clear the alarm and stop the alarm triggered video recording Record Channel Select the corresponding channel to start recording when the alarm input alert is triggered ...

Страница 39: ...ect the time intervals for buzzer output when alarm is triggered Send Email Select the time intervals for email notification when alarm is triggered Alarm Output Select the time intervals of delay for alarm output when alarm is triggered ...

Страница 40: ...40 System Management System upgrade The system hardware and software information Log Search Search the system event log ...

Страница 41: ...41 Exception Handling Select to turn on the buzzer alert when system error is detected Default The Restore Settings function restores the parameters of selected category back to factory default value ...

Отзывы: