Avtech Room Alert 4E Скачать руководство пользователя страница 18

Room Alert 4E


Settings 

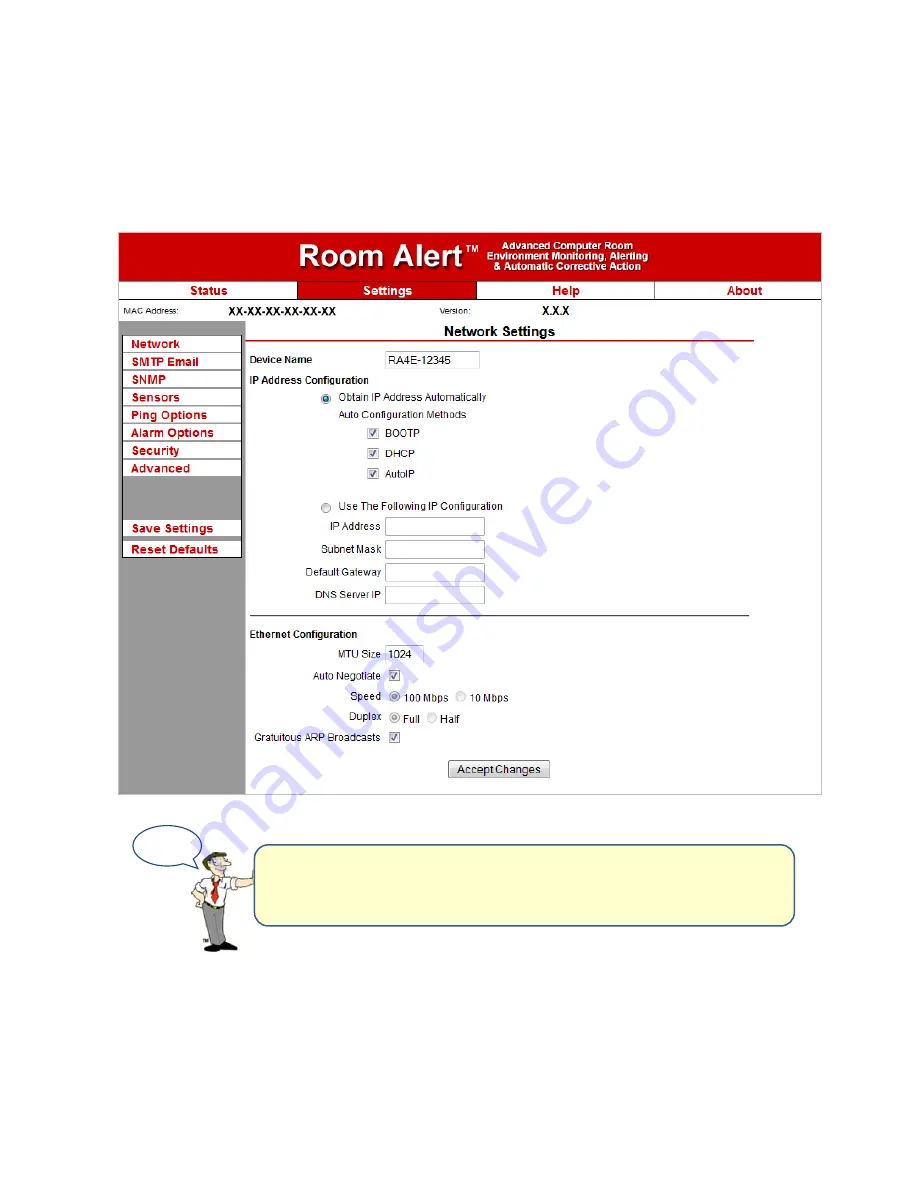
To access your Room Alert 4E’s settings, click 

Settings

 in the navigation bar at the top of your 

screen.  

TIP 

You’ll see a prompt for your username and password whenever 
you click 

Settings

. If you have not set up log in credentials for 

your Room Alert 4E, simply click 

OK

 without entering anything. 

14


AVTECH Software, Inc.


Содержание Room Alert 4E

Страница 1: ...AVT 150401 06 User s Guide Reference Manual...

Страница 2: ...door Temperature Digital Fluid Temperature Digital Humidity Main UPS Power Flood Water Current Loops Amperage Extreme Temperature Heat Index Feels Like Smoke Fire Fuel Water Tank Level Air Flow Sound...

Страница 3: ...On behalf of the entire team at AVTECH we say Thank You It is our privilege to serve you our valued customer...

Страница 4: ...s whether by estoppel implication or otherwise Trademark Acknowledgements AlertScript AVTECH the AVTECH Logo AVTECH Software the AVTECH System Manager Character AVTECH com AVTECHSoftware com Environme...

Страница 5: ...lert 4E In Your Web Browser 7 With The Built In Web Interface 7 With Device ManageR For Advanced Functionality 8 Step 3 Install Additional Components 8 Connect Included External Sensor s 8 Connect Com...

Страница 6: ...ates From AVTECH com 41 How To Update Room Alert 4E s Firmware 41 How To Discover Room Alert 4E When Your Network Blocks UDP Broadcasts 42 How To Reset Room Alert 4E To Factory Defaults 42 Introductio...

Страница 7: ...ionality with AVTECH s Device ManageR the powerful software bundled FREE with all Room Alert monitors Have the flexibility to monitor with any SNMP enabled 3rd party monitoring application Know immedi...

Страница 8: ...4E User s Guide Reference Manual You re reading it now One 1 Package Of Literature Additional Information The Room Alert 4E ID Box Front Power Port Back Reset Button Custom Light Tower Relay Port Pow...

Страница 9: ...pair of dry contacts connects Room Alert 4E to any AVTECH switch sensor via standard speaker wire or low voltage 2 wire cable Back Reset Button A small push button resets Room Alert 4E to factory def...

Страница 10: ...y Switch Sensor Port The custom port allows you to directly connect a Light Tower or Relay Switch Sensor to the Room Alert 4E For more information about AVTECH sensors and accessories please refer to...

Страница 11: ...the Room Alert 4E s power port Plug the other end into a surge protected power source Your Room Alert 4E is now powered and discoverable on your network Step 2 Open And View Your Room Alert 4E In Your...

Страница 12: ...wnloads Launch it in your web browser at http localhost 8080 Step 3 Install Additional Components Connect Included External Sensor s AVTECH s external Digital Temperature Sensor shown here comes stand...

Страница 13: ...nstall them according to the Installation Notes included with them Please refer to Status Settings and Alarm Options in this manual for instructions on viewing and configuring your external NOTE Curre...

Страница 14: ...oom Alert 4E in Device ManageR and click the Open Web button or Type the IP address of your Room Alert 4E monitor directly into the address bar of your web browser Your Room Alert 4E s web interface h...

Страница 15: ...rily modify the refresh interval of the Status screen while viewing which is 60 seconds i e every 1 minute by default you may enter a value in seconds in the Update Every field Click outside the field...

Страница 16: ...Channel 1 Internal Temperature Sensor Channel 2 External Digital Sensor Channel 3 External Digital Sensor Channel 4 External Switch Sensor Pings when configured in Settings Below the channels you see...

Страница 17: ...l digital sensor connected you may temporarily hide Channels 2 and 3 1 To hide the disconnected digital sensor click Connected Sensors in the Current Sensors Status Bar as shown here 2 To toggle the v...

Страница 18: ...Settings in the navigation bar at the top of your screen TIP You ll see a prompt for your username and password whenever you click Settings If you have not set up log in credentials for your Room Aler...

Страница 19: ...step you will lose your changes 3 Click Save Settings in the navigation bar to the left of your screen Your Room Alert will automatically reboot and commit your changes IP Address Configuration DHCP...

Страница 20: ...en to temporarily save your settings You may now navigate to another screen however if you close the web interface before the next step you will lose your changes 7 Click Save Settings in the navigati...

Страница 21: ...Duplex Full or Half 3 In Gratuitous ARP Broadcasts you may leave the checkbox at the default enabled or uncheck the box to disable 4 Click Accept Changes at the bottom of your screen to temporarily sa...

Страница 22: ...3 Check Use SMS to send a shorter email with a reduced character count 4 In Mail Server Port enter your mail server s SMTP port The default is 25 a commonly used port 5 In Timeout you may leave the d...

Страница 23: ...Accept Changes at the bottom of your screen to temporarily save your settings You may now navigate to another screen however if you close the web interface before the next step you will lose your cha...

Страница 24: ...P monitoring applications If you use a 3rd party SNMP monitoring application Obtain the Room Alert 4E MIB files through your customer account at AVTECH com Downloads and load them into your SNMP monit...

Страница 25: ...click Use 2 digit SNMP if you prefer to receive values in 2 digit rather than 4 digit format Then continue on to the SNMP Sending Configuration or SNMP Receiving Configuration section of the page expl...

Страница 26: ...or leave the default 0 0 0 0 3 Click Accept Changes at the bottom of your screen to temporarily save your settings You may now navigate to another screen however if you close the web interface before...

Страница 27: ...another screen however if you close the web interface before the next step you will lose your changes 4 Click Save Settings in the navigation bar to the left of your screen Your Room Alert will automa...

Страница 28: ...h sensors connected to your Room Alert 4E in this screen Your Room Alert 4E sends alerts based on these thresholds Navigate to Settings Sensors to open the Sensor Settings screen For more information...

Страница 29: ...the Internal Temperature Sensor if its reading differs from a known temperature value at that location 5 Click Accept Changes at the bottom of your screen to temporarily save your settings You may now...

Страница 30: ...differs from a known value at that location 5 Click Accept Changes at the bottom of your screen to temporarily save your settings You may now navigate to another screen however if you close the web i...

Страница 31: ...ay either refer to its Installation Note or see for yourself by physically connecting your sensor to your Room Alert and then observing what happens to its circuit state in the Status page After you c...

Страница 32: ...rily save your settings You may now navigate to another screen however if you close the web interface before the next step you will lose your changes 4 Click Save Settings in the navigation bar to the...

Страница 33: ...ill return as failed and register an alarm state Navigate to Settings Ping Options to open the Ping Settings screen 1 In Retry Count you may enter the number connection attempts Room Alert will make b...

Страница 34: ...tings in the navigation bar to the left of your screen Your Room Alert will automatically reboot and commit your changes Alarm Options Navigate to Settings Alarm Options to open the Alarm Options scre...

Страница 35: ...shows the options for a Light Tower w Audio before it has been configured 2 If you want to enable actions when your Room Alert 4E returns to a clear state click Alarm Clear Action You may pick the sp...

Страница 36: ...Step 3 shuts off the green LED turns on 5 Click Accept Changes at the bottom of your screen to temporarily save your settings You may now navigate to another screen however if you close the web inter...

Страница 37: ...creen however if you close the web interface before the next step you will lose your changes 5 Click Save Settings in the navigation bar to the left of your screen Your Room Alert will automatically r...

Страница 38: ...screen defaults Device ManageR Push time date and trace output Navigate to Settings Advanced to open the Advanced Settings screen Temperature Scale Configuration You may set the default temperature s...

Страница 39: ...cept Changes at the bottom of your screen to temporarily save your settings You may now navigate to another screen however if you close the web interface before the next step you will lose your change...

Страница 40: ...the port Device ManageR uses The default is 8080 4 In Push Interval choose the number of minutes you would like between pushes from the drop down list 5 Click Accept Changes at the bottom of your scre...

Страница 41: ...6 In Time Server Auto Refresh you may select how often Room Alert 4E automatically synchronizes with your time server You may leave the default 24 Hours or choose another interval as frequent as 10 mi...

Страница 42: ...e Tracing 2 In Trace Port you may leave the default port 143 or enter another port number 3 Click Accept Changes at the bottom of your screen to temporarily save your settings You may now navigate to...

Страница 43: ...urces You may find the version number and release date of the firmware that is installed on your Room Alert 4E on this screen To check if your Room Alert 4E has the most current version select Click H...

Страница 44: ...rt resources You may find the version number and release date of the firmware that is installed on your Room Alert 4E on this screen To check if your Room Alert 4E has the most current version select...

Страница 45: ...y enabled for To download click the Download Now button next to the appropriate product How To Update Room Alert 4E s Firmware 5 Download and save the most recent firmware update for Room Alert 4E fro...

Страница 46: ...range of IP addresses assigned to DHCP devices on your network 5 Click Begin Scan which initiates a TCP scan on port 30718 6 When the scan is complete click Close Window and your Room Alert 4E should...

Страница 47: ...on the network to reset it to factory defaults 1 With your Room Alert 4E connected to the network and powered on press and hold the reset button for at least 10 seconds until the left LED over the net...

Страница 48: ...ive history of environmental conditions Control the log file size automatically Manage Unlimited Network Cameras View all of your Axis camera displays simultaneously and control who has access Automat...

Страница 49: ...power on off status Monitors main UPS or single phase power Provides battery backup power for 15 minutes or more for any 5V device Max sensor cable distance up to 900 includes 25 Plugs in line with AV...

Страница 50: ...ood Sensor Spot Flood Sensor w 24 Cable More Sensors Cameras Packages Accessories Online 275 RMA ET1 SEN Real time low extreme temperature sensor Temperature range 328 32 F 200 0 C Analog 1 5 VDC Sens...

Страница 51: ...E 4E 3E 3W WiSH WiSPR INCLUDES Water Tank Level Sensor With 25 Cable Installation Note 195 RMA WTL1 SEN NC RMA WTL2 SEN NO N EW Real time recognition of fuel level rise or fall past an established lev...

Страница 52: ...jector 5V RoHS Power Cable Installation Note B E S T S E L L E R P O P U L A R 75 Designed to extend the length of AVTECH s Light Tower w Audio Cab be extended by adding additional 25 extensions Maxim...

Страница 53: ...ts wtih status updates and advanced statistics on all or select discovered devices i e Room Alert alerts detected by Device ManageR and more View and print status and or statistics for selected enviro...

Страница 54: ...oups simultaneously sequentially or according to a defined schedule Plugin Dial Out Bundle GSM Text Voice When used with Device ManageR this plugin package will allow users to send out text messages v...

Отзывы: