background image

AVTECH Software Inc.


8

Room Alert 32W


        Installation

NOTE: The Room Alert 3W does not ship with a username or password assigned so you should be able to access the 

‘Settings’ screen by leaving the username and password fi elds blank and clicking the ‘OK’ button.

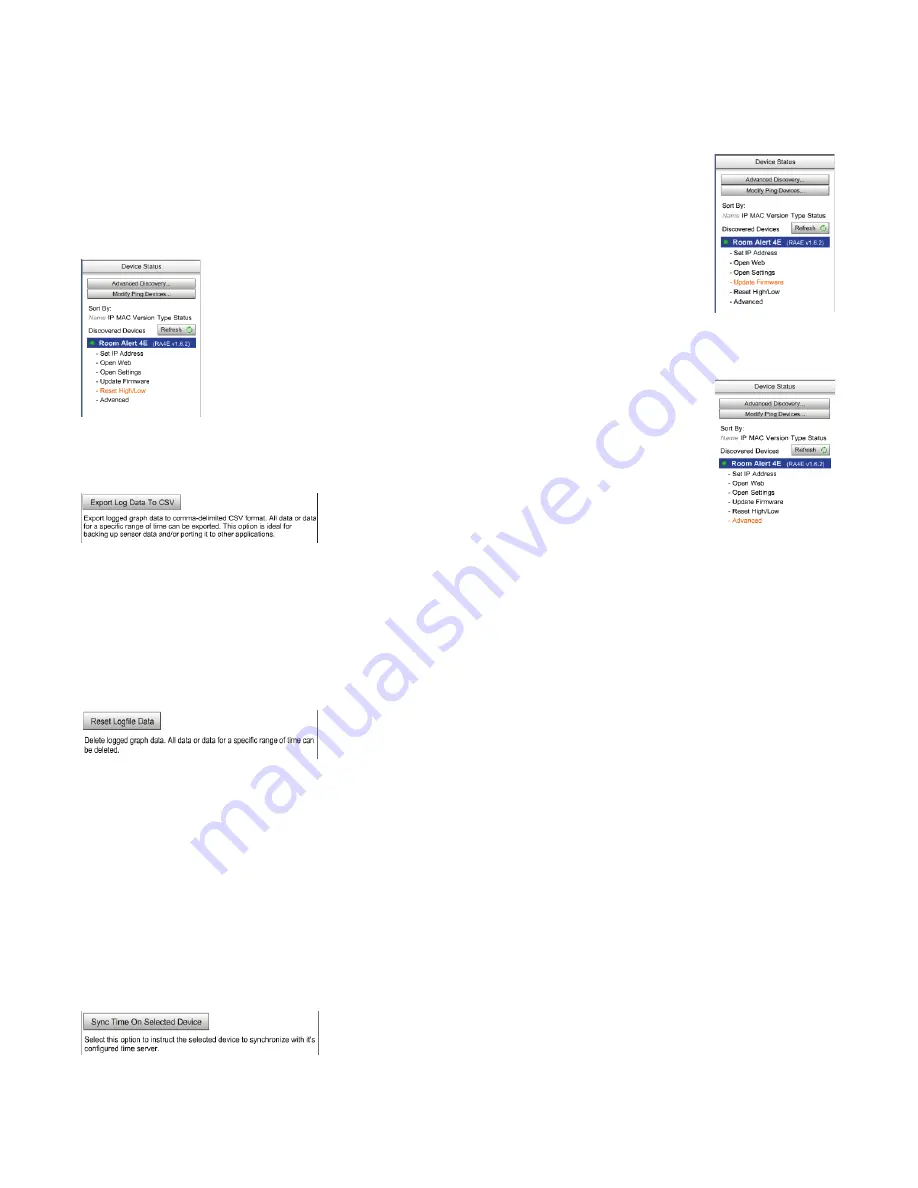
The ‘Update Firmware’ feature is used to initiate the fi rmware upgrade process using 
Device ManageR. Please see the ‘Upgrading Firmware’ section of the ‘Advanced 
Topics’ chapter for important instructions on the fi rmware update procedure.

The ‘Reset High/Low’ feature is used to clear the current High and 
Low historical values for the sensors on the ‘Status’ page of the 
Room Alert 32W monitor. These values are normally stored until the 
unit reboots, at which time they reset automatically. You can manually reset them if 
you wish by clicking the ‘Reset High/Low’ link or button.

The ‘Advanced’ feature is used to perform additional functions which are accessible 

via a menu once you click the link or button. 

   The ‘Export Log Data To CSV’ button allows you 

to export the logged data from the Device ManageR 
database to comma-delimited CSV format. You can 

select from a list of monitors to export data for a single monitor or you can export the 
logged data for all devices. You can export all of the logged data by selecting the ‘All Log Data’ radio 
button and you also have the option of specifying a date range to export from by selecting the ‘Date 
Range’ radio button. When selecting the date range, simply click the calendar button next to the ‘Start:’ 
header to specify the start date and time and the accompanying calendar button next to the ‘End:’ header 
to select the end date and time for the export.

   The ‘Reset Logfi le Data’ button allows logged sensor data for 

selected device (s) to be reset or deleted. The logfi le should be 
periodically reset on a regular basis (perhaps monthly, quarterly or 

annually) to ensure smooth operation and performance of Device ManageR. We recommend that you 
save a copy of the logged data for your own records before resetting or deleting the logged data. Use the 
‘Export Log Data To CSV’ feature to save a copy of the logged data. You can reset the logfi le data on all 
devices by selecting the ‘All Devices’ radio button or you can specify a single device to clear logfi le data 
on by selecting the ‘Specifi c Device’ radio button and selecting the desired monitor. In addition, you can 
reset all of the logfi le data for the device (s) or opt to delete only data from specifi c date ranges. Click the 
‘All Log Data’ radio button to clear all of the log data or the ‘Date Range’ radio button to specify a date 
range to delete from. When specifying a date range, click the calendar button next to the ‘Start:’ header to 
select a start date and time and then click the calendar button next to the ‘End:’ header to select an end date 
and time for the delete range. Click the ‘Reset Logfi le Data’ button to complete the logfi le reset process.

   The ‘Sync Time On Selected Device’ instructs the Room Alert 32W to 

synchronize with the time server specifi ed in the ‘Time Server IP’ 
fi eld on the ‘Advanced’ tab of the ‘Settings’ page. The time displayed 

Содержание Room Alert 32W

Страница 1: ...nitoring Real Time Temperature Humidity Power More with Logging Alerting Wireless Sensor Monitoring Phone Fax Webal 401 628 1600 401 628 1601 AVTECH com User s Guide Reference Manual 0 0 03 Room Alert 32W ...

Страница 2: ......

Страница 3: ...ECH the AVTECH Logo AVTECH Software the AVTECH System Manager Character AVTECH com AVTECHSoftware com Environment Alarm Environment Monitoring Made Easy EnvironmentMonitor com IT Environment Monitoring Made Easy Mini UPS MUPS Network Wide Monitoring Made Easy Device Discovery Device ManageR Protect Your IT Environment Don t Wait Until It s Too Late Room Alert Room Alert PLUS Room Alert Relay Room ...

Страница 4: ...ors And Accessories 11 Step 5 Check Room Alert 32W Firmware Version 12 Configuration And Setup Screens 13 Alert Methods 13 Email 13 Initial Email Setup 14 Testing 14 Email To SMS 15 SNMP 15 SNMP Queries SNMP Get 16 SNMP Traps 16 Monitoring With Device ManageR 16 Alert Thresholds 17 Internal Temperature Sensor Humidity Sensors 17 Internal Power Sensor 18 Digital Sensors 18 Switch Sensors 19 Wireles...

Страница 5: ...4 Room Entry Sensor 24 Sound Light Entry Sensor 25 Panic Button 1 25 Panic Button 2 25 Powered Wireless Sensor Hub P WiSH 25 Wireless Sensor Hub Powered Relay WiSPR 25 Dry Contacts 25 Additional Screens And Interfaces 26 Network 26 Security 26 Advanced 27 Using Trace Outputs 28 Help 28 About 29 Web Interface 30 Advanced Topics 32 Upgrading Firmware 32 Reset Factory Default 32 Unit Accessible Altho...

Страница 6: ...rising or falling and be assured continued operation even during a power outage with Room Alert 32W s built in Uninterruptible Power Supply UPS Status of internal and attached sensors for power flood smoke air flow room entry and more is viewed in real time through Room Alert 32W s web interface and your favorite web browser Room Alert 32W is designed to work easily with AVTECH s Device ManageR in...

Страница 7: ...conditions from the Room Alert 32W monitor Monitoring of wired switch sensors is possible up to 900 feet away the from Room Alert 32W a WiSH or WiSPR hub Exact distance will vary Notification to an unlimited number of individuals or groups at an unlimited number of temperature between 67 to 257 F or 55 to 125 C and humidity between 0 to 100 relative humidity thresholds too high or too low and by n...

Страница 8: ... Of Four 4 Rack Mount Bolts Cage Nuts Square Plug Adapters One 1 Package Of Literature Additional Information NOTE Some of the components arriving with this package may be individually wrapped and contain additional supporting components Please remember to keep these components together as they will be required for proper setup If you received additional components i e like additional sensors that...

Страница 9: ...gth is indicated for a specific WiSH or WiSPR Sensor then that sensor should be repositioned or moved to a better location for improved reliability PoE WLAN GSM Indicators These three LEDs indicate the current status of Room Alert 32W s built in PoE WLAN and or GSM modem coming in future models If the LED is green then the corresponding feature is functioning and in use Digital Switch Wireless Ala...

Страница 10: ...her power adapter with Room Alert 32W or it could damage the unit and void the warranty On Off Button Use this button to turn the Room Alert 32W unit on off IMPORTANT NOTE DO NOT CONNECT POWER to the Room Alert 32W monitor during the initial setup UNTIL AFTER you have connected it to your network as described above or it will cause problems automatically assigning the initial IP address More on in...

Страница 11: ...he Power port on the Room Alert 32W monitor only if the Room Alert 32W monitor is already connected to the network Be sure to remove the sticker over the Power port before attaching the AVTECH 5V 1A Power Adapter to the Room Alert 32W monitor Once the network and power connections have been completed in that specific order verify that the LED located on the bottom left side of the network jack lig...

Страница 12: ...nd Use DHCP check boxes to configure the unit and obtain an IP address automatically To assign static IP settings enter the valid IP settings for your network in the IPAddress Gateway IPAddress Subnet Mask and DNS Server IPAddress Once you have the settings configured as desired click the Update IP Settings button You will see a confirmation window explaining that the unit is rebooting and the upd...

Страница 13: ... simply click the calendar button next to the Start header to specify the start date and time and the accompanying calendar button next to the End header to select the end date and time for the export The Reset Logfile Data button allows logged sensor data for selected device s to be reset or deleted The logfile should be periodically reset on a regular basis perhaps monthly quarterly or annually ...

Страница 14: ... for your network Click the Advanced Discovery button under the Device Status section In the Advanced Discovery Options configuration window click the Set IP Via MAC Address button Enter the MACAddress of the monitor in the MACAddress field Be sure to use all capital letters The MAC address for the RoomAlert 32W is listed on the label attached to the bottom of the hardware unit If assigning the mo...

Страница 15: ... and work with the Room Alert 32W monitor at the new network location In the event that the Room Alert 32W is not discovered by Device ManageR the network may be blocking UDP broadcast packets on port 30718 Even if the Room Alert 32W obtains a valid IP address this can prevent the Room Alert 32W monitor from being discovered by Device ManageR To resolve this issue check the DHCP server for the MAC...

Страница 16: ...ations the AVTECH Device Discovery Utility will be needed to resolve your issue These situations would be a case where you cannot discover the Room Alert 32W with Device ManageR using either automatic or manual discovery although you need to update the firmware on the unit or the rare instance where you need to perform a firmware recovery on your Room Alert 32W For more information please see the ...

Страница 17: ...P broadcasts on your network you can manually add the Room Alert 32W to the Device Status section by its IP address using the Advanced Discovery button or simply type the IP address of the Room Alert 32W unit in the address bar of a web browser NOTE If the Status screen does not load sensor data be sure that a proxy or Microsoft ISA Internet Security and Acceleration server is not blocking traffic...

Страница 18: ...W monitor is fully SNMP compliant and can send SNMP Traps and or be accessed by any monitoring application that can issue a SNMP Get request Email Email alert notifications are configured in the Room Alert 32W web interface on the Email tab of the Settings screen Email alert notifications from the Room Alert 32W monitor are sent using anonymous SMTP relay Be sure the mail server being used is conf...

Страница 19: ...is entered in the Mail Server Address field the Room Alert 32W unit must be assigned static IP settings and have a DNS server IP address set A number of optional settings are available that control how email is sent and displayed The Email Footer Enabled checkbox controls whether the email footer with AVTECH contact information is included in email messages while the Use SMS checkbox will send a s...

Страница 20: ... providers This is the largest database of this type on the web However if your service provider is not listed please contact them by phone for the proper format and be sure that the mobile device being used has text messaging capability enabled If you learn of a new or changed format please email this with your contact information to Support AVTECH com so we may confirm it and post it online for ...

Страница 21: ...twork and received by an SNMP enabled software application capable of receiving SNMP Traps To configure the Room Alert 32W to send SNMP Traps to a specific IP address enter the IP address in one of the three SNMP Trap Recipient fields on the SNMP tab SNMP Traps sent from the Room Alert 32W monitor are sent using an SNMP community name of public If use of a third party application is desired be sur...

Страница 22: ...splayed will be a gray circle if a sensor is connected although an alert threshold is not set If an alert threshold is set for a connected sensor and the sensor is not in an alarm state the status icon displayed will be a green check If the connected sensor is in an alarm state the status icon displayed will be a red X Internal Temperature Humidity Sensors The internal temperature and humidity sen...

Страница 23: ...w thresholds for the temperature are entered in the High and Low columns Temperature thresholds must be entered in the temperature scale i e Fahrenheit or Celsius selected on the Advanced tab If the sensor readings differ from a known temperature at the sensor location the display value can be calibrated using the Adjust column Digital sensors provide real time variable status values that can be u...

Страница 24: ... time status information showing whether a sensor is in or out of an alert state These sensors have an internal switch that is monitored to see if the switch is open closed on off make break etc Sensor status can be logged for historical reference although this type of sensor does not allow threshold monitoring like digital sensors Users can still turn the logged status information into graphs or ...

Страница 25: ...tch the temperature scale i e Fahrenheit or Celsius selected on the Advanced tab If the reading received from the internal Digital Temperature Sensor is different from a known temperature at the sensor location the displayed reading can be calibrated using the Adjust column Setup for sensors connected to the Environment Sensor Channels digital sensor ports and Switch Sensor Contacts Sets is descri...

Страница 26: ...n the Sensors tab of the Settings page The sensor label can be modified for each Analog Sensor Input and High Low thresholds can be set to trigger alert notifications Relay Outputs Room Alert 32W has two built in relay outputs that can optionally be turned on or off in response to an alarm condition Each Relay Output is configured on the Relay Options tab of the Settings screen A unique sensor lab...

Страница 27: ...urn on off in response to an alarm condition Each Signal Tower Output is configured on the Alarm Options tab of the Settings screen A unique sensor label can be configured for each signal tower output which can help indicate where the signal tower is currently installed Each Signal Tower Output can be individually configured to turn on off in response to alarms being triggered and alarms being cle...

Страница 28: ... allows real time temperature values from 67 to 257 degrees Fahrenheit and or 55 to 125 degrees Celsius Accuracy is within 0 5 degrees Its non conductive casing makes it a perfect sensor for monitoring the temperature of fluids in extreme environments walk in coolers lab refrigerators or freezers This is an instant plug play sensor that connects to one of the external environment sensor channels v...

Страница 29: ...an be detected anywhere along the orange cable This is an instant plug play sensor that connects to one of the switch sensor contact sets via a low voltage 2 wire cable Flood Sensor Spot RMA FS2 SEN TheAVTECH Flood Sensor allows real time notification of flood water It is powered by a 9vAlkaline battery included This is an instant plug play sensor that connects to one of the switch sensor contact ...

Страница 30: ...via the push of a button This is an instant plug play sensor that connects to one of the switch sensor contact sets via a low voltage 2 wire cable Powered Wireless Sensor Hub P WiSH RMA PWSH HUB The AVTECH Powered Wireless Sensor Hub P WiSH is used exclusively to transmit sensor data from internal and connected sensors back to the Room Alert 26W or 32W IT environment monitoring hardware unit It ca...

Страница 31: ...If configuring static IP settings on the Room Alert 32W monitor be sure that the settings assigned are valid for the current location of the Room Alert 32W and that there are no other devices assigned to the same IP address DO NOT set an IP address that is outside of your subnet or you may not be able to see or discover the Room Alert 32W unit The MTU Size allows configuration of the size of packe...

Страница 32: ... Advanced The Advanced tab of the Room Alert 32W Settings screen is used to configure the temperature scale i e Fahrenheit or Celsius time zone time display daylight savings time setting time server IP address and trace configuration options The temperature scale selected in the Temperature Scale button will be the default temperature scale used when entering alert thresholds and displayed on the ...

Страница 33: ... window When the trace window loads click Connect to begin viewing the live trace output Once trace is running try to replicate any issues that are occurring so they are captured in the trace output If having issues sending email send a test email while viewing the trace output Once the details for an issue or event are captured copy and paste the trace output into a text editor to save the conten...

Страница 34: ...d About The RoomAlert 32W About screen provides general links and contact information forAVTECH sales support and websites The firmware version that is currently installed on the RoomAlert 32W monitor will also be listed with the date released directly below The link entitled Click Here To Check For Updates can be used to check if the firmware version installed on the RoomAlert 32W monitor is the ...

Страница 35: ...e to connect to a time server Please verify that the network has a connection to the internet and that NTP requests on UDP port 123 are not blocked If the network does not have a connection to the internet or use of a local time server is desired an IP address for a valid NTP time server can be entered in the Time Server IP field on the Advanced tab of the Settings screen To the right of the date ...

Страница 36: ...he Settings screen Below these two rows is the sensor display area The sections displayed from top to bottom are Internal Sensors Digital Sensors Switch Sensors and then Wireless Sensors Next to the sensor block name will be text indicating the number of sensors currently connected The display for each sensor within the sensor block will contain the corresponding sensor label for that sensor as we...

Страница 37: ...played in the Update Firmware dialog box Click the Update button to perform the firmware update Reset Factory Default Settings There are two primary methods for returning a Room Alert monitor to the factory default settings This can be useful if the unit is assigned invalid network settings and is no longer accessible or if the unit will be moved to a new location and will be reconfigured If the u...

Страница 38: ...ecovery The AVTECH Device Discovery Utility is capable of performing a firmware recovery in the event that this occurs To begin the firmware recovery process please complete the following steps Install the AVTECH Device Discovery Utility on a computer with a single Ethernet adapter Download the most current version of the Room Alert 32W Firmware Update file from the Downloads section of the AVTECH...

Страница 39: ......

Страница 40: ...Protect Your IT Facility Don t Wait Until It s To Late AVTECH com ...

Отзывы: