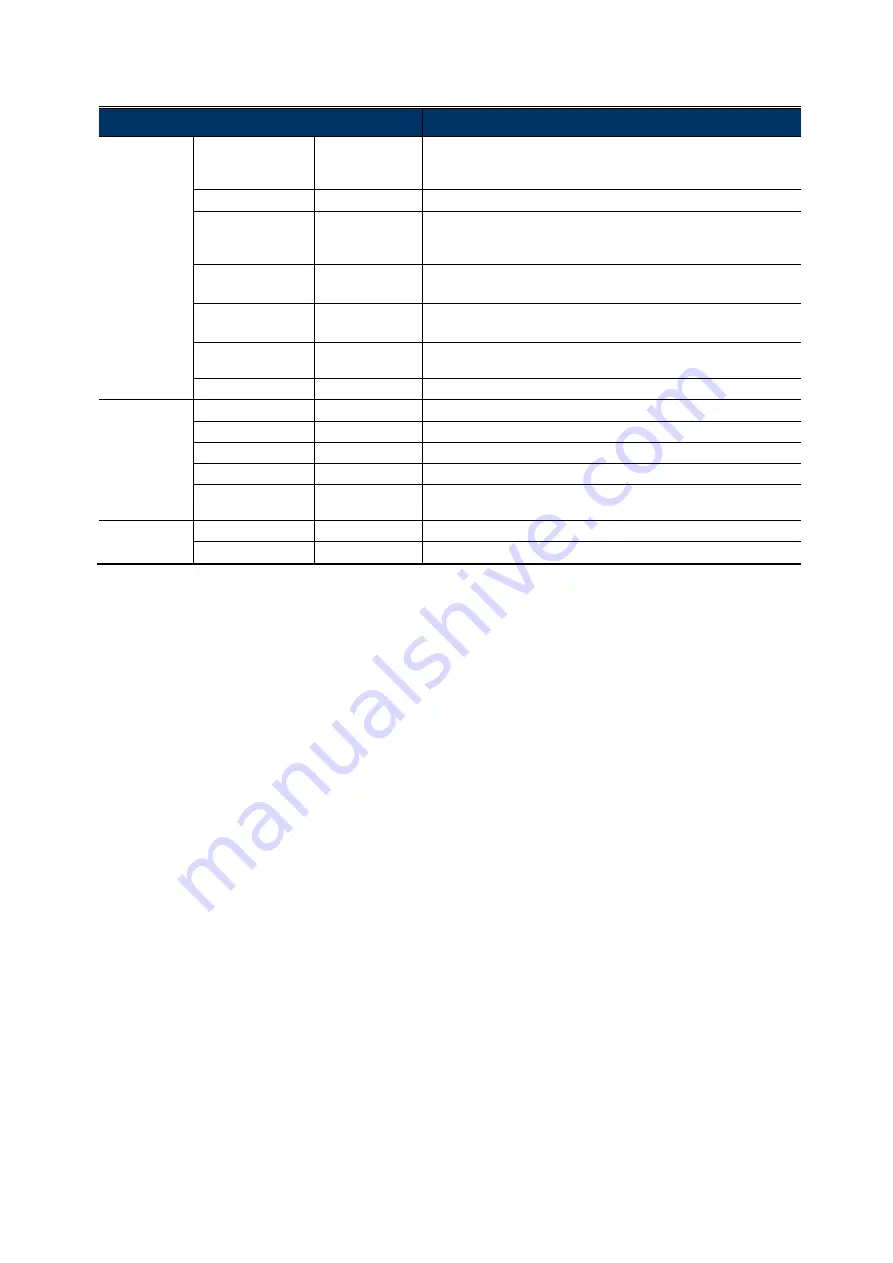
Avtech Ezum DGC1304-10 Скачать руководство пользователя страница 8


MENU 


DESCRIPTION 

EFFECT 

COLOR GAIN 

0 ~ 255 

Set the level of color saturation.   
The more the value, the more saturated the color will be, but the 
more noise the image will get. 


COLOR HUE 

0 ~ 71 

Set the level of hue.


SHARPNESS 

0 ~ 255 

Set the level of sharpness to enhance the clarity of image detail by 
adjusting the aperture and sharpening the edges. 
The more the value, the sharper the image will be. 


CONTRAST 

0 ~ 255 

Set the level of contrast. 
The more the value, the more the contrast level of the image will be.


BRIGHT OFF. 

-128 ~ 127 

Set the level to compensate the brightness of the image if needed. 
The more the value, the brighter the image will be. 


MIRROR 

OFF / ON 

Enable to turn the images horizontally based on your installation 
situation when necessary. 


FLIP 

OFF / ON 

Enable to flip the image 180° when necessary. 

SYSTEM 

CAMERA ID 

0 ~ 255 

Set the camera ID. 


ID DISP. 

OFF / ON 

Enable or disable the display of the camera ID. 


NAME DISP. 

OFF / ON 

This function has no use. 

 LANGUAGE 

ENG 

中文


Select the language of the menu: English / Simplified Chinese. 


FACTORY INIT 

OFF / ON 

Enable to restore the camera parameters to factory default values. 
The camera image will flash once when the reset is done. 

EXIT 

SAVE & EXIT 

-- 

Save all the changes you’ve made in each menu and exit. 

 EXIT --  Exit 

without 

saving. 


Содержание Ezum DGC1304-10

Страница 1: ...o constitute a risk of electric shock to persons This exclamation point within an equilateral triangle is intended to alert the user to the presence of important operating and maintenance servicing in...

Страница 2: ...s 1080P 25fps Min Illumination 0 1 Lux F1 6 Wide F2 8 Tele 0 Lux IR LED ON S N Ratio More than 48dB AGC OFF Shutter Speed 1 30 1 25 sec 1 720000 1 600000 sec Lens Motorized f2 8 f8 0mm F1 6 F2 8 Lens...

Страница 3: ...tep3 Drill 4 holes and screw the base to the wall or ceiling Figure 2 Figure 3 Step4 Put together the case and the lens and slightly adjust the camera lens Make sure it faces your target surveillance...

Страница 4: ...zoom out on the image to its original size Zoom in out Click to zoom in out the image Focus near far Click to adjust the focus of the image IR intensity Click and drag the slider from 0 5 to adjust th...

Страница 5: ...P to enter the menu of camera parameters ADVANCED CONFIG CAMERA CH1 CH2 CH3 CH4 DETECTION OSD MENU SETUP ALERT DCCS MENU SETUP NETWORK DISPLAY RECORD F W E8 DCCS DEVICE AVT SERIES NOTIFY CONNECTION OK...

Страница 6: ...damage the camera With this function the camera will delay the mode switch at night since the light change is temporary and unnecessary to pay attention AWB MODE AUTO Automatically adjust the white b...

Страница 7: ...ft side EX Extend narrow the current area from the right side SY Extend narrow the current area from the top EY Extend narrow the current area from the bottom MOTION MOTION Enable ON disable OFF motio...

Страница 8: ...level to compensate the brightness of the image if needed The more the value the brighter the image will be MIRROR OFF ON Enable to turn the images horizontally based on your installation situation wh...

Отзывы: