background image

Installation Instructions

Ventvisor

®

  Deflector

Page 1 of 3

I - Sheet Number


VV93 Rev.A

For proper installation and best possible fit, please read all instructions BEFORE you begin.

For technical assistance or to obtain missing parts, please call Customer Relations at 1-800-241-7219.

Important Safety Information

• CAUTION - Before driving, ensure that the vent visor is properly secured to vehicle.

• Do not use automatic “brush-style” car washes.

• Do not use cleaning solvents of any kind.

• Periodically check all components for tightness.

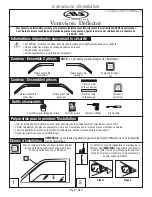
Car Wash Supplies

Clean Towel

• A trial fit is recommended to ensure proper positioning and fit. 

• Check fit of parts before painting as we will not accept the return of modified or painted parts.

• Wash and dry your vehicle to remove any debris and/or dirt from the installation area.  


Alcohol Pad x2

Contents - 2 Piece Set

Contents - 4 Piece Set

Front Driver 

Side Visor

Tools Required

NOTE: Actual product may vary from illustration.

Preparation Before Painting / Installation

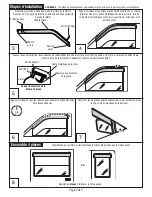
Installation Steps

NOTE: Actual application may vary slightly from illustrations.

Front Passenger 

Side Visor

Front Driver 

Side Visor

Front Passenger 

Side Visor

Rear Driver’s 

Visor

Rear Passenger’s 

Visor

Alcohol Pad x4

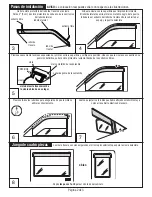
Buff the OUTSIDE of the rubber window channel with 

the scotch brite scuff pad. Then clean with an alcohol 

pad and dry with a soft cloth.

1

2

(1) Remove the triangular plastic mirror cap from the 

INSIDE of the door. (2) Loosen but do not remove the 

mirror mounting screws using a phillips screwdriver or 

nut driver as applicable.

Step 1

Step 2

Scotch Brite Pad

Scotch Brite Pad

Содержание Ventvisor

Страница 1: ...of modified or painted parts Wash and dry your vehicle to remove any debris and or dirt from the installation area Alcohol Pad x2 Contents 2 Piece Set Contents 4 Piece Set Front Driver Side Visor Tools Required NOTE Actual product may vary from illustration Preparation Before Painting Installation Installation Steps NOTE Actual application may vary slightly from illustrations Front Passenger Side ...

Страница 2: ...ess the exposed areas of tape against the surface and verify position With the visor in its final position remove the remaining tape liner by pulling on free ends 7 4 Piece Set The rear visor attaches with the same preparation methods as the front visor metal window frame tape rubber window channel PRESS visor cross section of visor in place Remove tape liner from rear flange of visor Peel back 2 ...

Страница 3: ...action from your investment We have made every effort to ensure that your product is top quality in terms of fit durability finish and ease of installation 2005 Lund International Inc All rights reserved Auto VentshadeTM the Auto VentshadeTM logo and the AVSTM logo are trademarks of Lund International Inc Lund International Ventshade Accessories Division 655 Raco Drive Lawrenceville GA 30045 800 2...

Страница 4: ...r Tampons à l alcool 4 Contenu Ensemble 4 pièces Outils nécessaires Serviette propre Fournitures pour lavage de voiture Préparation pour la peinture l installation Il est recommandé de procéder à un essai pour s assurer que le positionnement et l ajustement sont corrects Vérifier l ajustement des pièces avant peinture car nous n acceptons pas le retour de pièces modifiées ou peintes Laver les glis...

Страница 5: ...n adhésif contre la surface et vérifier la position Une fois la visière en position finale retirer le reste de la protection d adhésif en tirant sur les extrémités libres 7 Ensemble 4 pièces L installation de la visière arrière demande la même préparation que la visière avant Cadre métallique de la glace Ruban adhésif Glissière en caoutchouc de la glace APPUYER Visière Coupe transversale de la vis...

Страница 6: ...de votre investissement Nous avons pris toutes les mesures nécessaires pour assurer que ce produit est d une qualité supérieure en ce qui concerne l ajustement la durabilité la finition et la facilité d installation 2005 Lund International Inc Tous droits réservés Auto VentshadeTM le logo Auto VentshadeTM et le logo AVSTM sont des marques déposées de Lund International Inc Lund International Vents...

Страница 7: ...ilizados x 2 Contenido Juego de cuatro piezas Visera delantera del conductor Visera delantera del acompañante Visera trasera del conductor Visera trasera del acompañante Paños esterilizados x 4 Equipo de limpieza de vehículos Toalla limpia Herramientas necesarias Preparación antes de pintar o instalar Se recomienda realizar un ajuste de prueba para asegurar el posicionamiento y ajuste correctos Co...

Страница 8: ... verifique la posición Una vez que la visera se encuentre en su posición definitiva quite la cinta protectora restante tirando de los extremos libres 7 Juego de cuatro piezas La visera trasera se coloca siguiendo el mismo procedimiento que para la visera delantera marco metálico de la ventanilla cinta canal de goma de la ventanilla PRESIONE visera vista del corte transversal de la visera ubicada e...

Страница 9: ...n con su inversión Hemos realizado todos los esfuerzos para asegurarnos de que su producto sea de la mejor calidad en cuanto a ajuste durabilidad acabado y facilidad de instalación 2005 Lund International Inc Todos los derechos reservados Auto VentshadeTM el logo de Auto VentshadeTM y el logo de AVSTM son marcas comerciales de Lund International Inc Lund International Ventshade Accessories Divisio...

Отзывы: