AVLink MaitreView 4KPro Скачать руководство пользователя страница 66


MaitreView™ 4KPro User Manual                                                                                                                                   

66


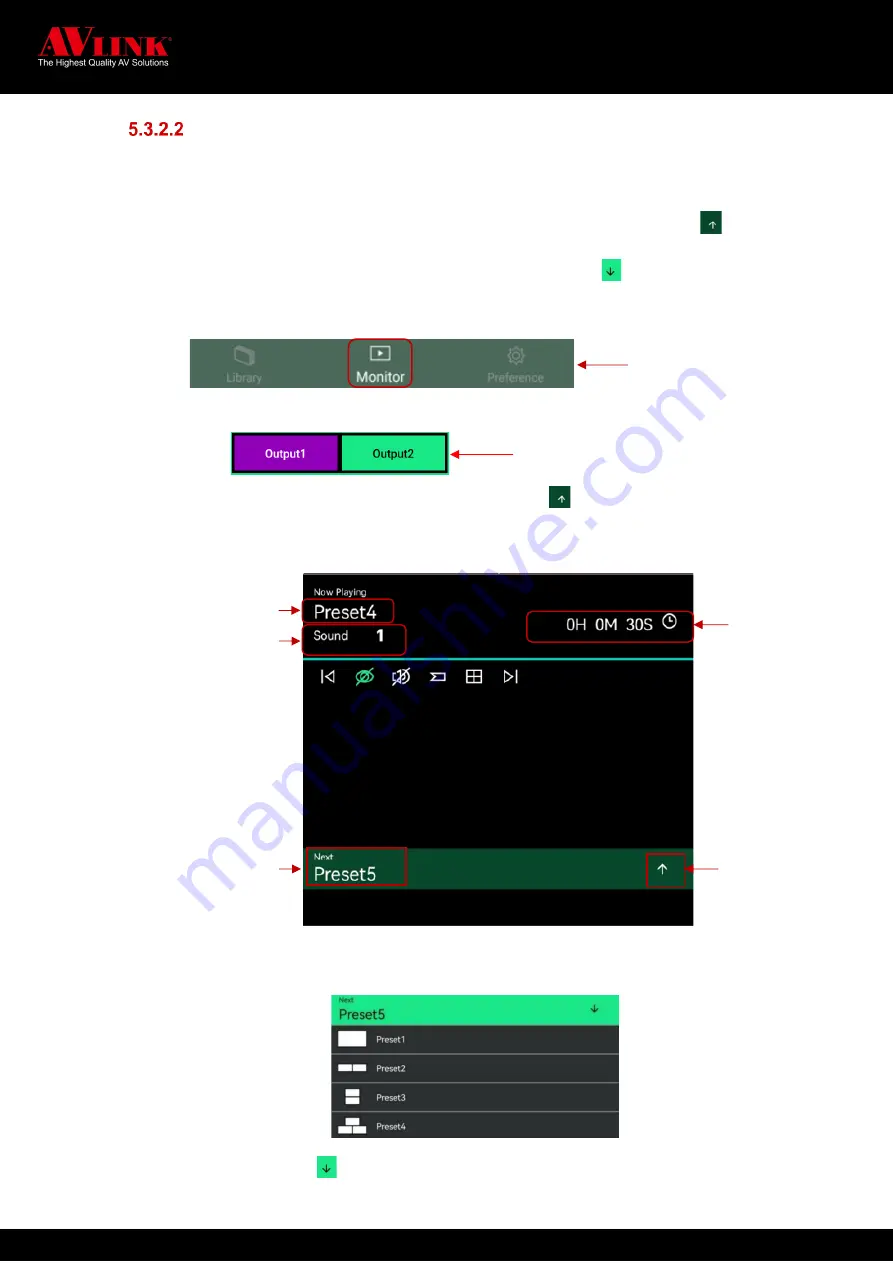
  How to check the content of the current playlist 

You can check the content of the current playlist by expanding the list, to do this you need to: 


Go Monitor ►Choose Output1 or Output2 ►Expand current playlist use


►Collapse current playlist press 

1. 

Choose 

Monitor

 from the Main Menu 

2. 

Choose 

Output1

 or 

Output2

 on output switch, the selected output will show in purple background 

3. 

Find the

 Current Playlis

t section, and press the up arrow       to expand the playlist 

4. 

All layouts on the current playlist will be shown here 

5. 

You can choose any layout in a playlist 

6. 

Once you finish, press       to collapse the current playlist and go back to the 

Monitor

 page 

Shows Layout play now 

You can choose Audio from 

input  source1~4  by  tap  on 

number once to expand list  

Playlist  time 

Interval  

shows all layouts in 

the current playlist 

Press to expand 

current playlist 

Main menu 

Output switch 

Содержание MaitreView 4KPro

Страница 1: ...MaitreView 4KPro User Manual UM MaitreView 4KPro v15...

Страница 2: ...ling the device to the rack Do not attempt to maintain the device yourself for any faults please contact your vendor Save this manual properly for future reference Copyright and Trademark All rights r...

Страница 3: ...3 3 1 INPUT CARD CONNECTION 14 3 2 OUTPUT CARD CONNECTION 15 3 3 CONTROLLER CONNECTION 16 3 4 POWER CONNECTION 17 4 WINDOWS APP 18 4 1 MAIN PAGE FOR WINDOWS APP 19 4 2 LINK OR UNLINK SWITCH 20 4 3 OUT...

Страница 4: ...be no more complex controlling setups You can simply drag drop to deploy layout anytime and anyway You will never be bridled by templated or fixed layouts MaitreView 4KPro can effectively display all...

Страница 5: ...ser Manual 5 The device packing includes the following MaitreView 4KPro x 1 12V 5A Power adaptor x 1 Rack Mounting Ear Set part No 3ME FI 03057 3ME FI 03058 Earset screw pack part No 3ME SC 00203 Quic...

Страница 6: ...mpressed 4K 60Hz 4 4 4 resolutions 18Gbps bandwidth Real seamless switching Real time drag drop to organized layouts into the preferred output and it only played on specific output Independent layouts...

Страница 7: ...e the LED will start to blink in green for around 30 seconds 3 After the POWER button stopped blinking and the LED is green the device is ready to use Turn off the device long press POWER button for a...

Страница 8: ...ts E NEXT Press to apply the next layout The NEXT button is used to apply the next layouts in the device the NEXT button can be pressed once to view the next layout one by one the next layout will sho...

Страница 9: ...IN HDMI input port Associate to input channels 1 to 4 respectively K DC 12V Power port for DC 12V Power adaptor included L POWER and ALARM LED The green LED indicates that the OUTPUT CARD functions c...

Страница 10: ...4 4 RACK MOUNT EARSET INSTALLATION MaitreView 4KPro device can be installed with a rack mount earset or without a rack mount earset al the mounting kit is included in the pack when you need to mount o...

Страница 11: ...Borders Configurable color thickness OSD Available on all regions with user defined names Presets Number of presets available 10 Video Inputs Input connectors 4 x HDMI HDMI 1 4 2 0 HDCP 1 4 2 2 compa...

Страница 12: ...e USB 2 0 SD Card slot SDXC SDIO 3 0 Capacity 2TB Format FAT32 ext4 exFat Mechanical Size H x W x D 76 2mm x 388 mm with mounting ears 487mm x 349mm Weight 4885g with mounting kit 5080g Housing SGCC G...

Страница 13: ...elow when any of the 4 input sources from A to D are connected to HDMI IN ports the signal will output through HDMI OUT to Output 1 and Output 2 The Photo Viewer can be connected through the USB 2 0 o...

Страница 14: ...back panel you may connect any of your 4K input sources on the HDMI IN ports when HDMI IN ports plugin correctly the POWER LED will be in green If the connection is faulty then the ALARM LED will be...

Страница 15: ...y of the output displays onto OUTPUT CARD when the HDMI OUT1 AUDIO OUT1 port and HDMI OUT2 AUDIO OUT2 are plugged in respectively If successfully connected the power LED will be green if the connectio...

Страница 16: ...g in a USB storage device or microSD card in respective ports and choose the photo that you wish to view on the output display the photo user chose will be displayed on the Photo Viewer which is the r...

Страница 17: ...wer supply If the power supply is steady the POWER LED on the front panel will be blue When connections on the back panel are completed the power button on the front panel is on stand by mode with a b...

Страница 18: ...rocess the MaitreView 4KPro Windows APP will be installed on the PC After installation is completed click on the desktop will launch the Windows APP when the following window appears on the PC monitor...

Страница 19: ...size mode change OSD text switch source mode bring to front BTF Layout List This section lists all layouts that are available to use Workspace This is the area where outputs are displayed you may conf...

Страница 20: ...4KPro Windows APP to the device you can do the following 1 Click on the Link or Unlink switch once the Windows APP will automatically detect all devices within the network range and the Device List w...

Страница 21: ...for available operation Operation Link Unlink File Load Preset Layout New Save Save as Save to Preset Playlist New Save Save as Edit Time Interval Setting Preference Device List Disconnect Update Syn...

Страница 22: ...display input sources within a layer You can edit the layer s order and region s position size border thickness color and input source 4 3 2 BACKGROUND The background layer is the bottommost layer wh...

Страница 23: ...on Output1 and Output2 How to set focus on output Before you start any action on output you must set focus on the output you wish to work with first to do this you may click anywhere on the yellow ar...

Страница 24: ...ut will change simultaneously 4 3 6 LAYOUT LIST The Layout List is the left pane under the menu and next to the Workspace it lists all layouts that are available to use you can use the scroll bar to m...

Страница 25: ...de on your Layout List window you can point to the layout and right click on the Layout List the hidden context menu will appear the following is what you can do You may configure your layout using th...

Страница 26: ...efault there are some existing layouts stored in the library for you to choose from During unlinked mode 1 You may create new layouts and save them in the library 2 New playlists can be created and la...

Страница 27: ...loading Layout or Playlist from the Library or viewing Preset from the Preset page How to Load Layout from Library To load default or user defined layouts from the library to Output1 or Output2 you ne...

Страница 28: ...Layout will be loaded and displayed on your output How to view Presets You may view presets from the Presets in File menu these are user defined Preset you can Go to File Choose Presets or press F9 1...

Страница 29: ...lect Layout Click Edit Choose Delete 1 Click on File choose Load and the Library page will appear 2 On the Library page click on the Layout to show all layouts stored in the library 3 Select a layout...

Страница 30: ...Edit and click on Delete 4 The Caution box will appear to confirm if you wish to delete click on Delete to remove the Preset Confirm change If the device is not linked in Unlinked mode when there are...

Страница 31: ...layout When using the to add a new layout you need to Choose Output1 or Output2 Press Type in Name Select Preset Press Confirm button 1 Choose Output1 or Output2 to work with refer to section 4 3 4 1...

Страница 32: ...n page 23 2 Click on Layout and then New to add a new layout 3 On the New Layout window type in the Name of the new layout 4 Choose a preset form Presets or User s Presets 5 Click on to add a new layo...

Страница 33: ...t 3 On the Save as page type in the Name to save the existing layout 4 Click on Save as button to confirm How to Save layout to Preset Save to Preset allows the user to save the layout to Preset and v...

Страница 34: ...ist first or edit an existing playlist then add layout to the playlist you can drag and drop layouts from the Layout List to the playlist and once layouts have been selected and stored in the playlist...

Страница 35: ...er on regions Time Change You can modify the time interval for applying a layout to automatic switch to next one the range is from 5s 23 59 59s How to create a new playlist Playlist allows you to assi...

Страница 36: ...ent Playlist section Select a Playlist Choose the layout from the Layout List 1 Go to Current Playlist section 2 Select Playlist from Output1 or Output2 refer to section 4 4 3 4 page 36 3 To add edit...

Страница 37: ...wish to save the Current Playlist as another playlist you can use the Save as to do this you can Go to the Current Playlist section Select Playlist Type in Name Click on Save as 1 Go to Current Playli...

Страница 38: ...vals in the box 2 Press to save the time interval between layouts played in the playlist How to load Playlist from Library If there are existing playlist stores in the library already to load the play...

Страница 39: ...you can click on to end the running of the playlist any time else it will play by itself and change the layout according to the time interval you have set How to delete Playlist from Library To delet...

Страница 40: ...the Playlist 4 4 4 SETTINGS MENU In the Settings menu you can access Preferences the Device List Disconnect the device and Update the MaitreView 4KPro device or synchronize the APP to keep the PC or...

Страница 41: ...d Storage Device This section shows the Device Name Version for MaitreView 4KPro and the Temperature for the device You can modify the device name on the input box it allows up to 14 characters number...

Страница 42: ...be viewed and edit in here To change your IP settings you can 1 Click on the IP Settings button the IP settings window will show up 2 Choose DHCP or Static IP 3 If you choose Static IP then input your...

Страница 43: ...1 On your Settings Menu go to Preference Page Click on the IP Settings button the IP settings window will show up 2 Choose Static IP and type in the IP address and Default Gateway Mask Then click on...

Страница 44: ...CP and Color Status for INPUT from Port1 Port5 respectively The status of the LED indicated if ports connected correctly refer to section 1 4 3 on page 10 for more detail Output The output shows Resol...

Страница 45: ...page 20 B Go to Settings and then choose the Device list After you choose the Device List the Device List window will pop up you can choose the correct device and click on connect to link MaitreView...

Страница 46: ...ws item has been selected 4 Click on update update will start automatically wait until the process completes by itself 5 System will Restart device after upgrade is completed you may confirm the versi...

Страница 47: ...on Setting choose Sync 2 Choose to Keep Device or Keep PC Where the Keep PC and Keep Device represent the following Keep Device Keep PC Keep changes from the device and layouts and playlists on PC wil...

Страница 48: ...ou to control remotely through Windows APP You can point your mouse close to the buttons and the tooltips will appear next to each button VIDEO MUTE Press to enable or mute video AUDIO MUTE Press to e...

Страница 49: ...new region will be region C with input 3 EDIT OSD TEXT Press to edit Text on the region MOVE AND RESIZE MODE Press to adjust the position and size of the region a user may choose either move and resi...

Страница 50: ...w the function is enabled 2 Choose any of input region A E on your workspace Output1 or Output2 to work with When the selected region has been set focus it will bring the region to the front for examp...

Страница 51: ...in the text A Select region to change OSD text then click on the edit OSD Text button B Find the OSD text to change and double click on the OSD text Then click on OSD text to highlight the text to cha...

Страница 52: ...l open up for you to choose color click OK after changing color 4 To change Thickness click on to change thickness for the outline border You can choose the thickness S M L After changes are made you...

Страница 53: ...to the Content page and find a region to change the input source 3 Click on to expand the list of Input Source 4 Choose input to change to For example change Region A from input source 1 to input sou...

Страница 54: ...choose one region 3 Switch source to File 4 Click on file and the Select file window will pop up 5 Make sure your USB flash drive or MICRO SD CARD is inserted in the device and the file format that y...

Страница 55: ...for HDMI and AUDIO OUT 1 or 2 and input sources have been plugged in Then you can choose one input source from 1 4 and output it on HDMI and AUDIO OUT 1 or 2 To do this you have to Choose Output1 or O...

Страница 56: ...menu choose Preferences 3 Click on Edit then press Reset 4 A caution message box will appear to confirm if you are sure the existing settings including your layouts the playlist will reset to factory...

Страница 57: ...list shows all available devices within the network range You can link to chosen device from the device list 5 1 1 HOW TO CONNECT TO THE DEVICE To link your device to MaitreView 4KPro Android APP you...

Страница 58: ...page will look like this Region config for configure regions Output status for viewing and configure layouts Playlist time interval shows time interval between layouts for Device control for controll...

Страница 59: ...he region config page to modify selected region properties Output status shows the status of your output where you can drag and drop and configure your layout Playlist time interval shows the time int...

Страница 60: ...youts and playlists stored in the library There are 2 ways you can use the library Library Page You can access your Library sub menu by clicking on Library on your main menu On the Library page you ca...

Страница 61: ...Layout 1 Choose Monitor from the main menu 2 Choose Output1 or Output2 on output switch the select output will show in purple background 3 Tap on the Library button once this will take you to the lib...

Страница 62: ...d displays it on the Output1 or Output2 on output status remember your MaitreView 4KPro Android APP works as a remote control you can only view and configure the layout without saving it The Now Playi...

Страница 63: ...re 3 Drop it by releasing your finger B To resize To resize the region you follow the steps below 1 Tap on the region you wish to resize 2 On the touch screen of your android device hold one finger on...

Страница 64: ...o Windows APP Playlist Time Interval Playlist Time interval is the time for each layout to automatically switch to next layout you can set this in MaitreView 4KPro Windows APP it can range from 5s 23...

Страница 65: ...and it will take you to the Playlist page 5 Find the playlist that you wish to load you can use your finger to scroll up or down the list when you find the playlist to run tap it once then the playlis...

Страница 66: ...itch the selected output will show in purple background 3 Find the Current Playlist section and press the up arrow to expand the playlist 4 All layouts on the current playlist will be shown here 5 You...

Страница 67: ...nfig page Switch to region config Enable or disable visibility on output Enlarge selected region on output Adjusting position for the selected region Adjusting size for the selected region For change...

Страница 68: ...nu 2 Choose Output1 or Output2 on output switch the selected output will show in purple background 3 Choose a region by tapping the region once you 4 Press on the Region Config button to go to the Reg...

Страница 69: ...3 Choose a region and press on to go to the region config page 4 On the Region Config page find Input tap to expand input list 5 Tap once on File it will open up the Search File page 6 On the Search...

Страница 70: ...rder size choose the color 1 Choose Monitor from the main menu 2 Choose Output1 or Output2 on output switch selected output it will show in purple background 3 Click Device Control Button Border to en...

Страница 71: ...uction below Go to Monitor Choose Output1 or Output2 Choose region click on Choose order Tap and drag on 1 Choose Monitor from the main menu 2 Choose Output1 or Output2 on output switch selected outpu...

Страница 72: ...rder for the region will be reset on the output 4 8 5 DEVICE CONTROL BUTTON The device control buttons on the MaitreView 4KPro Android APP work the same way as front panel buttons on the MaitreView 4K...

Страница 73: ...3 When you wish to confirm the system setting you can go to the Preference page on the Main menu in the Preference page you will be able to check the information for Device IP Port Storage and About C...

Страница 74: ...ure for the device How to change the device name The device name is editable you may edit the device name by pressing the pencil icon next to the name and typing in the new device name it takes up to...

Страница 75: ...formation about your HDMI IN and HDMI OUT connection Input If you have plugged your input device correctly the system will pick up Input information automatically please make sure if the status shows...

Страница 76: ...figuration for individual output Please be aware incorrect settings may result in a skewed or a blank screen Resolution and FPS The resolution and Frame per second FPS can set in within1920x1080p 50 6...

Страница 77: ...can be set in RGB YCrCb 4 4 4 4 2 2 4 2 0 Status Shows status of your device it can be idle working and error 4 9 4 STORAGE Shows Total and Available storage this is for internal use only 4 9 5 ABOUT...

Страница 78: ...the same network then MaitreView 4KPro Windows or Android APP will not be able to connect to the device 6 2 Why I can not see anything on my output If you can not see anything on your output you can 1...

Отзывы: