
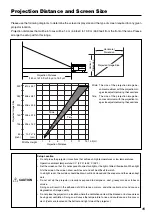
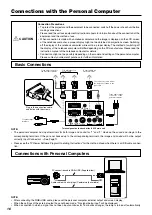


26
Adjusting the Brightness
NOTE:
Once the brightness adjustment bar has been displayed, it will disappear after 10 seconds if there is no brightness adjust-
ment.
Brightness adjustment bar
Operation with the Projector
Adjust using the BRIGHTNESS (
) buttons.
: Projection image becomes brighter
: Projection image becomes darker
Operation with the Remote Control
Adjust using the BRIGHTNESS (+)/(-) buttons.
(+) : Projection image becomes brighter
(–) : Projection image becomes darker
To change the brightness, perform a manual adjustment using the method described below.
Regular Operation
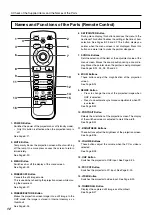
1
2
32
32
1
2
3
4
5
6
7
8
9
10
11
12
13
14
15
16
1
2
3
4
5
6
7
8
9
10
11
12
13
14
15
16
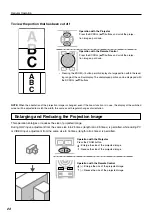
During OHP Input
Pressing the FREEZE/CAPTURE button captures the OHP
image that is currently being projected and saves it as an
image file.
Captured images are automatically stored in the internal
memory as OHP history images for up to 32 pages.
The projected image will become a frozen (fixed) display.
USB Connection Is Not Available
Once 32 pages have been stored, each time a new image is captured, an old
image will be deleted.
The Freeze icon is displayed at the time of image capture.
USB Connection Is Available
By transferring the images that are in memory to the personal computer, they can
be stored again in the 32-page memory.
The USB icon is displayed at the time of image capture. The icon display will differ
depending on the current number of memory pages.
(1 to 10 pages
/ 11 to 20 pages
/ 21 to 31 pages
/ 32 pages
)
Please see Page E-28 for information about the method of transfer.
Operation with the Projector
Press the FREEZE/CAPTURE button.
Operation with the Remote Control
Press the FREEZE/CAPTURE button.
Capturing the Projection Image / Still Image Display
Effective Only with OHP Input
Each time a new image is cap-
tured, the oldest image is deleted.