background image


53 

10. TROUBLE SHOOTING 

You can solve many common Wine cooler problems easily, saving you the cost of a possible service 
call. Try the suggestions below to see if you can solve the problem before calling the servicer. 
 

PROBLEM 

POSSIBLE CAUSE 

Wine cooler does not operate 


Not plugged in 


The appliance is turned off 


The circuit breaker tripped or a blown fuse 

Wine cooler is not cold enough 


Check the temperature control setting 


External  environment  may  require  a  higher 
setting 


The door is opened too often 


The door is not closed completely 


The door gasket does not seal properly 

Turns on and off frequently 


The room temperature is hotter than normal 


A large amount of contents has been added to 
the wine cooler.  


The door is open too often 


The door is not closed completely 


The temperature control is not set correctly 


The door gasket does not seal properly 

The light does not work 


Not plugged in 


The circuit breaker tripped or a blown fuse 


The  bulb  has  burned  out,  contact  your  after-
sales service 


The light switch is “OFF” 

Vibrations 


Check to assure that the wine cooler is level 

The wine cooler seems to make too much noise 


The  rattling  noise  may  come  from  the  flow  of 
the refrigerant, which is normal 


As  each  cycle  ends,  you  may  hear  gurgling 
sounds caused by the flow of refrigerant in your 
wine cooler 


Contraction  and  expansion  of  the  inside  walls 
may cause popping and crackling noises 


The wine cooler is not level 

The door will not close properly 


The wine cooler is not level 


The  door  was  reversed  and  not  properly 
installed 


The gasket is dirty 


The shelves are out of position 

The door doesn’t open / The push-pull system 
doesn’t work 


Check your wine cellar is properly installed (see 
chapter « Installation of your wine cellar » 


An  improper  installation  of  your  appliance 
prevents the proper opening operation 


Adjust  1mm  the  opening  system  by  turning  it 
(be  careful  not  to  unscrew  it  too  much  –  see 
chapter “Opening/closing push-pull system”) 


Replacing light 

This appliance consists of light-emitting diodes (LEDs). This type of diode cannot be changed by the 
consumer. The lifetime of these LEDs is normally sufficient for no change to be made. If however, and 

Содержание AVI24PREMIUM

Страница 1: ...ILISATION AVI24PREMIUM FR MANUEL D UTILISATION p 3 GB USE INSTRUCTIONS p 30 D GEBRAUCHSANWEISUNG p 56 NL HANDLEIDING p 83 SP MANUAL DE UTILIZACION p 110 IT MANUAL D USO p 137 Cave de service int grabl...

Страница 2: ...2...

Страница 3: ...re les pr cautions donn es D une mani re g n rale votre appareil doit tre entretenu par un professionnel qualifi Pour votre s curit et pour une utilisation correcte de l appareil avant d installer et...

Страница 4: ...reil doit tre correctement connect une prise terre Ne pas couper ou retirer le fil de terre du c ble d alimentation fourni Pour des raisons de s curit ne pas utiliser une rallonge lectrique Si votre a...

Страница 5: ...reil loign de toute source de chaleur et ne l exposez pas directement au soleil Ne laissez pas pendre le c ble d alimentation d une table ou tre en contact avec des coins tranchants ou des surfaces ch...

Страница 6: ...e retrouve bloqu dans l appareil ou y suffoque ne sont pas des faits du pass Toutefois des appareils jet s ou abandonn s demeurent dangereux m me s ils sont juste laiss s dans le garage quelques jours...

Страница 7: ...illants ATTENTION Afin d viter tout danger d l instabilit de l appareil il est important de le fixer et le monter selon les instructions d installation ATTENTION Ne rangez jamais de substances inflamm...

Страница 8: ...clenchement d un feu ou d une explosion Liquide r frig rant De l isobutane r frig rant R600a est utilis dans le circuit r frig rant de l appareil Il s agit d un gaz naturel hautement inflammable et do...

Страница 9: ...mais la mise la terre Si la prise murale est l che ne branchez pas le cordon Il existe un risque d lectrocution ou d incendie Vous ne devez jamais utiliser l appareil si le cache de l clairage int rie...

Страница 10: ...res et autres flammes nues afin d viter les risques d incendie L appareil est destin garder des boissons pour une utilisation normale domestique comme expliqu dans ce manuel d utilisation L appareil e...

Страница 11: ...mauvaise performance de l appareil Branchez votre cave vin une prise terre murale exclusivement et uniquement r glementaire En aucun cas vous ne devez r duire ou supprimer la troisi me broche de mise...

Страница 12: ...gie Pour limiter la consommation lectrique de votre appareil Installez le dans un endroit appropri voir chapitre Instructions d installation Gardez les portes ouvertes le moins de temps possible Veill...

Страница 13: ...ant avec de l isobutane R600a ne peuvent tre plac es dans une zone avec des sources d ignition par exemple descell contacts lectriques ou lorsque le fluide frigorig ne pourrait rassembler en cas de fu...

Страница 14: ...L APPAREIL 1 Porte vitr e 2 Joint 3 Charni re 4 Syst me push pull 5 Cache du ventilateur 6 Clayette 7 Panneau de contr le 8 Support de porte 9 Pieds 3 PLAQUE SIGNAL TIQUE Ci dessous l exemple d une p...

Страница 15: ...au dessous de la cave Une ventilation ad quate est n cessaire n obstruez aucune sortie d air N est pas con u pour tre place dans un garage sous sol ou autre lieu du m me type L appareil est destin un...

Страница 16: ...ST De 16 38 Tropicale T De 16 43 Sch ma d encastrement La porte de la cave vin assure une herm ticit presque compl te de l installation une fois int gr e ATTENTION pour l ensemble de ces mod les veui...

Страница 17: ...17...

Страница 18: ...18 Installation de votre cave vin 1 Meuble de cuisine 2 Porte de la cave 3 Corps de la cave 4 Partie sup rieure de la cave 5 Partie inf rieure de la cave tape A tape B tape C...

Страница 19: ...e cave vin Une mauvaise installation de votre appareil ne permettra pas au syst me de d clenchement d ouverture de porte de fonctionner correctement Assurez vous de respecter les instructions ci dessu...

Страница 20: ...20...

Страница 21: ...la vis n 3 3 Retirez la vis n 4 4 Enlevez d licatement la porte et posez la avec pr caution distance de la cave 5 Installez avec pr caution la nouvelle porte en la positionnant l endroit pr vu cet eff...

Страница 22: ...ter la temp rature degr par degr le r glage de la temp rature s effectue l aide des touches ou situ es droite de l indicateur de temp rature La plage de temp rature de cette cave est entre 5 C et 18 C...

Страница 23: ...l appareil pr s du compresseur La chaleur produite par le compresseur vapore ensuite les condensas r cup r s dans le bac Clayettes Pour viter d endommager le joint de la porte assurez vous que la por...

Страница 24: ...e bouteilles en empilage monotype et sans clayettes mais une cave vari e se constitue d une grande vari t de bouteilles et l aspect pratique de la gestion quotidienne d une cave limite son chargement...

Страница 25: ...nt une courte p riode Une coupure de 1 ou 2 heures n affectera pas les temp ratures de votre cave Afin de prot ger vos vins pendant les coupures de courant pensez minimiser le nombre d ouvertures de p...

Страница 26: ...ez pas plus la porte que n cessaire 9 EN CAS DE PANNE Malgr tout le soin que nous apportons nos fabrications une panne n est jamais totalement exclue Avant de contacter le service apr s vente de votre...

Страница 27: ...pas branch e Le fusible a saut au niveau de votre installation lectrique Le LED est hors service a grill contactez votre service apr s vente Le bouton de la lumi re est sur arr t Vibrations Contr lez...

Страница 28: ...aux appareils lectriques et ou lectroniques ou bien si vous achetez un appareil quivalent au revendeur de ce nouvel appareil L utilisateur est responsable d apporter l appareil en fin de vie aux struc...

Страница 29: ...e du r sultat obtenu pour 24 heures dans des conditions d essai normalis es La consommation d nergie r elle d pend des conditions d utilisation et de l emplacement de l appareil VOLUME NET 57 L TEMP R...

Страница 30: ...ned by a qualified professional For your safety and correct usage before installing and first using the appliance read this user manual carefully including its hints and warnings To avoid unnecessary...

Страница 31: ...e supplied For safety reasons do not use an electrical extension cable If your appliance is damaged e g a major impact or suffers harm power surge due to lightning flood fire it may be dangerous to us...

Страница 32: ...appliance is positioned can support its weight when loaded a 75 cl bottle weighs approximately 1 3 kg Your cellar must be placed on a flat surface If you have to position it on a rug or carpet place...

Страница 33: ...hemselves inside it If this appliance featuring a magnetic door seals is to replace an older appliance having a spring lock latch on the door or lid be sure to make the spring lock unusable before you...

Страница 34: ...gs in the appliance enclosure or in the built in structure clear of obstruction and ensure that air can circulate especially if the ap pliance is recessed into a wall WARNING Do not use mechanical dev...

Страница 35: ...cuit should be damaged Avoid opening flames and sources of ignition Thoroughly ventilate the room in which the appliance is situated It is dangerous to alter the specifications or modify this product...

Страница 36: ...of reach of children In case of doubt contact your installation technician Daily use This appliance is intended to be used exclusively for the storage of wine Do not store flammable gas or liquids in...

Страница 37: ...nd servicing Before carrying out servicing switch off the power supply and disconnect the appliance When cleaning the appliance do not use metal objects steam systems volatile fluids organic solvents...

Страница 38: ...recommended that the appliance be allowed to settle for at least 24 hours before connecting the electrical power supply so that the compressor fluid feed is correct Proper air circulation is necessary...

Страница 39: ...rts The appliance is designed for home use only The manufacturer declines any liability whatsoever in the case of other use R600a Safety instructions Caution Do not obstruct the ventilation grills on...

Страница 40: ...re of the type recommended by the manufacturer This appliance meets the requirements of all applicable European directives and their amendments and notably complies with the following standards 2011 6...

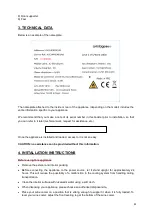
Страница 41: ...sistance can be provided without this information 4 INSTALLATION INSTRUCTIONS Before using this appliance Remove the exterior and interior packing Before connecting the appliance to the power source l...

Страница 42: ...ransportation Attention Store wine in sealed bottles Do not overload the cabinet Do not open the door unless necessary Do not cover shelves with aluminum foil or any other shelf material which may pre...

Страница 43: ...o consideration the clearances required for air intake and exhaust Hot air must be driven by the ventilation to the rear wall of the cellar and then expelled upwards The ventilation channels shall be...

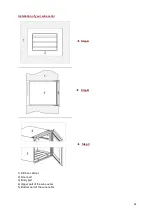
Страница 44: ...44 Installation of your wine cellar 1 Kitchen cabinet 2 Door part 3 Body part 4 Upper part of the wine cellar 5 Bottom part of the wine cellar Step A Step B Step C...

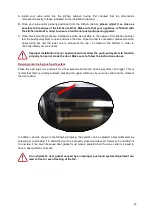
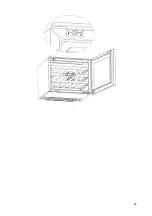
Страница 45: ...rder to correctly install your wine cellar Improper installation of your appliance will not allow the push pull system to function properly to open or close the door Make sure to follow the instructio...

Страница 46: ...46...

Страница 47: ...ew cover No 2 and the screw No 3 3 Remove screw No 4 4 Remove the door and carefully place it away from the cellar 5 Carefully install the new door by positioning it in the appropriate place 6 Re inst...

Страница 48: ...e degree by degree the temperature can be adjusted with the keys or to the right of the temperature display The temperature range of this cellar is between 5 C and 18 C In normal operation the display...

Страница 49: ...efore pulling out the shelves to add or remove bottles For easier access to the contents of the shelves slide the shelf out approximately one third of the way The shelves are however fitted with a sto...

Страница 50: ...heights diameters and alternating position method For example if a wine cellar is loaded only with Burgundy wine bottles there will be approximately 30 fewer bottles than the initial quantity calculat...

Страница 51: ...start before this time the compressor will only re start after 3 to 5 minutes if the temperature requires When switching on for the first time or following a prolonged shutdown it is possible that wh...

Страница 52: ...kdown is not one of those described in the table at the end of this manual IMPORTANT if the power cable supplied is damaged it must be replaced by the manufacturer a service centre approved by the bra...

Страница 53: ...after sales service The light switch is OFF Vibrations Check to assure that the wine cooler is level The wine cooler seems to make too much noise The rattling noise may come from the flow of the refr...

Страница 54: ...new product The user is responsible for taking the appliance to the appropriate collection centre at the end of its useful life Selective and appropriate collection for the recycling of no longer used...

Страница 55: ...ed on the basis of results obtained over 24 hours in standardized test conditions Actual energy consumption depends on conditions of use and the location of the appliance NET VOLUME 57 L ADJUSTABLE TE...

Страница 56: ...ngen zu verringern sollten Sie bei der Benutzung Ihres Ger ts die folgenden grundlegenden Sicherheitshinweise beachten Das Ger t muss grunds tzlich durch eine qualifizierte Fachkraft gewartet werden L...

Страница 57: ...tsrisiken f hren Im Zweifel ist die elektrische Installation durch eine Elektrofachkraft pr fen zu lassen Zu Ihrem Schutz muss das Ger t ordnungsgem an eine Schukosteckdose angeschlossen werden Auf ke...

Страница 58: ...das Ger t nicht in Wasser oder sonstige Fl ssigkeiten tauchen Das Ger t nicht mit feuchten H nden anfassen Das Ger t von W rmequellen fernhalten und vor direkter Sonnenbestrahlung sch tzen Das Netzkab...

Страница 59: ...e von Kindern aufbewahren da Erstickungsgefahr besteht Es besteht die Gefahr dass Kinder im Ger t eingeschlossen werden Leider kommt es immer wieder vor dass Kinder in solchen Ger ten eingeschlossen w...

Страница 60: ...Arbeitsumgebungen G steh user Hotels Motels und sonstige Wohnumgebungen Umgebungen vom Typ Bed and Breakfast Verpflegung und hnliche Gro handelsanwendungen ACHTUNG Um eine Gef hrdung infolge einer Ins...

Страница 61: ...uer aussetzen ACHTUNG Diese Ger te enthalten das K hlmittel R600a Isobutan stellen Sie keine brenn oder entz ndbaren und explosionsgef hrlichen Artikel in den K hlschrank oder in seine N he um jede Br...

Страница 62: ...r kann berhitzen und einen Brand verursachen Sicherstellen dass der Netzstecker des Ger tes leicht erreichbar ist Nicht am Netzkabel ziehen Den Schutzkontakt auf keinen Fall entfernen Wenn die Wandste...

Страница 63: ...sprechenden Anweisungen befolgen Das Ger t muss von Kerzen Beleuchtungsk rpern und offenen Flammen ferngehalten werden um der Brandgefahr vorzubeugen Das Ger t ist f r die Aufbewahrung von Lebensmitte...

Страница 64: ...t an einem feuchten Standort aufzustellen Das Ger t von direkter Sonnenbestrahlung und W rmequellen Ofen Heizger t Heizk rper usw fernhalten Direkte Sonnenbestrahlung kann die Acrylbeschichtung besch...

Страница 65: ...um die Gefahr der berhitzung zu vermeiden Zur Gew hrleistung einer ausreichenden Bel ftung die angegebenen Installationshinweise beachten M glichst vermeiden dass das Ger t die Wand ber hrt und oder m...

Страница 66: ...e verwendet werden Das Ger t ist ausschlie lich f r den Hausgebrauch bestimmt Der Hersteller kann nicht f r die unsachgem e Verwendung haftbar gemacht werden R600a Achtung Die L ftungsgitter des Ger t...

Страница 67: ...ungen und ist insbesondere konform mit den folgenden Normen 2011 65 EU ROHS 2014 35 EU Niederspannungsrichtlinie 2014 30 EU Richtlinie ber die elektromagnetische Vertr glichkeit 643 2009 CE ber die Ke...

Страница 68: ...lfen 4 INSTALLATIONSANWEISUNGEN Vor dem Gebrauch des Ger tes Die Au en und Innenverpackung entfernen Das Ger t vor dem Anschlie en an das Stromnetz ungef hr 24 Stunden lang aufrecht stehen lassen Dies...

Страница 69: ...Achtung Lagern Sie die Flaschen im geschlossenen Zustand berladen Sie das Ger t nicht ffnen Sie die T r nicht fter als unbedingt notwendig Decken Sie die Roste nicht mit Alufolie oder anderem Materia...

Страница 70: ...uft ein ausreichender Abstand zur Wand erforderlich ist Die warme Luft muss von der Bel ftung an die R ckwand des Weinschranks geleitet und von dort nach oben abgef hrt werden Die L ftungssch chte m s...

Страница 71: ...71 Installation des Weinschranks 1 K chenm bel 2 T r des Weinschranks 3 Geh use des Weinschranks 4 Oberer Teil des Weinschranks 5 Unterer Teil des Weinschranks Schritt A Schritt B Schritt C...

Страница 72: ...n Bei falscher Befestigung Ihres Ger ts kann das Ausl sesystem f r die T r ffnung nicht korrekt arbeiten Vergewissern Sie sich dass obige Anweisungen eingehalten wurden Push Pull ffnungsmechanismus Dr...

Страница 73: ...73 Desserrer L sen Serrer Festziehen...

Страница 74: ...r 3 abnehmen 3 Schraube Nr 4 herausdrehen 4 Die T r behutsam abnehmen und in einiger Entfernung zum Weinschrank vorsichtig abstellen 5 Die neue T r vorsichtig am vorgesehenen Ort positionieren 6 Schra...

Страница 75: ...der Temperatur erfolgt ber die Tasten oder rechts der Temperaturanzeige Der Temperaturbereich dieses Weinschranks liegt zwischen 5 C und 18 C in jeder Zone Im Normalbetrieb gibt Die Anzeige gibt die...

Страница 76: ...befindet Die vom Kompressor erzeugte Abw rme verdampft danach das im Beh lter gesammelte Kondenswasser Roste Um Besch digungen an der T rdichtung zu vermeiden muss sichergestellt sein dass die T re we...

Страница 77: ...ander stapeln aber ein reichhaltiger Weinschrank umfasst eine gro e Vielzahl verschiedener Flaschen und durch den praktischen Aspekt der allt glichen Nutzung des Weinschranks bleibt die Flaschenanzahl...

Страница 78: ...ei Stromausf llen Die meisten Stromausf lle sind nur von kurzer Dauer Ein ein bis zweist ndiger Stromausfall hat keinen Einfluss auf die Temperatur im Weinschrank Achten Sie bei Stromausf llen darauf...

Страница 79: ...notwendig 9 IM PANNENFALL Trotz aller Sorgfalt die wir f r unsere Produkte aufwenden kann eine St rung niemals v llig ausgeschlossen werden Bevor Sie sich mit dem Kundendienst Ihres H ndlers in Verbin...

Страница 80: ...cht angesteckt Die entsprechende Sicherung Ihrer Elektroanlage ist durchgebrannt Die LED ist au er Betrieb wenden Sie sich an den Kundendienst Der Beleuchtungsknopf steht auf Aus Schwingungen Stellen...

Страница 81: ...bzw beim Kauf eines gleichwertigen Ger tes zum H ndler des neuen Ger tes gebracht werden Der Benutzer ist daf r verantwortlich dass das Ger t am Ende seiner Lebensdauer einer geeigneten Sammelstelle z...

Страница 82: ...dlage von Ergebnissen der Normpr fung ber 24 Stunden Der tats chliche Verbrauch h ngt von der Nutzung und vom Standort des Ger ts ab NETTOVOLUMEN 57 L TEMPERATUR EINSTELLBEREICH 5 18 C FROSTFREI Autom...

Страница 83: ...an uw apparaat te beperken In het algemeen dient het onderhoud aan uw apparaat door een bevoegde vakman te worden uitgevoerd Lees voor uw veiligheid en voor een correct gebruik van het apparaat deze h...

Страница 84: ...e contactdoos Onderbreek of verwijder in geen geval de aardingsdraad van het meegeleverde voedingssnoer Om veiligheidsredenen mag u geen elektrisch verlengsnoer gebruiken Als uw apparaat is beschadigd...

Страница 85: ...tel het niet rechtstreeks bloot aan zonnestralen Laat het voedingssnoer niet over een tafel hangen en zorg ervoor dat het niet in aanraking komt met scherpe randen of warme oppervlakken Trek niet aan...

Страница 86: ...van kinderen Opsluiting van en verstikking bij kinderen zijn geen problemen uit het verleden Afgedankte of verlaten apparaten zijn nog altijd gevaarlijk zelfs als ze maar voor enkele dagen in de garag...

Страница 87: ...e instabiliteit van het apparaat te vermijden moet het in overeenstemming met de voorschriften worden vastgemaakt WAARSCHUWING Plaats nooit ontvlambare producten zoals spuitbussen in dit apparaat daar...

Страница 88: ...den geplaatst om brand of ontploffingen te vermijden Koelvloeistof Het koelcircuit van het apparaat bevat het koelmiddel isobutaan R600a dit is een licht ontvlambaar gas en dus schadelijk voor het mil...

Страница 89: ...t de aarding af Zit de contactdoos voor de netstekker los stop de netstekker er dan niet in U kunt een elektrische schok krijgen of er kan brand ontstaan U mag het apparaat nooit gebruiken zonder besc...

Страница 90: ...sico op brand te voorkomen Het apparaat is bedoeld om eet en of drinkwaren te bewaren in normale huishoudelijke omstandigheden zoals wordt uitgelegd in deze handleiding Het apparaat is zwaar Ga voorzi...

Страница 91: ...e of warme omgevingstemperaturen kunnen er ook toe leiden dat de apparaten niet goed functioneren Stop de stekker van de wijnkoeler in een afzonderlijke juist ge nstalleerde en geaarde wandcontactdoos...

Страница 92: ...ag niet naast radiators of kookplaten geplaatst worden Controleer of de stopcontacten na het installeren toegankelijk zijn Energiebesparingen Om het energieverbruik van uw apparaat te beperken Install...

Страница 93: ...losieve stoffen zoals spuitbussen met ontvlambaar drijfgas in dit apparaat op Waarschuwing vermijd schade aan de koelkringloop van het apparaat Waarschuwing koelunits die werken met isobutaan R600a mo...

Страница 94: ...rmen 2011 65 EU ROHS 2014 35 EU met betrekking tot elektrische veiligheid 2014 30 EU met betrekking tot elektromagnetische compatibiliteit 643 2009 CE met betrekking tot het energielabel 2 BESCHRIJVIN...

Страница 95: ...erienummer 4 INSTALLATIEVOORSCHRIFTEN Voordat u dit apparaat gebruikt Verwijder de verpakking rondom en binnenin Voordat u het apparaat aansluit op de stroombron moet u het ongeveer 24 uur rechtop lat...

Страница 96: ...p Overlaad het apparaat niet Open de deur niet vaker dan nodig Bedek de leggers niet met aluminiumfolie of een ander materiaal dat een goede luchtcirculatie kan verhinderen Als de wijnkast gedurende e...

Страница 97: ...oodzakelijk zijn voor de luchttoevoer en afvoer De warme lucht moet door de ventilatie naar de achterwand van de wijnkast worden geleid en vervolgens naar boven worden uitgedreven De ventilatiekanalen...

Страница 98: ...98 Uw wijnkast installeren 1 Keukenmeubel 2 Deur van de wijnkast 3 Behuizing van de wijnkast 4 Bovenste gedeelte van de wijnkast 5 Onderste gedeelte van de wijnkast Stap A Stap B Stap C...

Страница 99: ...t verkeerd is ge nstalleerd zal het uitklinksysteem voor het openen van de deur niet correct functioneren Zorg ervoor dat u zich aan de bovenstaande instructies houdt Push pull openingssysteem Duw op...

Страница 100: ...100 Desserrer Losdraaien Serrer Vastdraaien...

Страница 101: ...f nr 3 3 Verwijder schroef nr 4 4 Verwijder de deur behoedzaam en plaats deze voorzichtig op een afstand van de wijnkast 5 Installeer voorzichtig de nieuwe deur door deze op de daartoe voorziene plaat...

Страница 102: ...telling van de temperatuur gebeurt met behulp van de toetsen of naast de temperatuuraanwijzer Het temperatuurbereik van deze wijnkast ligt tussen 5 C en 18 C in elke zone Bij normale werking het displ...

Страница 103: ...or de compressor geproduceerd wordt verdampt vervolgens de condensaten die in de bak opgevangen werden Oplegplanken Om schade aan de deurpakking te verwijderen moet u zorgen dat de deur goed geopend i...

Страница 104: ...pelen zonder oplegplanken maar een gevarieerde kast bestaat uit een grote verscheidenheid van flessen en het praktische aspect van het dagelijkse beheer van een wijnkast beperkt de vulcapaciteit Waars...

Страница 105: ...ke geuren doen verdwijnen Wat moet u doen bij een stroomonderbreking De meeste stroomonderbrekingen worden snel opgelost Een onderbreking van 1 of 2 uur zal de temperaturen in uw wijnkast niet be nvlo...

Страница 106: ...Ondanks alle zorg die wij aan onze producten besteden kan een defect nooit volledig uitgesloten worden Voordat u contact opneemt met de dienst na verkoop van uw handelaar moet u echter het volgende co...

Страница 107: ...r steekt niet in het contact Gesprongen zekering Controleer uw elektrische installatie De LED weergave werkt niet meer neem contact op met uw klantenservice De toets voor de binnenverlichting staat op...

Страница 108: ...en of naar de doorverkoper van dit nieuwe apparaat als u een vergelijkbaar apparaat koopt De gebruiker moet het apparaat aan het einde van de levensduur naar een geschikte inzamelcentrum brengen Een s...

Страница 109: ...rkregen over 24 uur in genormeerde testomstandigheden Het werkelijke energieverbruik hangt af van de omstandigheden waarin het apparaat wordt gebruikt en de plaats waar het opgesteld is NETTO INHOUD 5...

Страница 110: ...cado debe realizar el mantenimiento del electrodom stico Por su seguridad y para utilizar correctamente el aparato antes de instalarlo y utilizarlo por primera vez lea atentamente este manual as como...

Страница 111: ...ni retirar el hilo de puesta a tierra del cable de la red el ctrica suministrado Por razones de seguridad no utilizar un cable alargador el ctrico Si el electrodom stico est estropeado p ej si ha reci...

Страница 112: ...om stico con las manos mojadas Mantener el electrodom stico alejado de cualquier fuente de calor o fuera de la luz directa del sol No permitir que el cable de la red el ctrica quede colgando de una me...

Страница 113: ...os no son problemas del pasado Los aparatos desechados o abandonados siguen siendo peligrosos incluso si van a dejarse en el garaje unos d as Si decide desechar el aparato desench felo de la toma mura...

Страница 114: ...nestabilidad del aparato debe fijarse de acuerdo con las instrucciones ATENCI N No guarde bajo ninguna circunstancia sustancias inflamables como aerosoles dentro del aparato ya que podr an derramarse...

Страница 115: ...L quido refrigerante En el circuito refrigerante del aparato se utiliza isobutano refrigerante R600a Se trata de un gas natural sumamente inflamable y por tanto peligroso para el medio ambiente Compru...

Страница 116: ...rra Si el enchufe de alimentaci n est suelto no insertar el cable de alimentaci n Existe riesgo de descarga el ctrica o incendio No se debe poner en funcionamiento el electrodom stico sin la tapa de l...

Страница 117: ...iento No exponga el aparato directamente al sol El aparato debe mantenerse alejado de velas luminarias y dem s llamas abiertas para evitar riesgos de incendio Este electrodom stico est destinado a gua...

Страница 118: ...de calor pueden aumentar el consumo el ctrico El fr o extremo o las temperaturas ambiente de calor tambi n pueden provocar funcionamientos inadecuados de los electrodom sticos Enchufe la vinoteca en...

Страница 119: ...stalaci n El aparato no debe estar situado cerca de radiadores o de fogones de cocci n Una vez que se haya instalado el aparato compruebe que se puede acceder bien a las tomas Ahorro de energ a Siga l...

Страница 120: ...ene sustancias explosivas como esprays de aerosol inflamables con propulsor en este aparato Atenci n No estropee el circuito frigor fico del aparato Atenci n Las unidades de refrigeraci n que funciona...

Страница 121: ...entes 2011 65 EU ROHS 2014 35 EU relativa a la seguridad el ctrica 2014 30 EU relativa a la compatibilidad electromagn tica 643 2009 CE relativa al etiquetado energ tico 2 DESCRIPCI N DEL APARATO 1 Pu...

Страница 122: ...I N Antes de utilizar este electrodom stico Retire el embalaje exterior e interior Antes de conectar el electrodom stico a la fuente de alimentaci n mantenerlo recto durante aproximadamente 24 horas D...

Страница 123: ...el aparato No abra la puerta m s de lo que fuera necesario No cubra las parrillas con hojas de aluminio o cualquier otro material que pudiese impedir una buena circulaci n del aire Si la bodega de vi...

Страница 124: ...la llegada y la evacuaci n del aire El aire caliente debe ser conducido por el sistema de ventilaci n hacia la pared trasera de la vinoteca y a continuaci n expulsado hacia arriba Los canales de venti...

Страница 125: ...125 Instalaci n de su vinoteca 1 Mueble de cocina 2 Puerta de la vinoteca 3 Cuerpo de la vinoteca 4 Parte superior de la vinoteca 5 Parte inferior de la vinoteca Etapa A Etapa B Etapa C...

Страница 126: ...r correctamente su vinoteca Una mala instalaci n de su aparato impedir que el sistema de activaci n de apertura de la puerta funcione correctamente Aseg rese de seguir estas instrucciones Sistema de a...

Страница 127: ...127 Desserrer Aflojar Serrer Apretar...

Страница 128: ...tornillo n 3 3 Retire el tornillo n 4 4 Retire la puerta con cuidado y p ngala con precauci n lejos de la vinoteca 5 Instale con precauci n la nueva puerta coloc ndola en el lugar previsto a tal efec...

Страница 129: ...lado de la temperatura se realiza mediante las teclas o situadas a la derecha del indicador de temperatura El intervalo de temperatura de esta vinoteca se encuentra entre 5 C y 18 C en cada zona En fu...

Страница 130: ...to que se encuentra en la parte posterior del aparato cerca del compresor El calor que produce el compresor permite la evaporaci n del agua condensada que queda en el dep sito Bandejas Para evitar el...

Страница 131: ...ero una vinoteca variada se compone de una gran variedad de botellas y el aspecto pr ctico de la gesti n diaria de una vinoteca limita su carga Por tanto probablemente coloque usted una carga algo men...

Страница 132: ...a de los cortes de electricidad se resuelven en poco tiempo Un corte de 1 o 2 horas no afectar a la temperatura de su vinoteca Para proteger los vinos durante los cortes de electricidad abra la puerta...

Страница 133: ...pueden descartar completamente Antes de ponerse en contacto con el servicio posventa de su distribuidor compruebe que La toma de corriente est conectada No se ha producido un corte de electricidad La...

Страница 134: ...a La toma no est conectada El fusible de su instalaci n el ctrica ha saltado El LED est fuera de servicio p ngase en contacto con su servicio postventa El bot n de la luz esta en parada Vibraciones Co...

Страница 135: ...de los dem s residuos dom sticos Por tanto se deber trasladar a un centro de recogida selectiva para aparatos el ctricos y o electr nicos o si adquiere un aparato equivalente al distribuidor del apara...

Страница 136: ...alculado en base a resultados obtenidos en 24 horas en condiciones de prueba normales El consumo energ tico real depende de las condiciones de uso y de la ubicaci n del aparato VOLUMEN NETO 57 L AJUST...

Страница 137: ...cate In via generale la manutenzione dell apparecchio deve essere effettuata da un professionista qualificato Per motivi di sicurezza e per un uso corretto dell apparecchio prima di installarlo e di m...

Страница 138: ...nista Per la tua protezione questo apparecchio deve essere collegato correttamente ad una presa di terra Non tagliare n togliere il filo di terra dal cavo di alimentazione fornito Per motivi di sicure...

Страница 139: ...chio con le mani bagnate Collocare l apparecchio lontano da fonti di calore e non esporlo direttamente alla luce del sole Non far pendere il cavo di alimentazione da un tavolo e non metterlo a contatt...

Страница 140: ...recchio e soffocare non deve essere sottovalutato Gli apparecchi da gettare o abbandonati rappresentano comunque un pericolo anche se vengono lasciati in garage solo per qualche giorno Quando l appare...

Страница 141: ...o rivenditori ATTENZIONE Per evitare qualsiasi rischio dovuto all instabilit dell apparecchio importante fissarlo e montarlo seguendo le istruzioni di installazione ATTENZIONE Non riporre mai sostanze...

Страница 142: ...o o un esplosione Liquido refrigerante Nel circuito refrigerante dell apparecchio impiegato come refrigerante l isobutano R600a Si tratta di un gas naturale altamente infiammabile e quindi pericoloso...

Страница 143: ...arecchio Non tirare mai il cavo di alimentazione Non eliminare mai la messa a terra Se la presa a muro allentata non collegare il cavo Rischio di scossa elettrica o di incendio Non si deve mai utilizz...

Страница 144: ...mente rispettare le raccomandazioni del produttore relativa all immagazzinamento dell apparecchio Fare riferimento alle relative istruzioni L apparecchio deve essere tenuto lontano da candele lampade...

Страница 145: ...etta del sole e da fonti di calore padelle stufe termosifoni ecc L esposizione diretta alla luce del sole pu rovinare il rivestimento in acrilico mentre le fonti di calore possono aumentare il consumo...

Страница 146: ...ni di installazione fornite per garantire una ventilazione adeguata Per quanto possibile evitare che l apparecchio tocchi le pareti e o sia a contatto con elementi caldi compressore condensatore per e...

Страница 147: ...tore non pu essere ritenuto responsabile in caso di altro utilizzo R600a Istruzioni di sicurezza Attenzione Non ostruire nessuna griglia di ventilazione dell apparecchio controllare che le aperture di...

Страница 148: ...pparecchio a meno che non siano del tipo consigliato dal produttore Questo apparecchio conforme a tutte le direttive europee vigenti e alle loro eventuali modifiche ed conforme in particolare alle seg...

Страница 149: ...Porta in vetro 2 Guarnizione 3 Cerniera 4 Sistema di apertura push pull 5 Copri ventola 6 Ripiano 7 Pannello dei comandi 8 Supporto della porta 9 Piedini 3 TARGHETTA INFORMATIVA Qui sotto illustrato l...

Страница 150: ...re l apparecchio su un pavimento abbastanza resistente da sostenerlo quando completamente carico Regolare i piedini del frigo cantina per livellarlo necessario lasciare una ventilazione appropriata no...

Страница 151: ...iva CLASSE SIMBOLO INTERVALLO DI TEMPERATURA AMBIENTE C Temperata estesa SN Da 10 C a 32 C Temperata N Da 16 C a 32 C Subtropicale ST Da 16 C a 38 C Tropicale T Da 16 C a 43 C Schemi di incasso La por...

Страница 152: ...152...

Страница 153: ...153 Installazione del frigo cantina 1 Mobile di cucina 2 Porta del frigo cantina 3 Corpo del frigo cantina 4 Parte superiore del frigo cantina 5 Parte inferiore del frigo cantina Fase A Fase B Fase C...

Страница 154: ...la corretta installazione del frigo cantina Se l installazione dell apparecchio non corretta il sistema push pull di apertura della porta non funzioner correttamente Verificare di aver rispettato le...

Страница 155: ...155 Allentare Stringere...

Страница 156: ...e della vite n 2 e la vite n 3 3 Togliere la vite n 4 4 Rimuovere delicatamente la porta e appoggiarla con cautela lontano dal frigo cantina 5 Montare con cautela la nuova porta posizionandola nell ap...

Страница 157: ...one della temperatura viene fatta con i tasti o che si trovano sulla destra dell indicatore della temperatura L intervallo di temperatura di questo frigo cantina va dai 5 C ai 18 C Durante il funziona...

Страница 158: ...a condensa situata sul retro dell apparecchio vicino al compressore Sar il calore prodotto dal compressore a far evaporare la condensa raccolta nella vaschetta Ripiani Per evitare di danneggiare la gu...

Страница 159: ...a In realt possibile inserire al limite pi bottiglie dello stesso tipo impilate senza usare i ripiani ma un cantina diversificata formata da una gran variet di bottiglie e l aspetto della praticit nel...

Страница 160: ...nte Nella maggior parte dei casi la corrente viene ripristinata in fretta Un interruzione di 1 o 2 ore non modificher la temperatura del frigo cantina Per proteggere i vini durante le interruzioni di...

Страница 161: ...tattare il servizio assistenza del proprio rivenditore si prega comunque di fare prima questi controlli La spina elettrica inserita correttamente Non saltata la corrente La causa del guasto non tra qu...

Страница 162: ...on stata fatta correttamente La guarnizione della porta non tiene pi La luce non funziona La spina non inserita saltato un fusibile nell impianto elettrico Il LED guasto saltato contattare il servizio...

Страница 163: ...iata di apparecchi elettrici e o elettronici oppure se si acquista un apparecchio equivalente al rivenditore del nuovo apparecchio L utilizzatore responsabile del conferimento dell apparecchio a fine...

Страница 164: ...lizzate Il consumo di corrente reale dipende dalle condizioni d uso e dalla collocazione dell apparecchio CAPACIT 57 L TEMPERATURA REGOLABILE 5 18 C SBRINAMENTO Sbrinamento automatico CLASSE CLIMATICA...

Отзывы: