
HDX-192 DSP Expansion Card Installation Guide
4
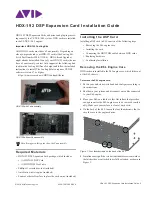
Connecting the HDX TDM Cable
In systems that have more than one card, you must connect all the
HDX cards to each other with HDX TDM cables (custom SATA
cables). Each HDX card has two ports along the top of the card,
labeled IN and OUT. Data communication across multiple cards
is achieved by connecting the cable from the OUT port of the first
card to the IN port of the next card.
To connect the HDX TDM cable:
1
Connect the end of the HDX TDM cable labeled
OUT
to the
OUT
port of the upper HDX card.
2
Connect the other end of the HDX TDM cable, labeled
IN
, to
the
IN
port of next the HDX card, as shown in Figure 12
3
For any additional cards, connect each additional card to its
preceding card using additional HDX TDM cables as de-
scribed above, until all cards are connected. (Each HDX card
is packaged with an HDX TDM cable.)
Replacing E6L Hardware
After installing the cards, replace the retaining bracket and put the
core back into the E6L chassis.
To replace E6L hardware:
1
Carefully place the HDX card assembly retaining bracket back
into position, making sure to not disturb the surface of the DSP
cards in the process, and tighten the captive thumbscrew se-
curing the bracket to the bottom of the E6L engine core.
2
Replace the two screws at the top of the retaining bracket.
3
Slide the core back into the E6L chassis, making sure the con-
nectors face outward.
When the core is fully seated into the chassis, the two latches
at the bottom of the chassis should fully collapsed.
4
Tighten the four thumbscrews to secure the core to the chassis.
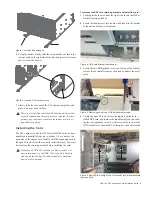
Confirming Installation
After installing HDX cards, confirm that you successfully in-
stalled them.
To confirm installation:
1
Connect power to the E6L, and connect an audio network ca-
ble from your S6L control surface to E6L.
2
Power on your S6L and E6L.
3
On the external VENUE software screen, go to the
Options >
Devices
page. In the HDX DSP section, tap the tab (
1–4
) cor-
responding to the slot in which you installed the card. The 18
DSPs provided by the HDX card should appear as
Available
.
Figure 12. Properly Connected Flex Cable
Figure 13. Options > Devices page showing the DSPs available on the
HDX card installed in slot 2


