background image

HD MADI Guide

18

Clock Source

The Pro Tools Hardware Setup dialog lets you 
select the Clock Source for your Pro Tools sys-
tem.

Internal 

If you are recording an analog signal di-

rectly into Pro Tools, you will usually use the 
Pro Tools 

Internal 

clock source. 

External 

If you are transferring material into 

Pro Tools from an external digital device, or if 
you utilize a common house clock signal, you 
will synchronize Pro Tools to that digital device 
or common signal. The external options for HD 
MADI are dependant on the sample rate and in-
clude:

To select the Clock Source:

1  

Choose 

Setup > Hardware.

2  

Choose the clock source from the Clock Source 

pop-up menu.

3  

Click 

OK

Identify

If you have multiple audio interfaces of the same 
type connected to your system, you should con-
firm the identity of each interface. This ensures 
that you select the appropriate interface in the 
Peripherals list when defining its inputs and 
outputs, and other settings, in the Hardware 
Setup dialog. 

To identify audio interfaces in your system:

1  

Choose 

Setup > Hardware.

2  

From the Peripherals list, select an audio in-

terface connected to your system.

3  

Select the 

Identify

 option, located in the lower 

left corner of the Hardware Setup dialog. This il-
luminates all the LEDs on the front panel of the 
selected audio interface. 

4  

Make a note of which interface in your studio 

setup corresponds to the identified interface. 

5  

Repeat the above steps for each additional au-

dio interface in your setup.

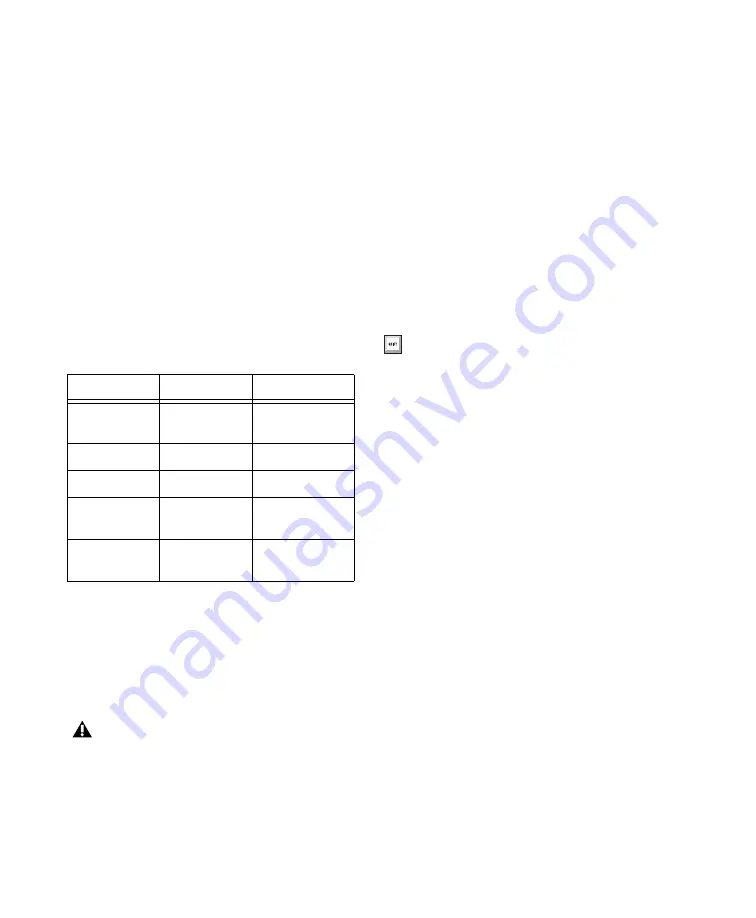
Available Clock Sources for HD MADI

44.1/48 kHz

88.2/96 kHz

176.4/192 kHz

SYNC/SYNC 
HD (if present)

SYNC/SYNC 
HD (if present)

SYNC/SYNC 
HD (if present)

Internal

Internal

Internal

MADI IN

MADI IN

MADI IN

Word Clock 
(44.1/48 kHz)

Word Clock 
(44.1/48 kHz)

Word Clock 
(44.1/48 kHz)

Word Clock 
(96 kHz)

Word Clock 
(176.4/192 kHz)

Your digital input device must be connected 
and powered on for Pro Tools to synchronize 
to it. If your input device is not powered on, 
leave the Clock Source set to Internal.

Use the Up and Down Arrow keys to scroll 
though the Peripherals list in the Hardware 
Setup dialog.

Содержание HD MADI

Страница 1: ...HD MADI Guide...

Страница 2: ...MediaComposer MIDI I O MIX MultiShell Nitris OMF OMF Interchange PRE ProControl Pro Tools M Powered Pro Tools Pro Tools HD Pro Tools LE QuickPunch Recti Fi Reel Tape Reso Reverb One ReVibe RTAS Sibel...

Страница 3: ...D MADI Front Panel 5 HD MADI Back Panel 8 Chapter 3 Connecting HD MADI 11 Connecting HD MADI to an HD Native Card 12 Connecting HD MADI to Pro Tools HD Cards 14 Chapter 4 Configuring HD MADI in Pro To...

Страница 4: ...HD MADI Guide iv...

Страница 5: ...2 kHz 24 or 16 bit resolution Sample Rate Conversion SRC on input or output Front panel clock and SRC indicators Front panel signal present LEDs for input and output BNC Word Clock I O for synchronizi...

Страница 6: ...e following Technical support information Software update and upgrade notices Hardware warranty information Hardware Warranty Your warranty can be found on the Registration Information Card About this...

Страница 7: ...n the worldwide Pro Tools community on the User Conference Training and Education Study on your own using courses available online or find out how you can learn in a classroom setting at a certified P...

Страница 8: ...HD MADI Guide 4...

Страница 9: ...The sample rate is set when you cre ate a new session and can be changed in the Pro Tools Hardware Setup or Playback Engine dialogs if no session is open Loop Master LED The LOOP MASTER LED indicates...

Страница 10: ...xternal Indicates that HD MADI is using the Word Clock in port BNC for system syn chronization When synchronized to Word Clock External Clock input and output do not have to be at the same Word Clock...

Страница 11: ...id word clock is detected the AES EBU LED blinks on and off until a valid clock source is selected Word Clock Indicates that the dedicated SRC Word Clock ports are being used as the clock source for t...

Страница 12: ...to 64 channels of MADI Optical or Coaxial I O as shown in the following table Real Time Sample Rate Conversion HD MADI inputs can stream in at any sample rate and be converted to the current Pro Tool...

Страница 13: ...ters Use DigiLink cables with DigiLink Mini adapt ers to connect to connect HD MADI to Pro Tools HD cards There are two types of DigiLink Mini adapters 12 DigiLink Mini female to DigiLink male 12 Digi...

Страница 14: ...es of either 44 1 kHz or 48 kHz As sample rate increases in the system Loop Sync operates at 1x 2x or 4x the base rate of 44 1 kHz or 48 kHz The Loop Sync In and Out ports are standard BNC connectors...

Страница 15: ...rt two Pro Tools HD cards are required See Connecting HD MADI to Pro Tools HD Cards on page 14 Rack Mounting HD Audio Interfaces HD MADI and all Avid HD audio interfaces need room at their sides to ma...

Страница 16: ...interface in the system To connect HD MADI to an HD Native card 1 Connect HD MADI Primary Port 1 to DigiLink Mini Port 1 on the HD Native card with the included DigiLink Mini cable 2 Connect HD MADI P...

Страница 17: ...n example of connecting multiple audio interfaces see Figure 2 below To make Loop Sync connections 1 Connect the Loop Sync Out of each interface to the Loop Sync In of the next interface with the BNC...

Страница 18: ...to a Pro Tools HD 2 or greater system 1 Connect HD MADI Primary Port 1 to the DigiLink Port on the Pro Tools HD Accel Core card with a DigiLink cable and a DigiLink to DigiLink Mini adapter 2 Connect...

Страница 19: ...g multiple audio interfaces see Figure 4 below To make Loop Sync connections 1 Connect the Loop Sync Out of each interface to the Loop Sync In of the next interface with the BNC cables included in you...

Страница 20: ...HD MADI Guide 16...

Страница 21: ...e default Sample Rate for new sessions 1 If a Pro Tools session is currently open close it 2 Choose Setup Hardware 3 From the Sample Rate pop up menu select the sample rate that you want 4 Click OK Hi...

Страница 22: ...and other settings in the Hardware Setup dialog To identify audio interfaces in your system 1 Choose Setup Hardware 2 From the Peripherals list select an audio in terface connected to your system 3 Se...

Страница 23: ...input The number of available input channels varies de pending on the sample rate see Table 1 on page 20 Split Uses both of the currently selected Physi cal MADI ports Optical 1 and 2 or Coaxial 1 an...

Страница 24: ...Word Clock In 1 port for SRC SRC Word Clock In 2 Select this option to clock to the SRC Word Clock In 2 port for SRC SRC AES EBU Select this option to clock to the SRC AES EBU port for SRC MADI IN Se...

Страница 25: ...t Rate Select the desired output sample rate frequency range for the MADI signal target output 44 1 kHz 48 kHz 88 2 kHz 96 kHz 176 4 kHz 192 kHz If the Word Clock Base Frequency option is en abled the...

Страница 26: ...n the Hardware Setup dialog see Hardware Setup on page 17 2 Choose Setup I O Closing the I O Setup Dialog To close the I O Setup dialog and save changes Click OK When you click OK Pro Tools checks sev...

Страница 27: ...e I O Setup Since HD MADI supports up to 64 channels of I O and each DigiLink port supports up to 32 channels of I O each DigiLink port is represented as 32 channels of MADI I O in the I O Setup see F...

Страница 28: ...and channels 61 64 of HD MADI DigiLink 2 are made inactive Split Mode at 176 4 192 kHz When HD MADI is operating at 176 4 kHz or 192 kHz the Split option is enabled automati cally Additionally in the...

Страница 29: ...system Output The Output page of the I O Setup lets you con figure output signal path names and formats Output names and channel formats are saved with the system I O Setup Input page Unlike other HD...

Страница 30: ...ed depending on the de fined session output bus paths and the available system output channel paths Insert The Insert page of the I O Setup lets you name Hardware Inserts that you may have connected t...

Страница 31: ...help conserve natural resources and ensure that it is recycled in a manner that protects human health and the environment For more information about where you can drop off your waste equipment for re...

Страница 32: ...t thereby declaring conformity to EMC Directive 2004 108 EC and Low Voltage Directive 2006 95 EC Korean EMC Regulations Communication Statement Note This equipment has been tested and found to comply...

Страница 33: ...receptacles and the point where they exit from the equipment 11 Only use attachments accessories specified by the manufacturer 12 For products that are not rack mountable Use only with a cart stand tr...

Страница 34: ...HD MADI Guide 30 UL UL60065 7th IEC 60065 7th Avid Inc Canadian CAN CSA C22 2 60065 03 CUL UL 1 2 3 4 5 6 7 8 9 10 11 12 13 14 15 16 17 HD MADI 40 C 18...

Страница 35: ......

Страница 36: ...ro Serra Boulevard Daly City CA 94014 3886 USA Technical Support USA Visit the Online Support Center at www avid com support Product Information For company and product information visit us on the web...

Отзывы: