17
2. INSTALLATION INSTRUCTIONS
Remove the external packaging, remove the protective plastic film from the surface of the appliance and
clean the external parts of the appliance with a cleaner designed for this purpose. Do not use steel wool or
any coarse agents, which could irreparably damage the surface of the appliance.
IMPORTANT
This unit can be installed as either built-in or free-standing unit. For built-in installation, certain clearances
are necessary for optimal operation. In this case, allow 3/16” on both sides, 2” at the rear and 1/16” at the
top to ensure proper ventilation. Take care that the air vent at the front of the appliance is never covered or
blocked in any way.
BEFORE INSTALLATING OF YOUR APPLIANCE
The placement of the appliance must meet the requirements in the section operating
conditions and must include a stable floor with a load-bearing capacity corresponding to the
weight of the appliance.
Level the appliance using the adjustable feet. Ensure there is a gap between the bottom edge
of the appliance and the ground, so that there is sufficient circulation of air. This will ensure the
optimal performance of the cooling system.
Use the appliance only for the purposes for which it has been designed.
The appliance must be located on a rigid and even surface. In this way you will ensure free
circulation of the coolant and effective operation of your appliance.
If possible, place the appliance in a cool, well ventilated and dry room.
Do not locate the appliance in direct sunlight or in a room with a high ambient temperature, or
in the vicinity of any sources of direct heat, such as a radiator or oven. This would cause the
compressor to work harder, resulting in a substantially higher power consumption level.
ELECTRICAL REQUIREMENTS
A 115 Volt / 60 Hz grounded electrical supply equipped with a 15 or 20 amp fuse or circuit breaker is
required. It is recommended that a separate circuit serving only your appliance be provided. Use outlets
that cannot be turned off by a switch or pull chain. Connect this appliance to a 3-prong power supply outlet
that has a ground terminal. If you only have a 2-prong outlet, have it replaced by a qualified technician with
an outlet that meets the local codes. DO NOT USE AN EXTENSION CORD. Required nominal voltage and
frequency are indicated on the rating plate. The connection to the power supply and grounding has to be
made according to current local standards and regulations.
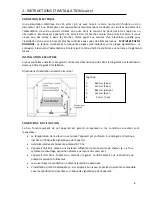
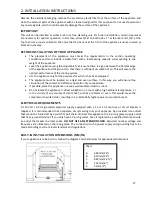
BUILT-IN INSTALLATION DIMENSIONS (MM/IN)
If your appliance is to be built-in, follow the diagram and chart below for appropriate dimensions.
Chart
A
660mm (26″)
B
610mm (24″)
C
883mm (34 ¾″)
D
152mm (6″)
E
51mm (2″)

