background image


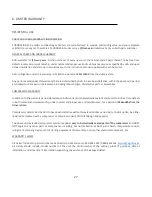
6. LIMITED WARRANTY  


RESIDENTIAL USE 

 
PARTS AND LABOR WARRANTY INFORMATION  
 
EURODESIGN Wine cellars and Beverages Centers are manufactured to provide outstanding value, and your complete 
satisfaction is our goal. Therefore all EURODESIGN units carry a 

(2) two year

 limited warranty on both parts and labor. 

 
GENERAL PARTS AND LABOR WARRANTY  
 
AVG warrants for 

(2) two years

 , to the purchaser of every new unit, the cabinet and all parts thereof, to be free from 

defects in material or workmanship, under normal and proper use and maintenance service as specified by AVG and upon 
proper installation and start-up in accordance with the instruction manual supplied with each AVG unit.  
 
AVG’s obligation under this warranty is limited to a period of 

24 months

 from the delivery date. 

 
Any parts covered under this warranty that are determined by AVG to have been defective, within the above said period, 
are limited to the repair or replacement, including labor charges, of defective parts or assemblies.  
 
COMPRESSOR WARRANTY 
 
In addition to the warranty period stated above, AVG warrants its hermetically sealed compressor to be free from defects 
in both material and workmanship, under normal and proper use and maintenance, for a period of 

36 

months

 from the 

delivery date. 


Compressors determined by AVG to have been defective within this extended time period will, at AVG’s option, be either 
repaired or replaced with a compressor or compressor parts of similar design and capacity.  
 
The above said extended compressor warranty applies 

only to hermetically sealed parts of the compressor 

and DOES 

NOT apply to any other parts or components, including, but not limited to, cabinet, paint finish, temperature control, 
refrigerant, metering device, motor starting equipment, fan assembly, or any other electrical component, etc.  
 
WARRANTY CLAIMS 
 
All claims for labor or parts must be made directly to AGI Service, tel: 450.963.1303/1.888.6512534, 

[email protected]


All  claims  should  include:  model  number  of  the  unit,  the  serial  number  of  the  cabinet,  proof  of  purchase,  date  of 
installation, and all pertinent information supporting the existence of the alleged defect.  


27 

Содержание PMC44DS

Страница 1: ...DEL Pour une utilisation optimale de cet appareil ainsi que pour votre sécurité veuillez lire attentivement les instructions contenues dans ce manuel avant de faire fonctionner cet appareil To ensure proper use of this appliance and your safety please read the following instructions completely before operating this appliance 080716 ...

Страница 2: ...DES MATIÈRES 1 Précautions importantes 3 4 2 Installation 5 6 3 Description de l unité et entreposage 7 8 9 4 Mode d emploi 10 11 5 Nettoyage entretien 11 12 6 Garantie limitée 13 14 7 Guide de dépannage 15 2 ...

Страница 3: ... RÉFRIGÉRANT SONT PERCÉS SUIVRE LES INSTRUCTIONS AVEC SOIN RÉFRIGÉRANT INFLAMMABLE UTILISÉ DANGER RISQUE D INCENDIE OU D EXPLOSION RÉFRIGÉRANT INFLAMMABLE UTILISÉ NE PAS UTILISER DE DISPOSITIFS MÉCANIQUES POUR DÉGIVRER LE RÉFRIGÉRATEUR NE PAS PERCER LES TUBES FRIGORIFIQUES ATTENTION N ENTREPOSEZ PAS OU N UTILISEZ PAS DE L ESSENCE OU TOUT AUTRE VAPEUR OU LIQUIDE INFLAMMABLE PRÈS DE CET APPAREIL OU ...

Страница 4: ...l si le cordon ou la fiche est endommagé Ne nettoyez jamais l unité avec une préparation acide de l essence du pétrole ou autre sorte de substance chimique qui pourrait endommager l appareil Ne jamais entreposer ou utiliser de l essence de gaz ou de liquides inflammables près de cet appareil Débrancher l appareil avant de procéder au nettoyage à la maintenance ou à la réparation Ne pas tenter de r...

Страница 5: ...tion se fait entre des armoires sans cadre une fourrure d un de large ou une bande panneau latérale pourra être nécessaire du côté charnière La bande agira comme un espacement entre le boitier de l appareil et la porte du cabinet adjacent La largeur de l ouverture doit inclure le panneau ou la fourrure Note La porte doit excéder d au moins 1 au delà des armoires environnantes et il doit y a avoir ...

Страница 6: ...r l appareil dans une prise électrique de 115V 60Hz La taille du disjoncteur doit être de 2 5 AMPS ampères Cet appareil est équipé d une fiche de courant à trois tiges pour réduire le risque de choc électrique Si la fiche ne s insère pas facilement ou à fond dans la prise de courant consulter un électricien Ne pas modifier la fiche et ne pas utiliser d adaptateur Cet appareil n est pas conçu pour ...

Страница 7: ... la zone du bas 2 tablettes de 8 bouteilles plus 1 tablette de 12 bouteilles 6 6 empilées Aussi certaines tablettes peuvent être retirées pour permettre le rangement de bouteilles de plus grand format RECOMMENDATIONS POUR L ENTREPOSAGE Votre cabinet a été conçu pour entreposer un maximum de bouteilles en toute sécurité Nous recommandons que vous observiez les consignes mentionnées pour optimiser s...

Страница 8: ...ABLETTE COULISSANTE Ne pas retirer plus d une tablette à la fois NOTE Avant de modifier la configuration originale de votre unité demander conseil à votre détaillant POUR RETIRER OU DÉPLACER UNE TABLETTE Enlever les bouteilles Tirer la tablette vers l extérieur Détacher en baissant l attache de côté droit et en soulevant celle de gauche en même temps puis tirer 8 ...

Страница 9: ...la grande bague originalement de la charnière inférieure dans le trou de la charnière du haut 7 Avec une clé à douilles de 10mm dévissez les vis de la charnière inférieures de l unité située au dessus du pied d ajustement avant droit et enlever la rondelle de caoutchouc et la charnière Mettre de côté la rondelle de caoutchouc pour la prochaine étape 8 Toujours avec une clé à douilles installez la ...

Страница 10: ...es 5 Si vous mettez l appareil hors tension attendez au moins 5 minutes avant de rallumer REMARQUES Lorsque l appareil redémarrera après une panne de courant les derniers paramètres seront automatiquement récupérer Si l appareil est débranché éteint ou qu il y a panne de courant il faut attendre 5 cinq minutes avant de redémarrer l appareil Si vous tentez de le faire avant ce délai l appareil ne r...

Страница 11: ...E TEMPÉRATURE Réglage de la température de zone l afficheur de température indiquera la température de la zone Appuyez sur les touches pour régler la température à la hausse ou à la baisse La température affichée diminuera ou augmentera par incrément d un degré L affichage de la température clignotera pendant 5 secondes après que la température ait été réglée et reviendra ensuite à l affichage de ...

Страница 12: ...tablissent en quelques heures et ne devraient pas affecter la température de votre unité si vous ouvrez la porte le moins possible Si le courant ne se rétablit pas après une longue période de temps voyez à protéger le contenu de l appareil DÉPLACEMENT DE L APPAREIL Videz l appareil Prenez la précaution de fixer avec du ruban adhésif toutes les pièces libres tablettes à l intérieur d e l appareil V...

Страница 13: ... AVG sont défectueuses dans la période couverte par la garantie sont limitées à leur réparation ou remplacement y compris les frais de main d œuvre de pièces défectueuses ou d assemblage GARANTIE DU COMPRESSEUR En plus de la période de garantie susmentionnée AVG garantit le compresseur scellé hermétiquement contre tout défaut de matériel et de fabrication à condition d une utilisation normale et a...

Страница 14: ...enseignements sur la garantie fournis avec l unité ALTÉRATION NÉGLIGENCE ABUS MAUVAISE UTILISATION ACCIDENT DOMMAGE PENDANT UN DÉPLACEMENT OU L INSTALLATION INCENDIE INONDATION FORCE MAJEURE AVG ne sera pas responsable de la réparation ou du remplacement d une quelconque pièce qui selon AVG a fait l objet d une altération de négligence d abus d une mauvaise utilisation d un accident de dommages du...

Страница 15: ...outé La porte est ouverte trop souvent La porte est mal fermée Le contrôle de la température est mal réglé Le joint d étanchéité de la porte n est pas suffisamment étanche La lumière ne fonctionne pas L appareil est débranché Le disjoncteur est éteint ou le fusible grillé L ampoule est brûlée L interrupteur de la lumière est en position d arrêt L appareil vibre Vérifiez que l appareil est bien à n...

Страница 16: ... IMPORTANT SAFETY PRECAUTIONS 17 18 2 INSTALLATION INSTRUCTIONS 19 20 3 APPLIANCE FEATURES STORAGE 21 22 23 24 4 OPERATING YOUR APPLIANCE 24 25 5 CARE AND MAINTENANCE 26 6 LIMITED WARRANTY 27 28 7 TROUBLESHOOTING GUIDE 29 ...

Страница 17: ... PUNCTURE REFRIGERANT TUBING CAUTION RISK OF FIRE OR EXPLOSION FLAMMABLE REFRIGERANT USED CONSULT REPAIR MANUAL OWNER S GUIDE BEFORE ATTEMPTING TO SERVICE THIS PRODUCT ALLSAFETY PRECAUTIONS MUST BE FOLLOWED CAUTION RISK OF FIRE OR EXPLOSION DISPOSE OF PROPERTY IN ACCORDANCE WITH FEDERAL AND OR LOCAL REGULATIONS FLAMMABLE REFRIGERANT USED CAUTION RISK OF FIRE OR EXPLOSION DUE TO PUNCTURED REFRIGERA...

Страница 18: ...d toward a certified electrician or an authorized Service Center Do not place or store anything on top of the unit Never clean appliance parts with flammable fluids The fumes can create a fire hazard or explosion Make sure the unit is unplugged before cleaning or repairing Do not store or use gasoline or any other flammable vapors in the vicinity or any other appliance The fumes can help create a ...

Страница 19: ...nding or built in installation For a built in installation please refer to the below drawing BUILT IN INSTALLATION Opening must be at least 24 inch width and depth The cutout dimension illustrated in below figure allows for door swing and access to the pull out shelves when installed as a built in appliance If installing between frameless cabinets a wide filler strip or side panel may be needed on...

Страница 20: ...fety this appliance should be properly grounded Plug the appliance into an electrical outlet of 115 V 60 Hz The size of the circuit breaker must be of 2 5 AMPS This appliance should be properly grounded for your safety The power cord of this appliance is equipped with a 3 three prong plug to minimize the possibility of electrical shock Do not under any circumstances cut or remove the third ground ...

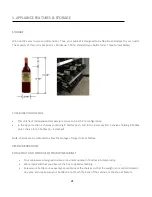
Страница 21: ... 8 bottles each and in the lower section 2 shelves holding 8 bottles plus 1 shelve for 12 bottles 6 6 stacked Note shelves can be removed to allow the storage of larger format bottles RECOMMENDATIONS FOR LAYOUT AND STORAGE OF YOUR WINE CABINET Your cabinet was designed to store a maximum number of bottles in total security We recommend that you observe the tips to optimize loading Spread your bott...

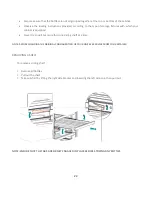
Страница 22: ...d Never try to pull out more than one sliding shelf at a time NOTE BEFORE CHANGING THE ORIGINAL CONFIGURATION OF YOUR UNIT SEEK ADVICE FROM YOUR RETAILER REMOVING A SHELF To remove a sliding shelf 1 Remove all bottles 2 Pull out the shelf 3 Take out shelf by lifting the right side bracket and lowering the left side one then pull out NOTE ENSURE THAT THE TABS ARE FIRMLY ENGAGED IN PLACE BEFORE STOR...

Страница 23: ...ge or scratches 5 There are two bushings in the upper hinge hole of the door one large and one small and only one large bushing in the lower hinge hole of the door Remove the three bushings and reinsert them The one large and one small bushing from the top are now located on the original bottom of the door Insert the large bushing from the lower hinge hole and place it in the original upper hinge ...

Страница 24: ...or will light for 3 seconds indicating and an audible beep will be perceived 2 The zone temperature will display 3 The zone temperature can be set between 39 F to 68 F 4 C to 20 C 4 The zone temperature may have a difference of 5 F 3 C from the programmed setting depending on loading and ambient conditions 5 If the unit is unplugged power lost or turned off you must wait 3 to 5 minutes before rest...

Страница 25: ...s a lock Unlock function If the appliance doesn t receive any instructions from user over 12 seconds every key in the control panel will be automatically locked To unlock press and hold the 2 temperature control keys at the same time for at least 3 seconds TEMPERATURE SETTINGS colder warmer Under normal conditions the temperature display will flash and indicate the current temperature of the zone ...

Страница 26: ...ior and exterior with a soft cloth Dust or anything else blocking the vent may hinder the cooling efficiency of the appliance Vacuum the vent if necessary VACATION TIME Unplug the unit from the wall outlet Remove all the contents Clean the appliance Leave the door open slightly to avoid possible formation of condensation mold or odors Short vacations Leave the appliance operating during vacations ...

Страница 27: ...rts or assemblies COMPRESSOR WARRANTY In addition to the warranty period stated above AVG warrants its hermetically sealed compressor to be free from defects in both material and workmanship under normal and proper use and maintenance for a period of 36 months from the delivery date Compressors determined by AVG to have been defective within this extended time period will at AVG s option be either...

Страница 28: ...proper usage or installation or failure to clean and or maintain product as set forth in the warranty packet provided with the unit ALTERATION NEGLECT ABUSE MISUSE ACCIDENT DAMAGE DURING TRANSIT OR INSTALLATION FIRE FLOOD ACTS OF GOD AVG is not responsible for the repair or replacement of any parts that AVG determines have been subjected to alteration neglect abuse misuse accident damage during tr...

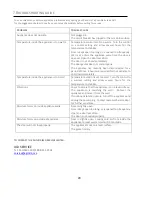
Страница 29: ... the appliance to cool down completely Temperature inside the appliance is too cold Temperature control is set too cold Turn the control to a warmer setting and allow several hours for the temperature to stabilize Vibrations Check to assure that the appliance is on a level surface The appliance is touching the wall Re level the appliance and move it from the wall If continued vibration occurs turn...

Отзывы: