background image


TABLE DES MATIÈRES 


1.


PRÉCAUTIONS IMPORTANTES..…………………………..….............3-4 


2.


INSTRUCTIONS INSTALLATION …………………………………..…5-6-7 


3.


UTILISATION……………………………………………………………..… 7 


a.


Commandes et réglages de température………………..…8-9 

b.


Inverser la porte…………………………………………………..11 

c.


Entreposage et rangement …………………………………….12 


4.


ENTRETIEN ……………………..………………………….………..……..13 

5.


GARANTIE ……………..…………………………..……..………….…14-15 

6.


GUIDE DE DEPANNAGE …………………………………………………..16 


Содержание NOIRE BSC27SB

Страница 1: ...ne utilisation optimale de cet appareil ainsi que pour votre sécurité veuillez lire attentivement les instructions contenues dans ce manuel avant de faire fonctionner cet appareil To ensure proper use of this appliance and your safety please read the following instructions completely before operating this appliance 030417 ...

Страница 2: ...ÉCAUTIONS IMPORTANTES 3 4 2 INSTRUCTIONS INSTALLATION 5 6 7 3 UTILISATION 7 a Commandes et réglages de température 8 9 b Inverser la porte 11 c Entreposage et rangement 12 4 ENTRETIEN 13 5 GARANTIE 14 15 6 GUIDE DE DEPANNAGE 16 ...

Страница 3: ... la terre Brancher l appareil dans une prise de courant à 3 fiches et ne pas utiliser de cordon rallonge N enlevez en aucun cas la troisième broche celle qui sert de mise à la terre du câble d alimentation N utilisez pas d adaptateur pour brancher cet appareil Si l appareil fait défaut débranchez le de la prise d alimentation Débranchez le câble d alimentation éteignez le ou enlevez le fusible Ne ...

Страница 4: ...e fois qu elle a utilisé l appareil Les enfants qui utilisent l appareil doivent être supervisés pour éviter qu ils ne jouent avec l appareil Ne rangez pas de matières explosives ou de vaporisateur contenant une matière inflammable comme du butane du propane du pentane etc dans l appareil Les composantes électriques peuvent enflammer le gaz dans l éventualité d une fuite Pour savoir si un contenan...

Страница 5: ...o de chaque côté 2 po à l arrière et 1 16 po au dessus de l appareil pour favoriser une bonne ventilation Ne jamais obstruer la grille de ventilation située a l avant AVANT D INSTALLER VOTRE APPAREIL L emplacement de cette unité doit respecter les exigences décrites précédemment et doit inclure un plancher stable capable de supporter le poids de l appareil Mettez l appareil au niveau en utilisant ...

Страница 6: ... à fonctionner davantage ce qui entrainera une augmentation substantielle de la consommation d énergie CONNEXION ÉLECTRIQUE Une alimentation électrique de 115 volts c a seulement de 60 Hz avec mise à la terre munie d un fusible ou d un disjoncteur de 15 ou 20 ampères est requise Nous recommandons de consacrer un circuit exclusivement à l alimentation de votre appareil Utilisez une prise dont le co...

Страница 7: ...idité relative ambiante maximale HR 75 L appareil doit être placé à une distance suffisante de toute source de chaleur p ex four système de chauffage exposition directe aux rayons du soleil etc L appareil doit être installé à un endroit protégé des conditions climatiques L appareil doit faire l objet d un entretien régulier conformément aux instructions du présent manuel de l utilisateur Les ouver...

Страница 8: ...1 F ou 1 C Bouton C F Appuyez sur ce bouton pour changer l unité de mesure affichée par le voyant indicateur soit entre C et F Le bouton allume ou éteint la lumière intérieure Si vous utilisez ce bouton la lumière n est plus contrôlée par le contact en ampoule et demeure ALLUMÉE le bouton lumière est désactivé lorsque le bouton conservation d énergie est allumé Affichage DEL l écran indique le rég...

Страница 9: ...oter et le mode de réglage se fermera L échelle de température est réglable de 39 F à 64 F de 4 C à 18 C FONCTIONS FONCTION DE MÉMORISATION DE LA TEMPÉRATURE En cas de panne de courant l appareil conserve en mémoire le réglage de température Lorsque le courant revient l appareil se remettra en marche et le même réglage de température sera appliqué FONCTION DE RAPPEL DE FERMETURE DE PORTE Si vous o...

Страница 10: ...une première fois ou après une réinitialisation ou après une longue période d inutilisation il peut exister un écart entre la température réelle à l intérieur de l appareil et celle affichée sur l écran DEL Cette situation causée par la durée de la période d activation est tout à fait normale Laissez l appareil en marche pendant plusieurs heures et les températures se stabiliseront éventuellement ...

Страница 11: ...te 2 et retirez l axe de porte ainsi que la porte 2 Mettez la porte de côté et dévissez les 2 vis 4 de la charnière supérieure et retirez la 3 Enlevez les clous 8 du coin supérieur gauche du cabinet et installez la charnière supérieure gauche supplémentaire 7 dans le coin supérieur gauche du cabinet au moyen de 3 vis 4 Faire pivoter la porte de 180 degrés installez la porte dans la même direction ...

Страница 12: ...ette unité est basée sur un format de bouteille standard de type bordeaux Bouteilles de 750 ml La capacité d entreposage est de 27 bouteilles de 750 ml voir détails format dimensions photo ci dessous l unité comporte 6 tablettes de 4 bouteilles alors que celle du bas en a 3 pour un total de 27 27 bouteilles ...

Страница 13: ...ez la porte le moins possible Si le courant ne se rétablit pas après une longue période de temps voyez à protéger le contenu de votre appareil DÉPLACEMENT DE L APPAREIL Videz l appareil Prenez la précaution de fixer avec du ruban adhésif toutes les pièces libres tablettes à l intérieur de l appareil Vissez les pieds ajustables au maximum Fermez la porte à l aide de ruban adhésif Assurez vous que l...

Страница 14: ...vis d AVANTGARDE sont défectueuses dans la période couverte par la garantie sont limitées à leur réparation ou remplacement y compris les frais de main d œuvre de pièces défectueuses ou d assemblage GARANTIE DU COMPRESSEUR En plus de la période de garantie susmentionnée AVANTGARDE garantit le compresseur scellé hermétiquement contre tout défaut de matériel et de fabrication à condition d une utili...

Страница 15: ...il conformément aux renseignements sur la garantie fournis avec l unité ALTÉRATION NÉGLIGENCE ABUS MAUVAISE UTILISATION ACCIDENT DOMMAGE PENDANT UN DÉPLACEMENT OU L INSTALLATION INCENDIE INONDATION FORCE MAJEURE AVANTGARDE n est pas responsable de la réparation ou du remplacement d une quelconque pièce qui selon AVANTGARDE a fait l objet d une altération de négligence d abus d une mauvaise utilisa...

Страница 16: ...ture est incorrect Le scellant de porte ne fonctionne pas adéquatement La lumière ne fonctionne pas L appareil n est pas branché Le disjoncteur ou le fusible du circuit est sauté L ampoule est brûlée Le bouton de la lumière est en position d arrêt OFF Ou la fonction conservation d énergie bouton est allumé Présence de vibrations Vérifiez que l appareil est au niveau L appareil fait trop de bruit U...

Страница 17: ...ANT SAFETY INSTRUCTIONS 18 19 2 INSTALLATION INSTRUCTIONS 20 21 3 OPERATING YOUR APPLIANCE a Conditions 22 b control and temperature Settings 22 23 c Reversing the door 25 d Storage 26 4 CARE AND MAINTENANCE 27 5 TROUBLESHOOTING 28 ...

Страница 18: ...nd work on the appliance should only be carried out by the customer service department as unauthorized work could prove highly dangerous for the user The same applies to changing the power cable Do not stand on the base drawers or doors or use them to support anything else Do not allow flames or sources of ignition to enter the appliance When transporting and cleaning the appliance ensure that the...

Страница 19: ...e you throw away your old appliance Take off the door Leave the parts in place so that children may not easily climb inside When disposing of your appliance please choose an authorized disposal site This appliance is equipped with a power cord having a grounding wire with a grounding plug The plug must be plugged into an outlet that is properly installed and grounded Do not under any circumstances...

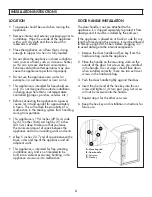
Страница 20: ...ion Take care that the air vent at the front of the appliance is never covered or blocked in any way BEFORE INSTALLATING OF YOUR APPLIANCE The placement of the appliance must meet the requirements in the section operating conditions and must include a stable floor with a load bearing capacity corresponding to the weight of the appliance Level the appliance using the adjustable feet Ensure there is...

Страница 21: ...as a ground terminal If you only have a 2 prong outlet have it replaced by a qualified technician with an outlet that meets the local codes DO NOT USE AN EXTENSION CORD Required nominal voltage and frequency are indicated on the rating plate The connection to the power supply and grounding has to be made according to current local standards and regulations BUILT IN INSTALLATION DIMENSIONS MM IN If...

Страница 22: ...capacity of the system corresponds to the specifications on the rating label of the appliance COMMANDS button to turn the unit ON and OFF press and hold this button for approximately 3 seconds button Energy conservation button Pressing this button for 3 seconds will turn the energy conservation mode ON or OFF In this mode the LED light and display will turn off and the C F light will be on indicat...

Страница 23: ...se or decrease by 1 F or 1 C If you try to go beyond the minimum maximum value that can be established the display will jump to the lowest highest adjustable temperature value automatically If a button is not pressed for 5 seconds the LED will stop flashing and the setting mode will be exited You can set the temperature in the range of 39 F to 64 F or 4 C to 18 C FUNCTIONS TEMPERATURE MEMORY FUNCT...

Страница 24: ...ce will not turn on If you turn on the appliance for the first time or after a restart or after it has been out of operation for a long time there may be a temperature difference between the temperature inside the appliance and that on the LED display This is a normal event caused by the duration of the activation period Leave the appliance turned on for several hours and the temperatures will sta...

Страница 25: ...in a safe place and unscrew the 3 screws from top right hinge 4 and take out the right top hinge 3 Remove the decorative nails 8 from left top of cabinet and install the spare top left hinge 9 at left top of cabinet using the 3 screws 4 Rotate the door 180 degrees then re installed it the same way it was removed making sure it is aligned properly 9 5 Block the hole at right top of cabinet with the...

Страница 26: ... This unit can store up to 27 wine bottles The unit s capacity is based on a regular 750ml Bordeaux bottle for size dimensions see below picture 6 X 4 bottle shelves plus 3 bottle on the lower part of the cabinet ...

Страница 27: ...he power is going to be off for a longer period of time you need to take the proper steps to protect your contents VACATION TIME Short vacations Leave the Wine Cellar operating during vacations of less than three weeks Long vacations If the appliance will not be used for several months remove all items and turn off the appliance Clean and dry the interior thoroughly To prevent door and mold growth...

Страница 28: ...her than normal A large amount of contents has been added to the appliance The door is opened too often The door is not closed completely The temperature control is not set correctly The door gasket does not seal properly The light does not work Not plugged in Tripped circuit breaker or blown fuse The bulb has burned out The light button is OFF Or Energy conservation button is on Vibrations Check ...

Отзывы: