background image


2.


INSTRUCTIONS D’INSTALLATION 


OUTILS NÉCESSAIRES POUR INSTALLER LA HOTTE 


Tournevis Phillips (tête étoilée)


Marteau et tournevis à tête plate


Pinces


Ciseaux à métal


Ciseaux (pour couper du ruban pour conduit)


Ruban pour conduit métallique de 2’’ (5 cm)


Marqueur ou crayon


Niveau


Ruban à mesurer


AVANT D'INSTALLER LA HOTTE 


Pour un échappement d'air plus efficace, nous recommandons une installation le plus 
rectiligne possible et d'utiliser aussi peu de coudes que possible.


Évacuez l'air à l'extérieur seulement. Ne pas évacuer l’air dans des espaces restreints 
comme l’intérieur des murs, plafond, grenier, faux plafond ou garage.


À cause du poids et de la dimension de la hotte, deux ou plusieurs personnes sont 
nécessaires pour déplacer et installer la hotte de façon sécuritaire.


Retirez  la  hotte  de  son  emballage  et  déposez-la  sur  une  surface  plane  pour 
l'assemblage.


AVERTISSEMENT 

CET APPAREIL DOIT ÊTRE CORRECTEMENT MIS À LA TERRE 


Cette hotte doit être branchée dans une prise de courant à 3 brins, 110-120V/60Hz, 
correctement installée et mise à la terre.


Si  l'alimentation  électrique  ne  répond  pas  aux  exigences,  consultez  un  électricien 
avant de continuer.


Le câblage électrique doit être le plus près possible de l'emplacement d'installation, 
dans le plafond ou le mur arrière.


La hotte doit être raccordée au câblage électrique de la maison conformément aux 
normes et codes locaux.


MUR ENCADRANT UN APPUI SUFFISANT 

CETTE HOTTE EST LOURDE. UNE STRUCTURE ET UN SUPPORT ADÉQUATS DOIVENT ÊTRE PRÉVUS POUR TOUS LES 
TYPES D’INSTALLATION. EN CAS DE MONTAGE SUR CLOISON SÈCHE (GYPSE), LA HOTTE DOIT ÊTRE SÉCURISÉE PAR 
DES SOLIVES VERTICALES (EN BOIS) DANS LE MUR OU PAR UN SUPPORT HORIZONTAL


6

Содержание AVH-308CS

Страница 1: ...TALLATION GUIDE USE AND CARE MANUAL NOTE Installateur Laissez ce manuel au propriétaire Propriétaire Conservez ce guide pour référence ultérieure Installer Leave this manual with the homeowner Homeowner Keep this guide for future reference MCT 26112018 IMPORTANT Lire et conserver ces instructions Read and save these instructions ...

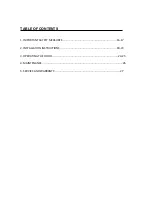
Страница 2: ...TABLE DES MATIÈRES 1 MESURES DE SÉCURITÉ IMPORTANTES 3 4 2 INSTRUCTIONS D INSTALLATION 5 10 3 MODE D EMPLOI 11 12 4 ENTRETIEN 13 14 5 SERVICE ET GARANTIE 14 ...

Страница 3: ...errouillé y fixer un avertissement en évidence telle qu une étiquette de couleur vive Les travaux d installation et de raccordement électrique doivent être effectués par une personne qualifiée conformément aux codes et aux standards de construction incluant ceux concernant la protection contre les incendies Une quantité d air adéquate est requise afin d assurer une bonne combustion et l évacuation...

Страница 4: ... cerises jubilées steaks au poivre flambés etc Nettoyez régulièrement les surfaces du ventilateur Ne pas laisser la graisse s accumuler sur le ventilateur les filtres ou les conduits d évacuation Utilisez le bon format de casserole Servez vous toujours de casseroles et d ustensiles appropriés à la dimension de la surface chauffante AVERTISSEMENT AFIN D ÉVITER TOUT RISQUE DE BLESSURES LORS D UN FEU...

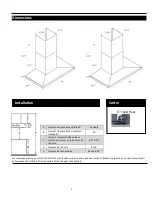
Страница 5: ...r et ils peuvent par ailleurs être incomplets et ou changer sans préavis A Hauteur du plancher au plafond variable B Hauteur du plancher au comptoir standard 36 C Hauteur recommandée entre la surface de cuisson et le dessous de la hotte 28 À 30 D Hauteur de la hotte 2 1 4 E Hauteur de la cheminée Max 44 63 Installation Sortie 6 rond Haut 5 ...

Страница 6: ...ller la hotte de façon sécuritaire Retirez la hotte de son emballage et déposez la sur une surface plane pour l assemblage AVERTISSEMENT CET APPAREIL DOIT ÊTRE CORRECTEMENT MIS À LA TERRE Cette hotte doit être branchée dans une prise de courant à 3 brins 110 120V 60Hz correctement installée et mise à la terre Si l alimentation électrique ne répond pas aux exigences consultez un électricien avant d...

Страница 7: ...z vous que le premier conduit est d au moins 12 avant de le rediriger Trop de coudes et de transitions réduiront la performance de la hotte Des conduits plus grands peuvent être nécessaires lors d une canalisation plus longue Installez un capuchon de toit ou de mur Reliez le conduit de métal au capuchon puis acheminez le conduit jusqu à l emplacement de la hotte Scellez les joints avec du ruban po...

Страница 8: ...a terre Une alimentation électrique de 110 120 volts 60 Hz Ca protégée par fusible sur un circuit séparé de 15 ampères fusionné aux deux extrémités de la ligne est requise pour l installation de ce produit N effectuer pas de mise à la terre sur une canalisation de gaz La hotte doit être raccordée directement à la boîte de déconnexion ou disjoncteur à fusible par un câble de cuivre sous gaine blind...

Страница 9: ...r désirée en tenant compte du dégagement minimum entre la hotte et la surface de cuisson voir schéma d installation 3 Alignez les trous de montage de la hotte sur les vis du mur et accrochez la hotte en place Serrez les vis pour fixer la hotte au mur ATTENTION ASSUREZ VOUS QUE LA HOTTE EST BIEN INSTALLÉE AVANT DE LA RELÂCHER AVERTISSEMENT Risque de choc électrique Cette hotte doit être correctemen...

Страница 10: ...roduit pour vérifier la tension appropriée à cet appareil 6 Rangez l excès des fils dans la boîte de câblage 7 Joignez les deux cheminées et utilisez les vis pour fixer la cheminée inférieure à la hotte tel qu indiqué sur l illustration ci dessous 8 Pour éviter d abimer les cheminées prolongez lentement la cheminée supérieure et la placer soigneusement sur le support de montage ensuite la fixer en...

Страница 11: ...le lorsque le moteur est éteint Indique la vitesse actuelle du ventilateur moteur F1 F3 Lumière Pour allumer éteindre les lumières DEL Minuterie numérique de délai Indique la durée de temps restant pour la fonction délai d arrêt Contrôles Rappel automatique de nettoyage Cette hotte est équipée d un rappel de nettoyage qui s active après 30 heures d utilisation Lorsque le ventilateur commence à tou...

Страница 12: ...t que le ventilateur est en marche appuyez et maintenez le bouton Marche Arrêt pendant plus de 3 secondes pour activer le délai d arrêt L indicateur de délai d arrêt s allumera et commencera le compte à rebours quand il atteindra zéro le ventilateur s arrêtera Réglage de la lumière Appuyez une fois sur la touche Lumière pour allumer les lumières et une fois de nouveau pour les éteindre Pendant que...

Страница 13: ...nent des produits chimiques qui peuvent être dangereux Dans le cas échéant rincez à l eau après l exposition et essuyez avec un chiffonpropre NETTOYER LES FILTRES Les filtres doivent être nettoyés après chaque période d usage de 30 heures ou une fois par mois Pour les retirer poussez sur le loquet de métal et le désengager de la hotte Basculez le filtre vers le bas puis retirer Pour le nettoyage d...

Страница 14: ...ez un tournevis à tête plate entre le boîtier de la lumière et la hotte soulevezdélicatement le boîtier de la lumière et recherchez l attache métallique Pressez sur l attache métallique et retirez la lumière Débranchez le câble d alimentation et jetez la lumière usagée Inversez les étapes pour installer une nouvelle lumière au DEL Allumez le disjoncteur et la hotte pour tester le fonctionnement 5 ...

Страница 15: ...TABLE OF CONTENTS 1 IMPORTANT SAFETY MEASURES 16 17 2 INSTALLATION INSTRUCTIONS 18 23 3 OPERATING THE HOOD 24 25 4 MAINTENANCE 26 5 SERVICE AND WARRANTY 27 ...

Страница 16: ...m being switched on accidentally If the panel cannot be locked securely fasten a noticeable warning device such as a tag Installation work and electrical wiring must be done by a qualified person in accordance with all applicable codes standards including fire rated construction Toprevent back drafting sufficient air circulation is needed for proper combustion and exhausting of gases through the e...

Страница 17: ...zette Cherries Jubilee Flambés etc Clean the unit s surfaces frequently Grease can accumulate on fan or filters Use proper pan size Always use cookware appropriate for the size of the surface element WARNING To reduce the risk of injury to persons in the event of a cooktop grease fire observe the following guidelines Smother flames with a close fitting lid cookie sheet or metal tray and then turn ...

Страница 18: ...anteed by us may be incomplete and or may change without notice A Floor to ceiling height variable B Floor to counter top height standard 36 C Recommended height between cooking surface and bottom of the hood 28 to 30 D Hood height 2 36 E Chimney height Max 44 63 Installation Duct transition 6 round top 18 Hood ...

Страница 19: ...QUIREMENTS CAUTION THIS APPLIANCE SHOULD BE PROPERLY GROUNDED This hood must be power supplied from a 110 120 V 60 Hz source and connected to an individual properly grounded circuit 3 prong outlet If the electrical supply does not meet above requirements call a licensed electrician before proceeding Route house wiring as close as possible to the installation location in the ceiling or back wall Th...

Страница 20: ...irecting Long duct runs elbows and transitions will reduce the performance of the hood Use as few of them as possible Larger ducting may be required for longer duct runs Install a wall cap with damper or roof cap at the exterior opening wall Join the wall cap or roof cap to the ductwork Connect round metal ductwork to cap and work back towards the hood location Use a 2 metal foil duct tape to seal...

Страница 21: ...ommended that a qualified electrician determine that the ground path is adequate A 110 120 volt 60 Hz AC only fused electrical supply is required on a separate 15 amp circuit fused on both sides of the line Do not ground to a gas pipe The range hood should be connected directly to the fused disconnect or circuit breaker box through flexible armored or non metallic sheathed copper cable A U L or C ...

Страница 22: ...NOT REMOVE THE PROTECTIVE PLASTIC FILM COVERING THE DECORATIVE CHIMNEY AT THIS STAGE INSTALLATION Measure the distance between the cooktop and the bottom end of range hood We recommend a minimum clearance of 28 for an electric cooking surface and of 30 for a gas cookingsurface 1 Mark the leveling point of the hood Position the two mounting screws on the wall 2 Measure the width of the chimney then...

Страница 23: ...ood and the exhaust opening either on the ceiling or wall Use metallic duct tape to seal the joints making sure they are airtight 6 Connect the range hood to a designated grounded outlet please refer the product label for the suitable voltage of this unit 7 Store excess wires in the wiring box 8 Install both chimneys and tighten screws to secure the lower chimney tothe rangehood as shown on the be...

Страница 24: ...ime left for the delay off function Controls Automatic cleaning reminder This range hood is equipped with a cleaning reminder that will activate after 30 hours of use When blower motor starts to rotate cumulative running time will be shown in Power On Elapsed Digital Timer This timer icon flashes when 30 hours of usage is up and reminds user to clean the aluminum filters After cleaning the filters...

Страница 25: ...ll light up and Power off Delay Digital Timer will begin to countdown when it reaches zero the blower will shut down Adjusting the light Press Light button once to turn lights on and once again to turn lights off While the lights are off press and hold Light button for over 3 seconds to adjust the intensity of the lights The level of brightness will be stored in system s memory CAUTION DO NOT touc...

Страница 26: ...ches or cleaning compounds to remain in contact with stainless steel for extended periods Many of these compounds contain chemicals which may be harmful Rinse with water after exposure and wipe dry with a clean cloth CLEANING GREASE FILTER The Stainless Steel baffle filters are intended to filter out residue and grease from cooking and are required to be kept clean Filters should be cleaned after ...

Страница 27: ...driver between the light housing and the hood body gently pry up the light housing and search for the metal clip Apply force to the metal clip and pull out the light fixture Disconnect the power cable and discard the used light fixture Reverse the steps to install a new LED light fixture Turn the breaker or hood ON to test for operation 5 SERVICE AND WARRANTY We warrant our hood under ordinary res...

Отзывы: