


Check the screen case leveling before first unrolling the screen.
Do not use the screen if it is not properly installed (leveled).
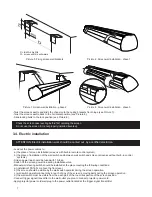
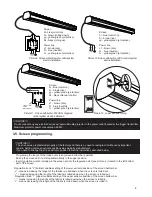
- Twist the screen casette and slide the chanel onto the ceiling brackets front hinge (see Picture 7).
- Twist the screen casette back to the horizontal position (see Picture 8).
- Slide locking bolts to the lock position (see Picture 8).
7
Picture 7 Screen wall installation - phase 2
Picture 8 Screen wall installation - phase 3
3.4. Electric installation
ATTENTION: Electric installation work should be carried out by a certified electrician.
- Lead out the power cables to:
the place of installation of the wall switch and between wall switch and screen
- Screen power line should be fused with 1A fuse.
- Switch off the screen power line during installation work.
- Manual wall steering switch should be installed at the place meeting the following conditions:
a) installation150-180 cm above the floor level,
b) the screen should be visible by the wall switch operator during the screen operation,
c) wall switch operator cannot stay in reach of any of the screen’s moving parts during the screen operation .
d) the wall switch must be visible from the each part of the room irrespective of the screen position.
- Connect trigger signal transmitter to the wall outlet you plan to connect projector power cord.
- Apply projector power cord wall plug to the power outlet located at the trigger signal transmitter.
a) the place of screen installation (screens with built-in remote control system),
b)
(screenss without built--in control
systems).
Picture 5 Fixing screen wall brackets
Picture 6 Screen wall installation - phase 1
D = (3/4W+55)±W/6
W - screen width in milimeters
150
D
75


