background image

AVerMedia AVerTV BoxW9 Plus 

ENG-8 

Chapter 4  OSD Menu Settings 

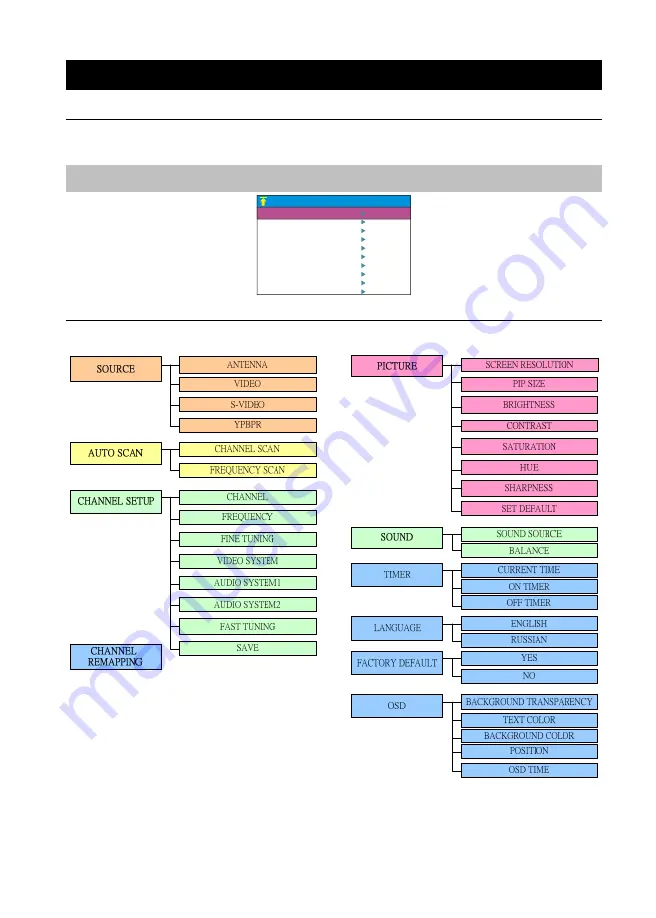
4.1  Calling Up the MAIN MENU 

Press the MENU button on the remote control to open/close the MAIN MENU or a submenu. Then, you can use the 

CH

 or CH

 button to select the items in the menu list; and the Vol

 or Vol

 button to adjust a setting. The next 

table lists the different functions you will find in the MAIN MENU. 

Note:  

The text appeared in red is the currently selected setting. 

MAIN MENU

SOURCE

CHANNEL REMAPPING

CHANNEL SETUP

PICTURE

TIMER

SOUND

LANGUAGE

AUTO SCAN

FACTORY DEFAULT

OSD


4.2 Menu 


Содержание AVerTV BoxW9 Plus

Страница 1: ...AVerTV BoxW9 Plus User s Manual English Pусский ...

Страница 2: ......

Страница 3: ...rewith confirmed to comply with the requirements set out in the Council Directives on the Approximation of the laws of the Member States relating to Electromagnetic Compatibility Directive 2004 108 EC Safety Low Voltage Directive 2006 95 EC DISCLAIMER No warranty or representation either expressed or implied is made with respect to the contents of this documentation its quality performance merchan...

Страница 4: ......

Страница 5: ...Control Panel ENG 3 2 2 Infrared Sensor ENG 3 2 3 Connection Ports ENG 3 Chapter 3 Installation and Setup ENG 4 3 1 Using the AVerTV BoxW9 Plus ENG 5 3 2 The Remote Control ENG 5 3 3 Customizing the Picture Setting ENG 6 3 4 Supported Display Setting ENG 7 3 5 Supported Display Setting in PIP Mode ENG 7 Chapter 4 OSD Menu Settings ENG 8 4 1 Calling Up the MAIN MENU ENG 8 4 2 Menu ENG 8 ...

Страница 6: ...AVerMedia AVerTV BoxW9 Plus package contains the following items AVerMedia AVerTV BoxW9 Plus VGA Cable S Video Component 2 in 1 Cable AVerTV BoxW9Plus User s Manua l Eng lish Pус ский User s Manual Remote Control with batteries Vertical Stand Power Adapter Audio Cable ...

Страница 7: ...own to the next active TV channel 2 2 Infrared Sensor When using the remote control aim it at the Infrared Sensor which is located at the front panel of the unit 2 3 Connection Ports The port connectors allow connection of your TV antenna PC VGA monitor or LCD projector speakers video or s video source etc 1 VGA OUTPUT to MONITOR 2 AUDIO INPUT from PC s SOUND CARD 3 TV Antenna 75Ω 4 Speaker Connec...

Страница 8: ...AVerMedia AVerTV BoxW9 Plus ENG 4 Chapter 3 Installation and Setup The figure below shows the proper cable connections for installing AVerTV BoxW9 Plus and connecting it to your audio video equipment ...

Страница 9: ...w shows the remote control unit layout 1 POWER Turn the unit on off 2 NUMBER BUTTONS To select a TV channel 3 CHANNEL RETURN Go to the previously selected channel 4 MENU To call up the menu display 5 VOL To increase and decrease volume level Use these button to adjust the menu or picture setting In adjusting the OSD position use these buttons to move the menu display to the left and right of the s...

Страница 10: ...SHARPNESS SET DEFAULT HUE BRIGHTNESS 10 10 10 10 10 If you want to change the screen resolution set the PIP SIZE or adjust the picture quality press the PICTURE button on the remote control Then you can use the CH or CH button to select the items in the PICTURE menu and the Vol or Vol button to open a submenu or make picture setting adjustments To restore the picture default settings select SET DE...

Страница 11: ...lay Setting in PIP Mode The reference table below lists the monitor display resolution and refresh rate settings that AVerTV BoxW9 Plus supports when viewing in PIP mode Note 1 If the monitor does not support or is not set to the following mode listed below it will switch back to TV Video mode 2 If the computer switches to sleep mode it will change back to TV Video mode Resolution Refresh Rate Hz ...

Страница 12: ... Then you can use the CH or CH button to select the items in the menu list and the Vol or Vol button to adjust a setting The next table lists the different functions you will find in the MAIN MENU Note The text appeared in red is the currently selected setting MAIN MENU SOURCE CHANNEL REMAPPING CHANNEL SETUP PICTURE TIMER SOUND LANGUAGE AUTO SCAN FACTORY DEFAULT OSD 4 2 Menu ...

Страница 13: ...If the default frequency table already includes all active TV channels in your area then avoid using the FREQUENCY SCAN CHANNEL SETUP CHANNEL SETUP CHANNEL VIDEO SYSTEM AUTO FINE TUNING 0 FAST TUNING YES SAVE 1 FREQUENCY 49 75 Mhz AUDIO SYSTEM1 D K AUDIO SYSTEM2 MONO The CHANNEL SETUP menu allows you to change or fine tune the TV frequency of channel numbers choose the video system used in your re...

Страница 14: ...O SYSTEM AUTO FINE TUNING 0 FAST TUNING YES SAVE 1 FREQUENCY 49 75 Mhz AUDIO SYSTEM1 D K AUDIO SYSTEM2 MONO CHANNEL After selecting a frequency choose a channel number to assign to that frequency Use the Vol or Vol button when choosing a channel number Note You can also use the CHANNEL setting to switch to composite VIDEO S VIDEO or YPbPr FREQUENCY Press the Vol or Vol button to scan down or up an...

Страница 15: ...rk Press the Vol button to change this item to OK and save the settings Note After selecting a TV frequency and assigning a channel number save the channel first before choosing a TV frequency for another channel Channel Remapping Menu Usage CHANNEL REMAPPING 2 77 25MHz 3 175 25MHz 4 5 6 9 10 7 8 1 49 75MHz This menu allows you to enable or disable a channel reprogram or reassign TV frequencies wi...

Страница 16: ...solid in color After you have made your selection press the Vol button TEXT COLOR TIMER TEXT COLOR BODY MESSAGE SAVE TITLE CYAN WHITE WHITE This sets the color of the following text TITLE Color of the menu name BODY Color of menu items MESSAGE Color of the hint messages at the bottom of the menus Use the CH or CH button to select the type of text whose color you want to change Then use the Vol or ...

Страница 17: ...ра RUS 3 2 2 Инфракрасный приёмник RUS 3 2 3 Входы выходы RUS 3 Глава 3 Установка и подключение RUS 4 3 1 Настройка AVerTV BoxW9 Plus RUS 5 3 2 Пульт ДУ RUS 5 3 3 Персональные настройки изображения RUS 6 3 4 Поддерживаемые параметры экрана RUS 7 3 5 Поддерживаемые настройки экрана в режиме PIP RUS 7 Глава 4 Навигация и выполнение настроек в экранном меню RUS 8 4 1 Вызов главного меню RUS 8 4 2 Мен...

Страница 18: ... В комплект поставки AVerMedia AVerTV BoxW9 Plus входит AVerMedia AVerTV BoxW9 Plus VGA кабель S Video Компонентный 2 в 1 кабель AVerTV BoxW9Plus User s Manua l Eng lish Pус ский Руководство пользователя Пульт ДУ с батарейками Подставка Блок питания Аудиокабель ...

Страница 19: ...ону инфракрасного датчика на передней панеле устройства 2 3 Входы выходы Разъемы входов выходов тюнера позволяют подключать к нему ТВ антенну компьютер VGA монитор или LCD проектор активные колонки источники VHS или S VHS сигнала и т д 1 Выход VGA для подключения к монитору 2 Аудиовход для сигнала со звуковой платы компьютера 3 ТВ антенна 75Ω 4 Аудиовыход для подключения колонок 5 Вход VGA для под...

Страница 20: ...AVerMedia AVerTV BoxW9 Plus RUS 4 Глава 3 Установка и подключение На рисунке приведённом ниже показана схема соединения AVerTV BoxW9 Plus с внешними аудио видео устройствами ...

Страница 21: ...тюнером можно через экранное меню тюнера либо посредством пульта ДУ 3 2 Пульт ДУ Ниже описаны функции кнопок пульта ДУ 1 POWER Включение выключение тюнера 2 Цифровая клавиатура Выбор ТВ канала 3 CHANNEL RETURN Переход к ранее выбранному каналу 4 MENU Вызов экранного меню 5 VOL Регулировка громкости звука Выбор элемента экранного меню Для изменения положения экранного меню используйте данные кнопки...

Страница 22: ...омпьютера 3 3 Персональные настройки изображения 10 10 10 10 10 Если вы хотите изменить разрешение экрана частоту кадров или др параметры изображения нажмите кнопку PICTURE на пульте ДУ выберите кнопками CH или CH нужный пункт появившегося экранного меню и с помощью кнопок Vol или Vol войдите в нужное подменю или установите непосредственное значение Чтобы установить значения по умолчанию выберите ...

Страница 23: ...на в режиме PIP В приведенной ниже таблице перечислены параметры разрешения экрана и частоты обновления которые поддерживаются AVerTV BoxW9 Plus при просмотре в режиме PIP Примечание 1 Если монитор не поддерживает или не настроен на один из перечисленных ниже режимов он переключится назад в режим ТВ Видео 2 При переходе компьютера в спящий режим он вернется в режим ТВ Видео Разрешение Частота обно...

Страница 24: ... с экрана ГЛАВНОЕ МЕНЮ настройки или для выхода из подменю Пока ГЛАВНОЕ МЕНЮ находится на экране кнопками CH или CH можно выбрать соответствующий пункт меню и кнопками Vol или Vol осуществить переход в выбранное подменю Нижеприведённая таблица содержит описание функций доступных в главном меню Примечание Выбранный параметр настройки отображается красным цветом 4 2 Меню ...

Страница 25: ...НОЕ СКАНИРОВАННИЕ ЧАСТОТ может занять некоторое время Если в список частот по умолчанию попадают все активные каналы вашего региона можно избежать затрат времени на ПОЛНОЕ СКАНИРОВАННИЕ ЧАСТОТ НАСТРОЙКА КАНАЛОВ Подменю НАСТРОЙКА КАНАЛОВ позволяет вам изменить или настроить такие параметры каналов как номер канала его частота тип ТВ системы и пр См более детальную инструкцию по работе с меню НАСТРО...

Страница 26: ...ю Описание КАНАЛ Вы можете выбрать номер канала чтобы настроить его на нужную частоту или настроившись по частоте на какой либо канал присвоить ему свой номер Номер канала выбирается кнопками Vol или Vol Примечание Вы также можете использовать меню КАНАЛ для выбора и настройки VIDEO S VIDEO и YPbPr входов тюнера ЧАСТОТА Нажав Vol или Vol запустите сканирование и настройку на нужный ТВ канал Если Б...

Страница 27: ...сле того как вы изменили значение частоты точной подстройки или видео аудио системы канала эти значения необходимо сохранить в памяти тюнера выбрав пункт меню СОХРАНИТЬ и нажав Vol Примечание После выбора частоты и номера канала сохраните этот канал и только после этого переходите к настройке следующего канала Меню сортировки каналов Описание 2 77 25M 3 175 25M 4 5 6 9 10 Г ц Г ц 7 8 1 49 75M Г ц ...

Страница 28: ...ону 100 означает что фон меню полностью непрозрачен Подтвердите свой выбор нажатием Vol ЦВЕТ ТЕКСТА TIMER Это подменю позволяет выбрать цвет текста следующих компонентов меню ЗАГОЛОВОК Цвет текста заголовка меню МЕНЮ Цвет текста центральной части меню ПОДСКАЗКА Цвет текста области сообщений меню Использую кнопки CH или CH выберите компонент меню вид которого вы хотите изменить и кнопками Vol или V...

Страница 29: ......

Страница 30: ......

Страница 31: ......

Страница 32: ...P N 300AM098 CMV M a d e i n Ta i w a n ...

Отзывы: