background image

9-5

Chapter 9

   Troubleshooting

The hard disk takes longer to read a file

•  

If you have been using the drive for a period, the files may be fragmented. Go to 

Start > All Programs > Accessories >

System Tools > Disk Defragmenter

 to perform a disk defragmentation. This operation may take a while.

•  

 Interrupt requests or problems with other hardware devices may have occupied the CPU and therefore slows down the system 

performance.

The files are corrupted

•  

 Run the Error-checking utility in Windows to check the HDD. Double-click My Computer. Right-click C: and select Properties. Click 

Check Now in Error-checking in Tools.

Display Problems

The display panel is blank when the system is turned on

•  

  Make sure the computer is not in the Standby or Hibernate suspend modes. The display is turned off to conserve energy in these 

modes.

The screen is difficult to read

•  

 The display resolution should at least be set to at least 1024x600 for optimal viewing.
- Go to

 Start > Control Panel

 and double-click the 

Display

 icon.

-  Under the 

Settings

 page, set screen resolution to at least 1024x600 and choose at least high colors.

The screen flickers

•  

 It  is normal if the display flickers a few times during shutting down or powering up.

Содержание N1200 Series

Страница 1: ...N1200 Series User s Guide Space Saving Contemporary Design ...

Страница 2: ...rticular installation If this equipment does cause harmful interference to radio or television reception which can be determined by turning the equipment off and on the user is encouraged to try to correct the interference by one or more of the following measures Reorient or relocate the receiving antenna Increase the separation between the equipment and receiver u Connect the equipment into an ou...

Страница 3: ...omplies with part 15 of the FCC Rules Operation is subject to the following two conditions 1 This device may not cause harmful interference 2 This device must accept any interference received including interference that may cause undesired operation ...

Страница 4: ...ctions Finnish VAROITUS Paristo voi räjätää jos se on virheellisesti asennettu Vaihda paristo ainoastaan valmistajan suosittelemaan tyyppiin Häitä kätetty paristo valmistajan ohjeiden mukaisesti French ATTENTION II y a danger dex losion sil y a remplacement incorrect de la batterie Remplacer uniquement avec une batterie du meme type ou dun type éuivalent recommandé par le constructeur Mettre au re...

Страница 5: ...00 240V before connecting the equipment to the power inlet 7 Place the power cord in a way that people are unlikely to step on it Do not place anything on the power cord 8 Always unplug the power cord before inserting any add on card or module 9 All cautions and warnings on the equipment should be noted 10 If any of the following situations arises get the equipment checked by a service personnel u...

Страница 6: ...onditioned environment with a storage temperature of 60 C 140 F or above as this may damage the equipment 13 To prevent explosion caused by improper battery replacement use the same or equivalent type of battery recommended by the manufacturer only Ethernet Notice This equipment is indoor use and all the communication wirings are limited to inside of the building ...

Страница 7: ...ERGY STAR specifications for computers The EPA ENERGY STAR Logo does not imply endorsement by the EPA As an ENERGY STAR Partner TriGem Computer AVERATEC has determined the products marked with the ENERGY STAR Logo are ENERGY STAR qualified as per the applicable ENERGY STAR guidelines for energy efficiency When used with an external ENERGY STAR compliant monitor this feature will also support simil...

Страница 8: ...nabled the computer can also be awoken by a network signal More information on the energy and financial savings potential of the Power Management Feature can be found at the EPA s ENERGY STAR Power Management Web site www energystar gov powermanagement More information on the ENERGY STAR program and its environmental benefits are available by visiting the EPA s ENERGY STAR Web site address www ene...

Страница 9: ...viii Before You Start WEEE Statement ...

Страница 10: ... Revision Note First Release Date 12 2009 Trademarks All trademarks are the properties of their respective owners u Microsoft is a registered trademark of Microsoft Corporation Windows XP Windows 7 are registered trademarks of Microsoft Corporation ...

Страница 11: ...consequential damages resulting from the furnishing performance or use of this material AVERATEC is a trademark or registered trademark of TriGem Computer Inc in the United States and or other countries All other product and brand names are trademarks of their respective owners 2009 TriGem Computer Inc All rights reserved Note Depending on the model your computer s components may vary and look sli...

Страница 12: ...ation about ENERGY STAR vi WEEE Statement viiI Trademarks ix Release History ix Before You Read x Chapter 1 Introduction Unpacking 1 1 Introduction 1 2 Chapter 2 Getting Started Connecting to a Power Source 2 1 Turning On Your Notebook Computer 2 2 Setting Up Windows 7 for the First Time 2 3 Operating on Battery Power 2 7 Charging the Battery Pack 2 8 Using Memory Card 2 9 ...

Страница 13: ...ess LAN 5 2 Chapter 6 Running BIOS Setup Entering the BIOS Setup Screen 6 1 Leaving the BIOS Setup Screen 6 1 BIOS Action Keys 6 2 Modifying the BIOS Settings 6 3 Chapter 7 VGA Utilities Display Devices 7 3 Display Settings 7 3 Color Correction 7 4 Hot Keys 7 4 Chapter 8 Expansion of the System Replacing Memory Module 8 1 Chapter 9 Troubleshooting Audio Problems 9 3 Hard Disk Problems 9 4 Display ...

Страница 14: ...1 Chapter 1 Introduction Introduction Chapter 1 ...

Страница 15: ...please contact your local dealer immediately Keep the box and packing materials in case you need to ship the unit in for service in the future The package should contain the following items u Notebook Computer u Quick Start Guide u High capacity Li Polymer battery pack u AC adapter and power cord These accessories listed above may change without notice ...

Страница 16: ...nology The Notebook s modular design provides maximum expandability without compromising portability Getting to Know Your Computer Opening the LCD Panel Warning To avoid damage to the display panel 1 Do not to slam the display upon closing 2 Do not to place any object on top when it is closed or open 3 Be sure the system is turned off or in suspend mode before you close the display panel ...

Страница 17: ... of the top open view and descriptions below will help you to get familiarized with the main features of your notebook 1 Integrated webcam 2 LCD display 3 Integrated speakers 4 Power button 5 Keyboard 6 Microphone 7 Touchpad 8 Microphone jack 9 Headphone Speaker jack Warning Do not place any heavy objects on the top of notebook This may damage the display 1 2 3 4 12 11 7 6 5 10 8 9 12 ...

Страница 18: ...wer LED Wireless LAN LED LED Graphic Symbol Indication This LED lights when you press the Caps Lock key White blinking light indicates hard drive activity Amber light indicates the battery is being charged No light indicates the battery is fully charged White light indicates the WLAN module is active Pressing Wireless LAN on off button will set this LED lights Persistent White light indicates the ...

Страница 19: ...2 1 3 1 Kensington lock 2 Power jack DC in 3 USB connector 4 Ventilation grill Right View 1 Network connector Ethernet LAN 2 VGA port 1 2 Note When using a Ethernet LAN please use an EMI shielded Cable to minimize inteference when transmitting ...

Страница 20: ...1 6 Chapter 1 Introduction Bottom View 1 Battery pack 2 Battery lock switch 3 Battery release latch 4 Hard disk drive Door 5 Ventilation grill 6 Main memory Wireless LAN Door 2 3 1 6 5 4 ...

Страница 21: ...2 Chapter 2 Getting Started Getting Started Chapter 2 ...

Страница 22: ...Whenever possible keep the AC adapter plugged into the notebook to recharge the battery Warning Do not use inferior extension cords as this may result in damage to your notebook The notebook comes with its own AC adapter Do not use a different adapter to power the computer Warning Never turn off or reset your notebook while the hard disk is in use doing so can result in loss or destruction of your...

Страница 23: ...leted the computer reads the operating system from the hard disk drive into computer memory this is commonly referred to as booting a computer If your OS Operating System such as Windows XP Windows 7 etc is installed it should start automatically To turn the Notebook off save your work and close all open applications click on Start then Shut Down and select Shut down the computer and click Yes or ...

Страница 24: ...omplete Windows 7 set up and registration To set up your computer follow the next steps 1 Turn on any peripheral devices connected to your computer and press the power button on your system 2 Follow the on screen prompts to begin the Windows 7 setup 3 Choose your country or region time and currency and keyboard layout and then click Next ...

Страница 25: ... 6 After reading the license terms check I accept the license terms and click Next 7 You can select automatic updates for Windows to help keep your computer up to date We recommend that you select Use recommended settings 4 Enter a User Name and a Computer Name and then click Next ...

Страница 26: ...etwork If you don t have a wireless network you can skip this step and do it later Click Skip 10 Windows 7 desktop will appear 9 Please wait as Windows proceeds to finish setting up your computer s configuration This process may take some time to complete ...

Страница 27: ...tarted Installing the Battery Pack 1 Slide the battery into the slot Press it into place gently but firmly until the latch locks it into place 1 2 Note Ensure the battery lock switch is unlocked then insert the battery firmly ...

Страница 28: ...led and no AC adapter is plugged in Warning Only use batteries that are approved by an authorized dealer All batteries are not the same and therefore should not be treated as such Using the wrong battery could cause serious damage to your computer and yourself through toxic emissions CAUTION Danger of explosion if battery is incorrectly replaced Replace only with same or equivalent type recommende...

Страница 29: ...ating performance Power LED White Steady White Blinking The notebook is powered on The notebook is in suspend mode Status Content Battery LED Battery charging Battery is fully charged Battery fault Amber OFF Blinking Status Content Attention The battery pack cannot be hot swapped while the notebook computer on When the battery level runs low it is possible to lose data if the notebook is left on I...

Страница 30: ... below can be used on this notebook You can use memory cards to store or read your files SD MMC Memory Stick Memory Stick Pro Yes No Yes Yes Yes No Yes Yes Memory Card Copyright Protection Write Protection Note The information disclosured in this manual is based on the data collected at the time of publication ...

Страница 31: ...y cards are shown below Verifying the correct direction and orientation of the card Note Each kind of card has its specific insertion direction Ensure you insert the card in right direction The miniSD card and the memory stick duo and so on which does not mentioned in the manual cannot be used with the notebook Before inserting the memory card please verify card types Note Depending on the type of...

Страница 32: ... be set to the LOCK position to prevent accidental data deletion Memory Card Removal Before removing the memory card please ensure the card operation is finished data reading and writing has been done Note When Safe To Remove Hardware icon appears windows will not be able to recognize the memory card until the card is removed and re inserted Attention While using various memory cards on Windows pl...

Страница 33: ...3 Chapter 3 Using the Notebook Computer Using the Notebook Computer Chapter 3 ...

Страница 34: ...S FUNCTIONS LCD Care LCD screens are delicate devices that need careful handling Please pay attention to the following precautions When you are not using the computer keep the LCD screen closed to protect it from dust If you need to clean your LCD screen use a soft tissue to gently wipe the LCD surface Do not put your fingers or sharp objects directly on the surface and never spray cleaner directl...

Страница 35: ...ou can hook up an external monitor through the 15 pin CRT connector Three configurations are available LCD only CRT only Simultaneous display of the LCD screen and CRT monitor You can switch between these display configurations by pressing the key combination Fn F3 ...

Страница 36: ...o Key Application Key The Application Key functions as same as the right button on touchpad or mouse Function Keys The Function Keys at the top of the keyboard provide shortcuts to do things in the Windows operating system If you are using a program such as a word processing application or spreadsheet the function keys can have different uses in the program ...

Страница 37: ... key in combination with other keys allows invoking many common functions through the keyboard Open Help and Support Center in Windows 7 Graphic Symbol System Control Minimize the Window To Switch Between Active Windows To open Run Dialog To open My Computer To open Search ...

Страница 38: ... of Keys Sending the Commnad to Discontinue or Interrupt the Operation 1 ESC Escape Equivalent to clicking the Cancel button 12 Pause Break Pressing it to stop the execution of the current program or transmission 1 2 3 4 5 6 7 8 7 4 9 11 13 15 14 12 16 ...

Страница 39: ... be used to delete selected files 15 Insert Allows text to be inserted When insert is enabled the text inserted in a document will not overwrite any other text However when disabled text will be overwritt en Combining to Input Text 3 Caps Lock Pressing it will set a keyboard mode in which typed letters are capitaliz ed by default and in lower case when the Shift key is pressed the keyboard remains...

Страница 40: ...essing and holding the Fn key while pressing a key with a icon 7 Alt Alternate Alt is a key generally located by the space bar on keyboards This term may be used to describe a key combination such as Ctrl Alt Del The above combination means press and hold on the keyboard CTRL and ALT and DEL to perform the function in this case reboot the computer or open the close program window task manager wind...

Страница 41: ... and programs In combination with other keys these function keys perform different functions Taking the Hard Copy of the Screen 14 Prt Sc Print Screen Pressing the Print Screen key causes the computer to send whatever images and text are currently on the display screen to the printer Some graphics programs and Windows use the Print Screen key to obtain Screen Captures ...

Страница 42: ...e LCD only CRT only and LCD CRT Fn F4 Decreases the brightness level Fn F5 Increases the brightness level Fn F6 Mute Unmute Audio Fn F7 Decreases the speaker volume Fn F8 Increases the speaker volume Fn F9 Turns off the display backlight Fn F10 Webcam ON OFF Fn F11 Bluetooth ON OFF on supporting models only Fn F12 3G ON OFF on supporting models only Fn Esc Enable Disable the Touchpad Graphic Symbo...

Страница 43: ...our keyboard You can use the static sensitive panel of the touchpad and slit it to move the cursor You can use the buttons below the touchpad as left and right mouse buttons Introducing the Touchpad Touchpad The left button has the same function as a mouse left button The right button has the same function as a mouse right button ...

Страница 44: ...ensitivity or adjust the speed of your touch pad please refer to the following sections Scroll Operation Use the fingertip to slide up or down on the edge of the touchpad to scroll up or down Adjusting the mouse pointer speed If you want to adjust the mouse pointer speed please follow these steps Attention DO NOT use pointed objects to touch the touchpad It may cause touchpad damage DO NOT operate...

Страница 45: ...Computer 1 Double click the Synaptics Pointing Device icon in the task bar 2 After selecting the Pointer Options tab set the point speed option in the Motion menu Then select the Enhance pointer precision option and press the OK button ...

Страница 46: ...3 13 Chapter 3 Using the Notebook Computer Adjusting the Touch Sensitivity 1 Double click the Synaptics Pointing Device icon in the task bar 2 Select the Device Setting tab and click Settings button ...

Страница 47: ...3 14 Chapter 3 Using the Notebook Computer 3 Select the Pointing Sensitivity item and click the Touch Sensitivity item Adjusts the Touch Sensitivity slider ...

Страница 48: ... on the Notebook s power system including the AC Adapter the battery system recharging the battery and tips for conserving battery power The power system is comprised of two parts the AC Adapter and the battery system The AC Adapter converts AC power from a wall outlet to the DC power required by the computer Note If you typically go through 20 or more charge cycles full charge to complete dischar...

Страница 49: ...mpletely drained go to the next step Otherwise let the battery run down until the low battery warning beeps are heard The system will automatically enter into Suspend mode 2 Turn the Notebook off Connect the AC adapter and let the battery fully recharge When the battery charge indicator turns off the battery is fully charged 3 Turn On the notebook let the battery run down until the low battery sta...

Страница 50: ...ttery Pack Charging Function To charge the battery while the battery pack is in the notebook plug the AC adapter into the notebook and an electrical outlet The charging time is approximately 4 6 hours when the notebook is turned off and approximately 6 10 hours when the notebook is turned on When the battery is fully charged the battery charge indicator turns off Note Under heavy use or when expos...

Страница 51: ...y 5 seconds Beeping accelerates Battery Low Indicates that there is 7 to 10 minutes charge remaining Battery Critical Indicates that there is 1 to 2 minutes of battery charge remaining Save your work and turn off the Notebook or connect the AC adapter Sound Meaning When there is only one minute of battery charge remaining the Notebook will suspend to the HDD and power off You should connect AC pow...

Страница 52: ...is incorrectly replaced Replace only with the same or equivalent type recommended by the manufacturer Dispose of used batteries according to the manufacturer s instructions Never remove the battery pack while the power is on as this may result in data loss when the system loses power ...

Страница 53: ...ng Windows 7 Help Windows To open the Help dialog box click Start Help and Support Recycle Bin Taskbar Start Button Notification Desktop Desktop may vary differently on the software installed in your notebook with different or additional shortcuts ...

Страница 54: ... by right clicking your mouse and select Empty Recycle Bin Start Button Allows easy access to all Windows programs The Start menu will automatically show the most frequently used programs If you wish to keep an item right click the item and click Pin to Start menu Log Off will enable the current user to log off and allows a new user to log on Turn Off Computer allows you to Shut down Restart modes...

Страница 55: ...onveniently move between programs by clicking the relevant button To add or remove toolbars from the taskbar right click an empty spot on the taskbar select Toolbars choose the toolbar you want to add Notification The icons that appear here are for quick access to some programs and computer functions that you frequently used ...

Страница 56: ... Chapter 3 Using the Notebook Computer Control Panel It is in this area that you can change how Windows looks and works Click Start Control Panel There are three interfaces Category Large icons small icons ...

Страница 57: ...o you can use any Bluetooth device after pairing it with your system Your system has a built in Bluetooth module so you can use any Bluetooth device after pairing it with your system To use a Bluetooth device refer to the next steps 2 Double click the Bluetooth Devices icon on the task bar 3 If your Bluetooth device is paired correctly you can see the icon of your device in the device list box Usi...

Страница 58: ...25 Chapter 3 Using the Notebook Computer Note If you want to set Bluetooth use Bluetooth Settings To set Bluetooth Select the settings for Bluetooth in each tab and click OK when you finished the settings ...

Страница 59: ...4 Chapter 4 Desktop Operation Desktop Operation Chapter 4 ...

Страница 60: ...ith two internal stereo speakers a microphone and input audio ports for external audio units An external microphone can be connected to the microphone jack External speakers or headphones can be connected to the Notebook s audio out jack External audio devices can be connected to the Line in jack All audio features are software controlled The Notebook s multimedia sound system includes the followi...

Страница 61: ...ur notebook comes equipped with an integrated sound system capable of providing you with quality audio sound through the builtin speakers or through external speakers connected via the system ports Sound Recording Your system allows you to record sounds and store them as files using the microphone via the microphone jack on the right side of the notebook computer Check the Help and Support in Wind...

Страница 62: ...e in providing high quality sound to external speakers and receiving and processing sounds from an external microphone or external sound source Connecting Peripheral Devices To expand your computing capabilities you can add a variety of external devices to your computer Note For a high quality sound double click on the Volume Control at the lower right end of your screen From the Volume Control wi...

Страница 63: ...5 Chapter 5 Internet Connection Internet Connection Chapter 5 ...

Страница 64: ... Internet Normally a LAN or broadband router is used to connect to the Internet via an Ethernet cable There are numerous ways to connect to the Internet This may vary from the user s working environment as well as system specifications Using a wired LAN Using a wireless LAN ...

Страница 65: ...ple used here explains how to use the basic Windows configuration features to configure the system You can also use the program that comes with the wireless LAN card to configure the network 2 Click an AP you want to connect to and then click Connect 1 Click the Wireless Network Connection icon on the status bar If there is an AP enabled environment a list of available APs will appear ...

Страница 66: ...he security key or password Enter the security key or password and click OK The window will not appear if no security key or password is set up 4 A window will appear displaying Connecting to xxxxx Where XXXXX is the name of your router AP 5 When the Set Network Location window appears select a location and click Close ...

Страница 67: ...6 6 Chapter 6 Running BIOS Setup Running BIOS Setup Chapter 6 ...

Страница 68: ...asswords to limit access to users This is an important feature because a great deal of vital information is carried within the computer nowadays Unauthorized access can be prevented Later in this chapter you will learn how to use this security feature Entering the BIOS Setup Screen First turn on the power When the BIOS performs the POST Power On Self Test press F2 key quickly to activate the Phoen...

Страница 69: ...to Sub Screen Function Key Command Description Shows the Help Screen F1 General Help Selects the next field Tab Select a field Selects the next upper item Select an item Selects the next lower item Select an item Selects the next value within a field Lower value Selects the next value within a field Higher value Selects the menu Select Menu ...

Страница 70: ...tup Modifying the BIOS Settings The AMI BIOS setup main menu is subdivided into sub menus Each menu item is described in this section Main Under this menu you may change System time date and view system memory information Advanced ...

Страница 71: ...6 4 6 4 Chapter 6 Running BIOS Setup Security Boot Save Exit ...

Страница 72: ...7 Chapter 7 VGA Utilities VGA Utilities Chapter 7 ...

Страница 73: ... Mobile icon on the lower right corner of the screen Click the Graphics Properties menu to enter the Intel Graphics Media Accelerator Driver for Mobile display window You can also click the touchpad or mouse right button and select the Personalize item Select the Display Settings option to enter its window display ...

Страница 74: ...ht button and select the screen resolution item Click the Advanced Settings tab to enter Generic PnP Monitor and Mobile Intel 4 Series Express Chipset Family window display Select Intel Graphics Media Accelerator Driver for Mobile and click the Graphics Properties tab ...

Страница 75: ...7 VGA Utilities Display Devices This feature allows you to connect and configure external display devices Display Settings This feature allows you to adjust the color scheme resolution refresh rate of your display ...

Страница 76: ... 7 VGA Utilities Color Correction This feature allows you to adjust the color settings for your display Hot Keys This feature allows you to set the corresponding hot keys you may frequently use to change settings ...

Страница 77: ...8 Chapter 8 Expansion of the System Expansion of the System Chapter 8 ...

Страница 78: ... turn off the notebook Before installation please remove the battery pack and AC adapter Memory is extremely sensitive to static electricity It is possible to damage it when people or objects touch it with static electricity Please remove any static electricity before touching the memory DO NOT touch the contact pins of memory Memory modules are very fragile so it is therefore highly recommended t...

Страница 79: ...he memory module cover forward Raise and remove the cover 5 Open the latches which locks the memory module in place Remove memory from the memory slot Note When opening the latches do not apply unreasonable force and do it carefully When too much force is applied the latch may become permanently damaged ...

Страница 80: ...d insert the memory to the memory slot connector until the click sounds 8 Install battery pack and connect AC adapter 7 Install the memory module cover lock with the screw Note Please make sure not to insert the memory in the wrong direction Please make sure the notch on memory s lower part is aligned to the slot ...

Страница 81: ...9 Chapter 9 Troubleshooting Troubleshooting Chapter 9 ...

Страница 82: ... to the computer Check to see the power indicator of the computer is on Check to see if your keyboard is operational by pressing and holding any key Check for any incorrect or loose cable connections Make sure the latches on the connectors latch securely on to the receptor end Be sure you have not performed an incorrect setting on the hardware devices in the BIOS Setup utility A faulty setting may...

Страница 83: ...roubleshooting Legacy peripheral are not plug and play capable You need to restart the system with these devices powered up and connected first Be sure to go to BIOS SETUP and load DEFAULT SETTING after BIOS re flash ...

Страница 84: ...io page make sure that the audio codec mentioned in the spec is the default playback device Sound cannot be recorded You will need to plug in an external microphone to the microphone connector to record sound Double click the speaker icon on the lower right corner of the taskbar to see if the MIC volume has been muted Go to Start Control Panel and double click or Sounds and Audio Devices icon In t...

Страница 85: ...er has been subjected to static electricity or physical shock you may have damaged the disk drive The hard drive is making abnormal whining noises should back up your files as soon as possible Make sure the source of noise is indeed from the hard drive and not the fan or other devices The hard disk drive has reached its capacity Run Disk Cleanup utility in Windows Start All Programs Accessories Sy...

Страница 86: ...DD Double click My Computer Right click C and select Properties Click Check Now in Error checking in Tools Display Problems The display panel is blank when the system is turned on Make sure the computer is not in the Standby or Hibernate suspend modes The display is turned off to conserve energy in these modes The screen is difficult to read The display resolution should at least be set to at leas...

Страница 87: ...uch pad The built in keyboard accepts no input Please try to make sure the system doesn t hang up and is still working The characters on the screen repeat while I type You may be holding the keys down too long while you re typing Keep the keyboard clean Dust and dirt under the keys could cause them to stick Configure the keyboard to wait longer before the auto repeat feature starts To adjust this ...

Страница 88: ...years The battery is of type CR2032 3V Send the battery to the dealer for replacement Memory Problems The POST does not show an increased memory capacity when you have already installed additional memory Certain brands of memory module may not be compatible with your system You should ask your vendor for a list of compatible DIMM The memory module may be defective The O S issues an insufficient me...

Страница 89: ...ly slows down its CPU clock to protect itself from thermal damage The program appears stopped or runs very slowly Press CTRL ALT DEL to see if an application is still responding Restart the computer This may be normal for Windows when it is processing other CPU intensive programs in the background or when the system is accessing slow speed devices such the floppy disk drive You may be running too ...

Страница 90: ...Troubleshooting USB2 0 Problems The USB device does not work Check the settings in the Windows Control Panel Make sure you have installed the necessary device drivers Contact the device vendor for additional support ...

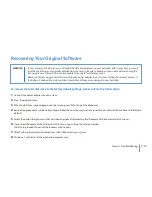
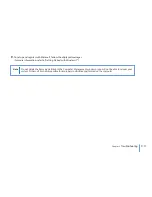
Страница 91: ...Recovery of the Entire Hard Disk menu you will see the caution window Click OK to proceed To cancel the recovery click Cancel 7 After finishing the restoration procedures click OK to restart your system 8 Windows 7 will start and the registration program runs WARNING If you recover your hard disk you will lose all the data and programs on your hard disk After recovering you must reinstall any soft...

Страница 92: ...isplayed messages For more information refer to Getting Started with Windows 7 Note Do not delete the Recovery partition in the Computer Management window or you will not be able to recover your system TriGem USA is not responsible for improper modifications performed on the computer ...

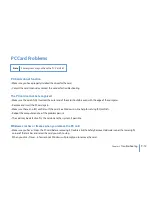
Страница 93: ... Make sure there is no IRQ conflict with the card See Windows on line help for solving IRQ conflicts Reboot the computer and see if the problem persists The card may be defective Try the card on another system if possible Windows crashes or freezes when you remove the PC card Make sure you have Stop the PC card before removing it Double click the Safely Remove Hardware icon at the lower right corn...

Страница 94: ...10 Chapter 10 Specification Specification Chapter 10 ...

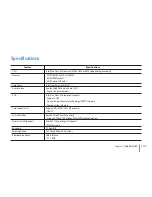
Страница 95: ...orts DX9 Dynamic Video Memory Technology DVMT support Shared System Memory Support SD MMC MS MS pro card USB I F Realtek PCIe FE Family Controlly Supports 10 and 100 Mb sec Full Half Duplex operation WiFi 802 11 b g or b g n Optional PCIe Mini card 82 Keys K B PS2 Touch Pad with 2 buttons USB Interface 2 1 EDR CPU Memory Core Logic Audio Codec VGA Card reader 4 in 1 LAN Controller Wireless LAN Opt...

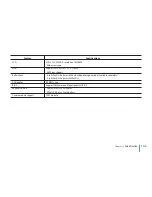
Страница 96: ...port 4 cells Pack Li Polymer 6500mAH depending on model Available separately 2 cells Pack Li Polymer 3250mAH 40 Watts 2pin Support AMI American Megatrends Inc BIOS 265 W x 192 D x 28 H mm 995g 0 5 Kg w 2 cells battery 1 3M module LCD HDD Battery Pack AC Adapter BIOS Physical Outline Camera module support Feature Specifications ...

Страница 97: ......

Отзывы: