background image


19 


User Type 

Access rights 

Can access all the configuration pages 

Can preview live image, modify and adjust certain settings except
System > General, User Manag

Admin 

Operator 

 in 

ement, and Network; and SD Card > 

ble 

Management. As for the I/O Control, admin could enable/disa
allowing operator to access it. 

Viewer 

Can only access the preview and status information pages. 
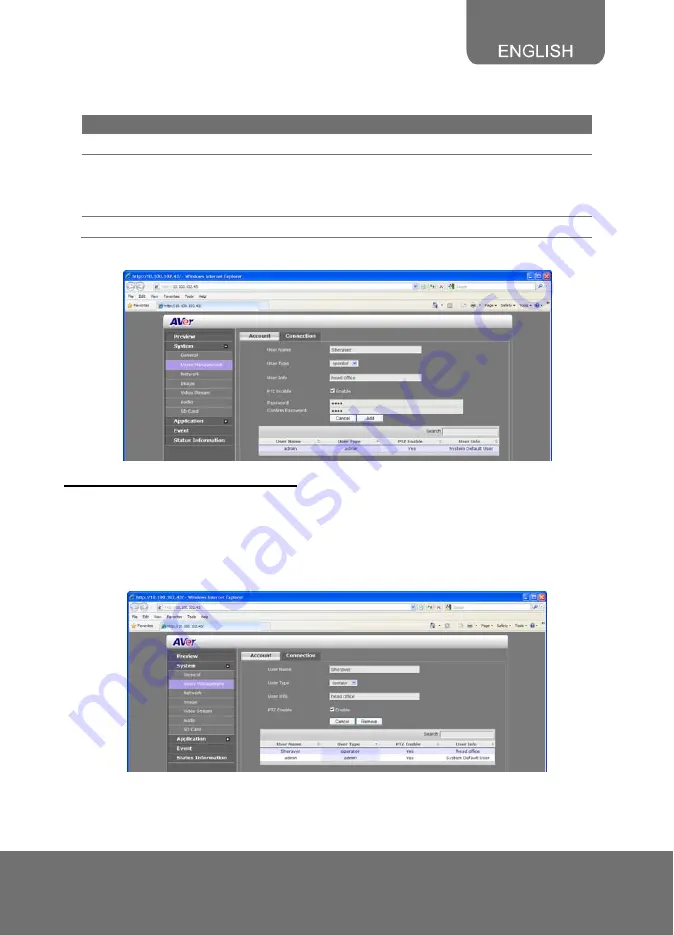
3. 

Add. 

Enter the same password in Password and Confirm Password text box. Then click 


To Delete or Edit a User Account 

Select the user account you want to delete or edit in User Management > Account tab. 


- Click 

Cancel

 to void the operation. 

- Click 

Modify

 to apply the new change

the Modify button. 

s. Make sure to edit the account before clicking 

- Click 

Remove

 to delete the account.


Содержание SF2121H-R

Страница 1: ...AVer SF2121H R User Manual ...

Страница 2: ...g up the IP Camera over the Internet 9 Using DHCP Server Router Network 9 Using NON DHCP Server Router Network 10 Configuring the Internet Explorer Security Setting 12 Using the IP Camera Browser Interface 13 Preview 13 Using Media Player to view IP Camera 15 System General 15 System General Maintenance 15 To Upgrade the IP Camera Firmware 16 System General Date Time 17 System General System Log 1...

Страница 3: ...stem SD Card Management 30 System SD Card FileSearch 31 Application Motion Detection 31 To Set the Motion Detection 31 Application Patrol 32 To Setup the Patrol 32 Event 33 To Setup the Event 34 Status Information 35 Technical Specifications 35 Federal Communications Commission Statement Class B 37 Class B EMC 38 COPYRIGHT 38 NOTICE 38 WARNING 38 Limited Warranty 38 ...

Страница 4: ...not expose this unit to rain or high humidity environment Do not attempt to open the housing or service this unit by yourself Always refer all servicing to qualified service personnel Unplug the power supply before cleaning Use only a lens cleaning cloth and never use benzine thinner or other solvent for cleaning Avoid placing this unit in a dusty environment and avoid dust from entering the lens ...

Страница 5: ...ackage AVer SF2121H R Power Adapter 12V 2A The power adapter will vary depending on the standard power outlet of the country where it is sold Camera Stand 3 Lens Ring Pad Software Manual CD L type Hex Wrench 3 Screws 3 Plastic Anchor O Op pt ti io on na al l A Ac cc ce es ss so or r y y CS mount Lens ...

Страница 6: ...8 fig 1 2 1 RJ45 Ethernet Port 2 DC 12V 3 I O Terminal Block 4 Power LED Indicator 5 SD card slot 6 Video Out 7 Audio Out 8 Reset button 9 Console 10 MIC 11 DIP switch Note The reset button will set all the configuration settings back to factory default CS Mount Lens 1 3 2 fig 1 3 1 Zoom controller 2 Focus controller 3 DC Iris control cable ...

Страница 7: ...lens clockwise to the CS mounting ring Make sure the lens adhesive cover is removed when using it for the first time 2 Connect the CS mount lens cable to the socket Deploying Network Network Connection via Ethernet Switch 1 Connect the RJ45 cable from the Ethernet switch to LAN PoE port of SF2121H R Ethernet Switch 2 Connect the power adapter to DC12V port of SF2121H R Power Adapter Wall Outlet ...

Страница 8: ...r to transmit data and power thru single Ethernet cable PoE Enabled Switch Connection Diagram PoE Switch PoE Injector Connection Diagram Ethernet Switch PoE Injector Power cable Wall outlet RJ45 LED LED Status Blinking Green Connected to 100 Base T mode and also transmitting and receiving data Steady Yellow Connected to the Internet ...

Страница 9: ...ta Out support 200mA 3 Power 12V 4 Ground 5 RS 485 6 RS 485 5 1 2 3 4 6 Power LED LED Status Steady Red Power on Blinking Red Firmware update complete No Light Power off Internal Connection Diagram of DI DO Adjusting the CS mount Ring 1 Unplug the CS mount lens cable from the socket ...

Страница 10: ...cket Check if the IP camera can display proper image If not repeat step 3 and 4 to add the next ring If all the rings are used up and still the IP camera cannot display proper image Remove all the rings and continue to next step 5 Using the L type hex wrench loosen the bolt underneath the IP camera 6 Remove the CS mount ring from the IP camera ...

Страница 11: ...h the IP camera Note Do not fully tighten bolt underneath the IP camera for it may damage the CS mount ring F Fo oc cu us si in ng g t th he e I IP P C Ca am me er ra a w wi it th h B BN NC C M Mo on ni it to or r The IP camera is supported with BNC analog video out port which allows you to connect an analog display devices such as an LCD BNC monitor for you to adjust the camera focus and zoom 1 C...

Страница 12: ... within the same LAN In accessing the IP camera you need to use IE browser Using DHCP Server Router Network DHCP server router network automatically assigns IP addresses to devices You can use the IPCam Utility software in the CD to search the IP camera in the network 1 Make sure the DIP switch behind the IP camera is set to DHCP 2 Install the AVer IPCam Utility software 3 Run the IPCam Utility 4 ...

Страница 13: ...evice and each time when adding another IP camera in the network the default IP address of the current one must be changed to avoid conflict Default IP http 192 168 1 168 1 Make sure the DIP switch behind the IP camera is set to Static IP 2 Connect the computer to the network and set the IP address with the same subnet prefix of 192 168 1 XXX The last decimal number should be set any from 1 to 255...

Страница 14: ... adding another IP camera in the network the default IP address of the current IP camera must be changed to avoid conflict To change the default IP address in IP camera browser interface click System Network Setting Network Type S Then in the IP address change the last decimal number 192 168 1 tatic 168 to any unassigned number in the network and click Save The page will turn dark while saving 6 T...

Страница 15: ...view and access the IP camera High Internet Explorer security setting may prevent you from installing the ActiveX If you are unable to view the IP camera you may need to install ActiveX or change the security setting To change the Internet Explorer Security Setting 1 Run Internet Explorer 2 Click Tools Internet options 3 Click Security tab Local Internet Custom level ...

Страница 16: ...ac ce e The admin have the full access to the IP camera browser interface The menu on the left you can expand and navigate to access all the features Preview In the Preview page all three user levels can view and change the language setting the IP camera video stream setting use the digital or RS 485 Pan and Partol control capture screen shot record video turn on off 2 way talk mic and volume and ...

Страница 17: ...et locations in Application Patrol 6 Digital RS 485 ve and you can use the Select Digital to control the IP camera ePTZ operation This allows you to closely view the target area without having to physically mo the IP camera The image will be zoomed in direction control to pan the zoomed image Select RS 485 to control the PTZ driver or scanner via RS 485 connection to I O terminal block The IP came...

Страница 18: ...eam 2 if stream 2 is enable RTSP WWW XXX YYY ZZZ 554 live_st3 for Stream 3 if stream 3 is enable System General In this section only admin level is authorized to configure the IP camera general settings There are 3 tabs in General settings Maintenance Date Time and System Log You can view the significant occurrence in the IP camera such as System General Maintenance In the Maintenance tab the admi...

Страница 19: ...d network settings 5 Factory Default Set all the configuration settings back to factory default 6 Firmware Upgrade Upgrade the firmware to the latest version To Upgrade the IP Camera Firmware 1 Download the file from our website and save it in your computer hard disk 2 Click Browse Locate and select the file and click Open 3 Click Apply Wait till you see the massage Firmware Upgrade OK You may now...

Страница 20: ...cel to keep the old setting 2 1 3 4 Name Function 1 Current Date Time Display the current date and time setting 2 Date Format Select the date display format 3 Time Zone Set the local time zone 4 Setting Method Select the date time setting method Sync with current PC obtain the date and time setting on the current login computer Sync with NTP Server obtain the date and time setting from NTP server ...

Страница 21: ... edit account to connect to the IP camera and configure the client connection setting There are 2 tabs in User Management setting Account and Connection System User Management Account In Account tab admin can create delete and set the access level of the user account To Create a User Account 1 Click System Users Management Account tab 2 Enter the User Name select the User Type enter the User Info ...

Страница 22: ...a allowing operator to access it Viewer Can only access the preview and status information pages 3 Add Enter the same password in Password and Confirm Password text box Then click To Delete or Edit a User Account Select the user account you want to delete or edit in User Management Account tab Click Cancel to void the operation Click Modify to apply the new change the Modify button s Make sure to ...

Страница 23: ...Secure 1 Http Connection Socket Layer Select the max number of user to simultaneously access the 2 Maximum Number of Clients IP camera 3 Enable Filter list Select to turn the IP address filtering on off 4 Filter Type Select to allow deny the IP address in the filter list to access the IP camera 5 Filter List Create and display the filtered IP address To Add Filter 1 Click Add Filter in User Manage...

Страница 24: ...Canc System Network Setting In Setting tab you can configure the type of network connection for IP camera and name for the IP camera Depending on the network connection IP camera can be accessed from the computer within the same local area network LAN or anywhere with Internet connection After compl el to keep the old setting 2 1 3 Name Function 2 witch 1 Device Name Assign name for the IP camera ...

Страница 25: ...this option to access the IP camera anywhere with Internet connection To use this option this requires an account provided by the ISP Set this setting while connected to camera directly to DSL the LAN and click save Connect the IP or cable modem System Network Server In Server tab you can configure the Email FTP and NAS setting It is necessary to configure the server settings so that IP camera can...

Страница 26: ... use this feature you need to register a domain name at http dyn com dns Enter the DDNS domain name user password and enable DDNS enable check box After completing the setting click Save to apply the new setting and Cancel to keep the old setting System Network QoS In Qos tab you can configure the Quality of Service setting Enabling the QoS allows you to set the parameter and prioritize the IP cam...

Страница 27: ...g and set the port mapping System Image Both admin and operator levels can adjust the Image setting There are 5 tabs OSD Preference Exposure Advanced and Privacy Mask System Image OSD In OSD tab you can enable disable overlaying time stamp text title and add logo After completing the setting click Save to apply the new setting and Cancel to keep the old setting 1 4 2 5 3 ...

Страница 28: ...0F 4 Logo Select the location of the logo image file Click the checkbox to enable disable display the logo 5 Customize Logo Upload your company logo The maximum size is 64 x 64 pixels System Image Preference In Preference tab you can tune the IP camera white balance display color or black white set the flicker frequency change the video orientation and adjust the brightness and contrast After comp...

Страница 29: ...sure to where the adjustable and movable frame on the screen is located Move the spot to dark zone to adjust the light condition Backlight compensation measure the exposure at the center of the screen 2 Exposure Mode Select to automatically or manually adjust the exposure For manual exposure control adjust the exposure level control to the best image quality 3 DC Iris Calibration Click Start to au...

Страница 30: ... hitting the sensor During day time the IR light has an interfering effect on the image quality of the camera which leads to corruption of color and contrast as well as blurring At night time the infrared light is used to achieve more detailed images in the dark or with low ambient light Auto automatically switch on off the IR cut filter It uses the light sensor in front of the camera to determine...

Страница 31: ... In Privacy Mask tab you can enable 3 privacy masks Simply adjust the size and position the mask on the area you want to conceal The viewer will not be able to see the masked area It will cover the video screen with black frame System Video Stream Both admin and operator levels can configure the Video Stream After configuring the video stream setting click Save to apply the new setting and Cancel ...

Страница 32: ...o stream constant as possible which increases the bandwidth requirement when there is high motion and decreases when ere is no motion The bandwidth must be able to accommodate th high throughputs CBR Constant Bit Rate use this setting if there is bandwidth concern This setting is restricted to keep the bit rate setting This could affect the image quality and frame rate if there is high activity th...

Страница 33: ...gement Both admin and operator levels can manage the SD Card local storage After managing the SD Card settin g We recomme g click Save to apply the new setting and Cancel to keep the old settin nd formatting the SD card when using it for the first time 5 2 1 3 4 Name Function 2 Cycle Storage recording The old file in the SD card will 1 SD Card Info Shows the SD card details No details will appear ...

Страница 34: ...ame will blink when the motion detected has reached the percentage threshold setting This feature can be utilized to trigger a response in Event setting To Set the Motion Detection 1 Click Application Motion Detection 2 Enable the region check box to create a motion detection frame 3 Move and adjust the frame to the area you want to detect the motion 4 Adjust the sensitivity and percentage Sensiti...

Страница 35: ...ol 1 Click Application Patrol 2 Use the direction buttons and zoom button to locate the patrol target area Press to view the full image and reset the zoom level 3 Type a name for the patrol shooting area e g UpperLeft in the Name text box and press Add The preset target area will be listed in the User Preset Locations Click to delete the preset target area and to show the preset target area Repeat...

Страница 36: ...e changes 6 Click to delete the selected preset location in the Portal Locations list and to arrange the patrol order 7 Click Save to implement the preset patrol setting Event Both admin and operator levels can configure the Event setting In this section the IP camera can be configured to perform an action when an event is triggered at the specified time ...

Страница 37: ...on Detection Region 1 2 3 the IP camera when a motion is detected on the motion detection region This triggers Digital Input This triggers the IP camera when the external digital input device or sensor is activated SD Card rs the IP camera when the SD card is not detected This trigge Network This triggers the IP camera when the Internet connection got disconnected 7 Select the type of response for...

Страница 38: ...ou can only select one storage option to save the video file For better performance we recommend setting the video str 4000 kbps 8 Click OK to ad event setting Status Information formation about the device and network setting T Te ec ch hn ni ic ca al l S Sp pe ec ci if fi ic ca at ti io on ns s Device Type Box Compatibility ONVIF Application environment Indoor Outdoor Indoor outdoor with suitable...

Страница 39: ...up to 24fps 1600 x 1200 MJPEG up to 30fps 1280 x 1024 Bit rate mode H 264 MPEG 4 64Kbps 12Mbps MJPEG 1 Low 98 High Streaming H 264 MPEG 4 MJPEG Multi streaming 3 streaming simultaneously IMD Intelligent Motion Detection zone 3 Privacy mask area 3 image orientation mirror flip BLC backlight compensation supported WDR wide dynamic range supported De noise supported Day night function supported ePTZ ...

Страница 40: ... on n s s C Co o m mm m i i s ss si i o o n n S St t a at te e m m e en n t t C C l l a as ss s B B This device complies with Part 15 of the FCC Rules Operation is subject to the following two conditions 1 this device may not cause harmful interference and 2 this device must accept any interference received including interference that may cause undesired operation NOTE This equipment has been test...

Страница 41: ...th trademarks used herein for description purpose only belong to each of their compan N N O OT T I I C C E E ARE SUBJECT TO CHANGE WITHOUT PRIOR NOTICE THE SPECIFICATIONS INFORMATION CONTAINED HEREIN IS TO BE CONSIDERED FOR REFERENCE ONLY W W A AR R N N I I N NG G O RE RISK OF FIRE OR ELECTRIC SHOCK DO NOT EXPOSE THIS APPLIANCE TO RAIN I MODI O T DUCE OR MO FICATI STURE WARRANTY VOID FOR ANY UNAUT...

Страница 42: ...d of any repaired or repla thirty 30 days from the date of delivery of the repaired or replaced product Limitations of Warranty AVer makes no warranties to any third party You are responsible for all claims damages settlements expenses and attorneys fees with respect to claims made against You as a result of Your use or misuse of the Product This warranty applies only if the Product is installed o...

Отзывы: