Avenview RTERM Series Скачать руководство пользователя страница 27

www.avenview.com 

27 


The color functionality differs with emulation. 
 
In general VT100, VT220 and ANSI Console work with applications which control the color directly. The 
remaining personalities associate colors based on existing monochrome video attributes. 
This section will define parameter selection based on personality selected. 
Background will determine the color of the background screen under some conditions (16 colors). 

Cursor 

Select the color of the cursor (16 colors). 

Normal F.G. /   
Normal B.G 

These fields allow you to select the character and background color (16 colors) for data 
entered on the display before your application defines the color display remotely 

Intensity F.G. / 
Intensity B.G. 

These fields allow you to select the character and background color (16 colors) for data 
entered on the display as Dim in ASCII emulation’s and Bold in VT\ANSI emulation’s before 
your application defines the color display remotely.   

Color Mode 

Is automatically selected based on your emulation selected. 

Color Map 

Applies in WY325 mode only and determines if the monochrome attribute Reverse or Blank 
will be used to map monochrome attributes to color. 
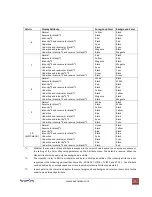
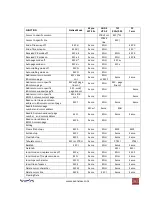


ASCII (NOT WY325) 

WY325* 

VTXXX 

ANSI 

CONSOLE 

Background 

The whole data area of the screen will 
be display in this color when application 
hasn’t entered character or space with 
the Normal or Intensity B.G. color. 

No Function 

Same as ASCII 

Same as 

ASCII 

Cursor 

Selects Cursor color 

Selects 

Cursor color 

Selects 

Cursor color 

Selects 

Cursor color 

Normal F.G. 

Selects color or Normal F.G. 

No Function 

Initial color 

selection at 

power up 

Initial color 

selection at 

power up 

Normal B.G. 

Selects color or Normal B.G. 

No Function 

Initial color 

selection at 

power up 

Initial color 

selection at 

power up 

Intensity F.G. 

Selects color or Intensity F.G. 

No Function 

Initial color 

selection at 

power up 

Initial color 

selection at 

power up 

Intensity B.G. 

Selects color or Intensity B.B. 

No Function 

Initial color 

selection at 

power up 

Initial color 

selection at 

power up 

Color Mode 
(Normal / 
Palette) 

Automatic 

Automatic 

Automatic 

Automatic 

Color Map 
(Reverse / Blank) 

No Function 

See Above 

No Function 

No Function 

* When the WY325 personality is selected holding the CTRL key down and depression either the 0, 1, 2…9(.) period key in 
the numeric pad changes the assignment of color the screen. Each selection is called a palette as mention in Color Pallete. 

Содержание RTERM Series

Страница 1: ...nges to specifications and product descriptions at any time without notice No license whether express implied or otherwise to any intellectual property rights is granted by this publication Except as...

Страница 2: ...1 11 How to Use the Slides 12 1 12 How to Install One Man Installation Slides 13 1 12 1 Package Contents 13 1 12 2 Install the Front Mounting Ear x 2 pcs 13 1 12 3 Install into Rack 14 Section 2 How t...

Страница 3: ...6 3 3 Web Server Configuration 48 3 3 1 Local 48 3 3 2 Dynamic DNS 49 3 3 3 HTTPS SSL 50 3 3 4 RADIUS 50 Section 4 Serial Port Configuration 51 4 1 Serial Port Configuration 51 4 1 1 Port Authenticati...

Страница 4: ...move User 62 6 1 4 Edit ACL 63 6 1 4 Change Password 63 6 2 Date and Time 64 6 3 Firmware Upgrade 65 6 3 1 Prepare Upgrade Environment 65 6 3 2 Upgrade from Web Page 66 Section 7 Operations 67 7 1 On...

Страница 5: ...isuse neglect fire water lightning or other acts of nature unauthorized product modification or failure to follow instructions supplied with the product Repair or attempted repair by anyone not author...

Страница 6: ...spilled on to the power supply or on other hardware may cause damage fire or electrical shock Only qualified service personnel should open the chassis Opening it yourself could damage the equipment an...

Страница 7: ...drawer x 1 pc 2 RJ45 DB9 female adapter x 1 pc 3 RJ45 DB9 male adapter x 1 4 Fasteners for rear L brack x 4 pcs 5 330mm rear mounting L bracket x 1 pair RTERM 17T 16 mounting depth adjustable from 32...

Страница 8: ...al LCD Keyboard Drawer comes with the standard parts shown on the package contents Check and make sure they are included and in good condition If anything is missing or damage contact the supplier imm...

Страница 9: ...Carry handle to release the 2 pt lock 2 2 point lock 3 LCD interchangeable module kit 4 LCD membrane 5 Adjustable rear mounting L bracket 6 Micro switch for screen auto power off 7 Serial port Status...

Страница 10: ...fasteners slightly loose Figure 2 Measure the front and rear mounting depth of the rack Align each rear L bracket to a suitable length and tighten the fasteners shown in Figure 2 Figure 3 Fix the LCD...

Страница 11: ...NCP Series LCD Keyboard Drawer Figure 4 Gently pull the tab toward the front of the LCD shown in Figure 4 Figure 5 Flip up the LCD to a suitable angle as shown in Figure 5 Figure 6 Operate the LCD ke...

Страница 12: ...f each slide as shown in Figure 7 Figure 8 Push the white arrow button on either side of the LCD keyboard drawer to unlock as shown in Figure 8 Avoid pressing the red button located on either side Fig...

Страница 13: ...t mounting ear left right x 2 pcs 3 Support bracket x 4 pcs 4 M6 cage nut x 8 pcs 5 M6 washer x 8 pcs 6 M6 15mm screw x 8 pcs 7 M3 2 4 5mm screw x 14 pcs 1 12 2 Install the Front Mounting Ear x 2 pcs...

Страница 14: ...crews slightly loose Attach left and right front mounting ears to vertical rails Tighten the screws Attach the support brackets to chasis with M3 2 4 5mm screws x 6 pcs Installation complete Pickup th...

Страница 15: ...www avenview com 15 Section 2 How to Connect Console Terminal LCD Keyboard Drawer 2 1 On screen Display Operation...

Страница 16: ...s connectors are properly connected 2 2 2 Front Panel Port LD Indications 16 ports Power Red Power on indication Link Orange 10BaseT Ethernet Connection Green 100BaseT Ethernet Connection Ready Green...

Страница 17: ...and then depress the Esc key to enter the SETUP mode When you enter SETUP mode and text on the screen temporarily disappears and the main SETUP directory appears When you leave the SETUP mode the main...

Страница 18: ...screen gives you the choice of saving or not saving parameter changes in the nonvolatile memory before returning the terminal to the normal operating mode If you don t save your setting before you lea...

Страница 19: ...ction which the data transfer can be between one designated serial port ESP and one of the other serial ports Select the access port and configure each setting type in the value for Inactivity timeout...

Страница 20: ...com 20 Type in use name and password The default login name and password are root User Name Default Password Root root Press CTRL and C keys to get out of Serial to Serial function and back to main co...

Страница 21: ...er of lines selected in the lines parameters 2 x Lines Two times the value of the lines parameter 4 x Lines Four times the value of the lines parameter Equal to the value of the lines parameter with a...

Страница 22: ...Attribute Sets display attributes to be assigned to each character as it is entered Char to be active to the end of the line Line or to be active to the end of the page Page Xmt Limit Causes the term...

Страница 23: ...and shaking singles None or to control data output in respons to Xon Xoff handshaking Partly Cuases the terminal send the data to the SERIAL1 port with none odd mark even or space partly Comm Mode Set...

Страница 24: ...e stop or two stops bits Ptr Partly Causes the terminal to send the data to the SERIAL 2 port with none odd mark even or space parity Ptr Xmt Hndshake None DSR Xon Xoff Both Ptr Rcy Hndshake None DTR...

Страница 25: ...delete characters or to clear the definition 4 If you want to change the key s direction press on the numeric pad until your choice appears Direction determines where the key data is transmitted Remot...

Страница 26: ...to this terminal by the MIS manager Each terminal must have a unique IP address The address is used to allow the host to identify messages from this terminal and to allow the terminal to filter out re...

Страница 27: ...e or Blank will be used to map monochrome attributes to color ASCII NOT WY325 WY325 VTXXX ANSI CONSOLE Background The whole data area of the screen will be display in this color when application hasn...

Страница 28: ...sity 2 3 Underline intensity 2 and reverse or blank 1 Cyan Black Red Black Magenta Black Blue Black Black White Black Red Black Magenta Black Blue 3 Normal Reverse or blank 1 Intensity 2 Intensity 2 a...

Страница 29: ...or blank 1 Underline Underline and reverse or blank 1 Underline and intensity 2 3 Underline intensity 2 and reverse or blank 1 White Black Yellow Black Blue Black Cyan Black Black White Black Yellow...

Страница 30: ...HOME Display page 0 CTRL 0kpd Display page 1 CTRL 1kpd Display next page or active other window 4 PAGE DOWN Display previous page or active other window 5 PAGE UP Toggle between split screen 5 and fu...

Страница 31: ...native mode includes WY 325 WY 120 and WY 60 The remaining columns show the support for the command in other ASCII personalities according to the following notations Same Same as native code code is...

Страница 32: ...Wyse ESC v 4 Select PC Term mode ESC 5 Same ENH Wyse ESC v 5 Select VT52 mode ESC 6 Same ENH Wyse ESC v 6 Select VT100 mode ESC Same ENH Wyse ESC v Select PCGAPHIC mode 1 ESC I Same ENH Wyse ESC v I S...

Страница 33: ...Sound Bell CTRL G Same Same Same Same Select Bell Volume ESC c volume Same ENH Unlock keyboard CTRL N or ESC Same CTRL B ESC ESC Lock keyboard CTRL O or ESC Same CTRL D Same ESC CAPS LOCK off ESC E E...

Страница 34: ...mode ESC Same ENH Wyse ESC v Select PCGAPHIC mode 1 ESC I Same ENH Wyse ESC v I Select VT220 7 mode ESC Same ENH Wyse ESC v Select VT220 8 mode ESC Same ENH Wyse ESC v Select WY 325 mode 3 ESC B Same...

Страница 35: ...ame Select Bell Volume ESC c volume Same ENH Unlock keyboard CTRL N or ESC Same CTRL B ESC ESC Lock keyboard CTRL O or ESC Same CTRL D Same ESC CAPS LOCK off ESC E ENH ENH ENH ESC SP M CAPS LOCK on ES...

Страница 36: ...mode ESC Same ENH Wyse ESC v Select PCGAPHIC mode 1 ESC I Same ENH Wyse ESC v I Select VT220 7 mode ESC Same ENH Wyse ESC v Select VT220 8 mode ESC Same ENH Wyse ESC v Select WY 325 mode 3 ESC B Same...

Страница 37: ...verse screen ESC 1 Same ENH ESC b Restore normal screen ESC 0 Same ENH ESC d 4 Set scrolling speed and type ESC scroll Same ENH Smooth scrolling on ESC 8 5 Smooth scrolling off ESC 9 5 Set cursor disp...

Страница 38: ...page ESC w C or Same ENH ESC K Display page n ESC w page Same ENH Split screen horizontally simple split ESC x A line Same Split screen horizontally simple split and clear pages ESC x 1 line Same Spli...

Страница 39: ...e CTROL O Same Same Write protect mode on ESC Same CTRL N Same Same Clear cursor column to write protected spaces ESC V Same EHN Same Protect mode off Same EHN Same Same Protect mode on ESC Same EHN W...

Страница 40: ...Same ENH Same Address cursor in specific 80 132 column current page ESC a lll R ccc C Same ENH Same Read cursor line and column address in 80 column current page ESC Same ENH Same Same Read 80 column...

Страница 41: ...rsor ESC T Same ESC K Same Same Clear unprotected line to nulls from cursor ESC t Same Same Same Fill page with H s ESC F Sending data Begin print send at top of page ESC d Same ENH Begin print send a...

Страница 42: ...C p ESC p Define delimiters ESC x ESC x Character Sets Select primary character set ESC c D Same Select secondary character set ESC c E Same Define primary character set ESC c B bank Same Define secon...

Страница 43: ...ce to get the device configuration on the right pane If you want to change the settings Enter the Super user name password Change the settings on the right pane Then click Update Device The new settin...

Страница 44: ...t the user to the login screen Figure below shows the user homepage of the Web management interface A menu bar provided on the left hand side of the screen Selecting an item on the menu bar opens a tr...

Страница 45: ...m Static IP DHCP Dynamic Host Configuration Protocol The IP serial console is initially defaulted to Static IP mode with a static IP address of 192 168 123 211 The configuration setting will not go in...

Страница 46: ...unexpected results against your original plan The IP address Mask specifies the host range by entering base host IP address followed by and subnet mask The host IP addresses to be filtered based on th...

Страница 47: ...IPCS receives a TCP packet it will process the packet with the chain rule depicted below The process ordering is important the packet will enter the chain rule 1 first if meet the rule then take actio...

Страница 48: ...r 192 168 2 x can access to the IPCS through http by the 1 2 and 3 rules 3 3 Web Server Configuration The IP serial console Web server supports both HTTP and HTTPS HTTP over SSL services simultaneousl...

Страница 49: ...s change By default the IPCS only supports Dynamic DNS service offered at Dynamic DNS Network Services LLC www dyndns org To use the Dynamic DNS service provided by Dynamic DNS Network Services the us...

Страница 50: ...w up the Lock icon on the right hand side of the taskbar 3 3 4 RADIUS Authentication is the process of identifying an individual usually based on a username and password The IP serial console supports...

Страница 51: ...avenview com 51 Radius Server Configuration Section 4 Serial Port Configuration 4 1 Serial Port Configuration Under the Serial Port heading click Configuration will show the list of port summary as be...

Страница 52: ...to Local the IP serial console will use its own user list to authenticate a user If configured otherwise the IPCS will request authentication from the external authentication servers i e RADIUS Figur...

Страница 53: ...for each port based on the device attached to it We can use the shortcut Move to on the up right corner to go to the target port page directly 4 1 4 Operating Modes The IP serial console unit provides...

Страница 54: ...the device attached to the serial port as if the device were connected directly to the network Data streamcan be sent back and forth between the device and the Telnet SSH client program RawTCP is also...

Страница 55: ...ets periodically If the Telnet SSH client does not answer the packets in a period of time system will assume that the connection is down unintentionally The IPCS will close the existing Telnet SSH con...

Страница 56: ...while in console server mode the data receiving from the tracking serial port will be buffered in IPCS memory The user can also define keywords for each serial port that will trigger an email notific...

Страница 57: ...ld data 4 2 Connection The IP serial console web pages provide a web based serial port connection which enables the user to access the serial ports without using the Telnet client program A Java apple...

Страница 58: ...tion Operation mode Select the Serial port connection menu item click the terminal icon at C column If connect success the terminal emulation will pop up login prompt Enter user name and password to l...

Страница 59: ...power distribution units that enables remote power control of servers and network appliances When used in conjunction with IP Console Servers the SPC provides comprehensive management capabilities an...

Страница 60: ...cannot change the data from this page This page will be automatically refreshed every 10 seconds to show the system current time 5 1 2 System Logging The user may configure the IP serial console to e...

Страница 61: ...ess privileges User Name Default Password Access Privileges root root Full access user define user define Can only access Serial Port and System Status Log Note The first character of User name must b...

Страница 62: ...nview com 62 Above figure shows the Add User screen You will see the new user on the user list now 6 1 3 Remove User To remove a user Check the users at the User Administration screen Click the button...

Страница 63: ...llow the authorized users to access To edit the ACL Check the users at the User administration screen Click the Edit icon Enter user name password Select the port to access to Click the button Submit...

Страница 64: ...to be kept maintained by the internal battery backup By convention weather scientists use one time zone Greenwich Mean Time GMT This time is also known as Universal Time UTC The user may also need to...

Страница 65: ...tftpd32 The website below kindly provides the software http perso orange fr philippe jounin tftpd32_download html 3 Run the TFTP server software program for example tftpd32 exe 4 Select the directory...

Страница 66: ...d successfully will be shown meaning the new firmware has been upgraded into the Flash memory If you want to run the new firmware you need to click the Reboot item then Yes to confirm to reboot the sy...

Страница 67: ...ction Power light Green On Orange Power saving Power on off LCD Display the OSD menu Scrolls through menu options and adjusts the displayed control Exit the OSD screen Shortcut key to auto adjustment...

Страница 68: ...ayed during the process PHASE CLOCK Phase Clock To enter into the Phase Clock sub menu H V POSITION H V Position Align the screen image left or right and up or down MISC Information Display the curren...

Страница 69: ...isplayed during the process H Position Align the screen image left or right V Position Align the screen image up or down Clock Adjust the clock value Phase Adjust the phase value 3 Function OSD Positi...

Страница 70: ...to 12 Ethernet telnet sessions to pre set IP address Serial and Ethernet connections cannot be used concurrently Terminal Emulation Emulations VT52 V100 VT200 Console ANSI PC Term TVI910 925 WY 50 WY...

Страница 71: ...Power Option Model 12V 24V 48V Input Rating Input Voltage 12 Volt 24 Volt 48 Volt Input Rage 9 18V 18 36V 36 75V Input Current No Load 50 mA 50 mA 50 mA Full Load 4950 mA 2450 mA 1220 mA Output Ratin...

Страница 72: ...rminal LCD keyboard drawer is based on the RS 232 C protocol standard supported on most terminals PCs servers as well as many manageable devices which equipped with at least one RS 232 serial port tha...

Страница 73: ...Personality change the Wyse 120 to VT100 3 Press F4 Comm Baud rate change 38400 to 9600 Parity None unchange Data Stop Bits 8 1 unchange Rcv Hndshake change Xon Xoff to None Xmt Hndshake change Xon Xo...

Страница 74: ...Section 10 Dimensions Model Product Dimension W x D x H Package Dimension W x D x H Net Weight Gross Weight RTERM 17T 16 442 x 650 x 44 mm 17 4 x 25 6 x 1 75 in 589 x 856 x 168 mm 23 2 x 33 7 x 6 6 in...

Страница 75: ...atory profits or for punitive incidental or consequential damages in connection with the furnishing performance or use of the Avenview hardware software or other products and documentation provided he...

Отзывы: