Avenview AVW-DS-55V7-T Скачать руководство пользователя страница 18

3.2.2  

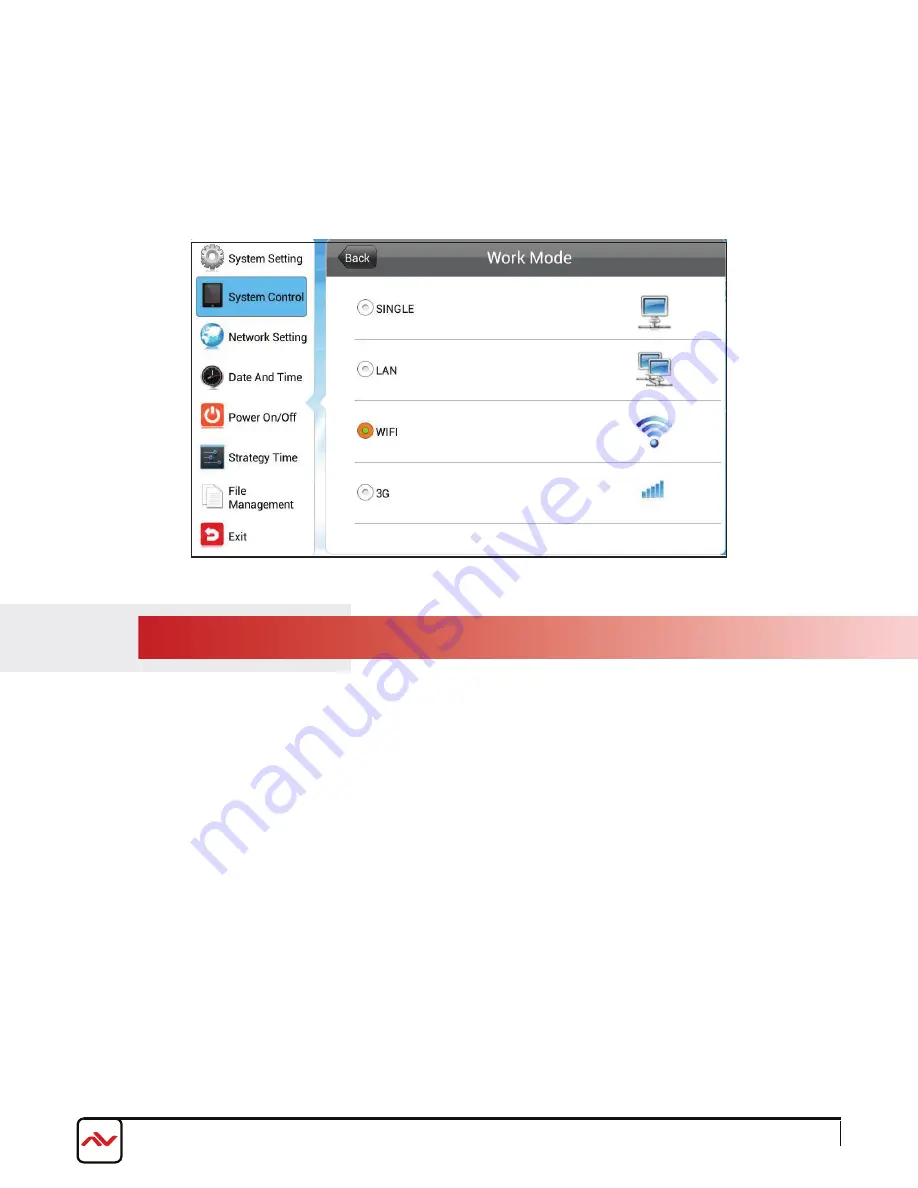
OSD SYSTEM CONTROL - PLAY MODE

This menu will only be available when the unit is in SINGLE mode. There are three playback modes supported when in SINGLE 

(stand-alone) mode.

SINGLE:

 This is the stand-alone mode. The unit will work independently from any server or player. All network related menus will

be unavailable.

LAN:

 This mode should be selected if the unit is hard wired to a Local Area Network connection. All network related menus are available

except for WIFI/3G networks.

WIFI:

 This mode should be selected if the unit is being connected to a WLAN (Wireless Local Area Network). All network related

menus are available.

3G:

 This mode should be selected if the unit is being connected to a 3G mobile network. All network related menus are available.

OPEN:

 Media files such as images and videos, stored in the root directory of a USB disk can be played directly from the unit’s USB 

port. Supports plug and play without any software.

ENCRYPT:

 Only encrypted content packages created by the EzPoster software, with the same password as the units can be played. 

The unit’s password file ADPKeyRenew.BIN can be created and imported together with the content packages by EzPoster.  Initial 

password is 12345678 by default.

NO ENCRYPT:

 Only content packages without encryption password, which were created by EzPoster can be played.

3G:

 This mode should be selected if the unit is being connected to a 3G mobile network. All network related menus are available.

Rev.00 03/2018

www.avenview.com

Page 17 of 35

Содержание AVW-DS-55V7-T

Страница 1: ...55 LCD Digital Display PRODUCT MANUAL Model AVW DS55V7 VIDEO WALLS VIDEO PROCESSORS VIDEO MATRIX SWITCHES EXTENDERS SPLITTERS WIRELESS CABLES ACCESSORIES Control Your Video Model AVW DS55V7...

Страница 2: ...ons and product descriptions at any time without notice No license whether express implied or otherwise to any intellectual property rights is granted by this publication Except as set forth in Avenvi...

Страница 3: ...1 7 OSD SYSTEM SETTING SCROLL TEXT 14 3 1 8 OSD SYSTEM SETTING SYNC SETTING 15 3 1 9 OSD SYSTEM SETTING RESTORE TO FACTORY SETTINGS 15 3 1 10 OSD SYSTEM SETTING AUTO START 16 3 2 1 OSD SYSTEM CONTROL...

Страница 4: ...TABLE OF CONTENTS 4 SYSTEM UPGRADE 31 5 SPECIFICATIONS 33 6 WARRANTY CARD 34 Rev 00 03 2018 www avenview com...

Страница 5: ...e checked by a qualified service engineer before using it again Do not use liquid or aerosol cleaners to clean this unit Always unplug the power to the device before cleaning 1 1 IMPORTANT SAFEGUARDS...

Страница 6: ...rsuant to part 15 of the FCC Rules These limits are designed to provide reasonable protection against harmful interference when the equipment is operated in a commercial environment This equipment gen...

Страница 7: ...lling text real time clock logo etc Video Support MPEG1 MPEG2 MPEG4 H 264 WMV Audio Support MP3 Static Image Support JPEG BMP PNG 2 INTRODUCTION The Avenview AVW DS55V7 Digital Signage 55 Touch Kiosk...

Страница 8: ...with correct specifications If inappropriate power supply is used then it may cause a fire Do not twist or pull by force the ends of the UTP HDMI cable It can cause malfunction Keep the device away f...

Страница 9: ...ernal VGA source input 6 USB1 Port Connect Type A USB2 0 Cable for external media files or updating 7 USB2 Port Connect Type A USB2 0 Cable for external mouse keyboard files 8 TF Port Connect TF memor...

Страница 10: ...ge Press To navigate LEFT in menu or LEFT functions in OSD or Next Media Press To MUTE the volume of the media content playing Press To increase the VOLUME UP level of the media content playing Press...

Страница 11: ...ent Playlist This bar indicates how many playlists were created by the user with a maximum of up to 6 six B Setup This will activate the OSD System Settings menu Play This will start the video playbac...

Страница 12: ...ll call out the OSD System Setting menu as shown below Press the UP DOWN LEFT RIGHT buttons on the remote control to navigate the sub menus and press PLAY STOP button to enter Please note that the use...

Страница 13: ...1 2 OSD SYSTEM SETTING SWITCH SCREEN MODE Adjust and rotate the screen display Orientation of the screen should correlate with how the screen has been installed and mounted Set the screen resoultion R...

Страница 14: ...Choose wheter to display the real time clock on the screen and set the position on the screen UpLeft UpRight Display the clock in the top left or right corner of the screen LeftDown RightDown Display...

Страница 15: ...set to OFF the text will not appear on the screen even if it was included in the playlist If set to ON the text will appear on screen if it was included in the playlist This option will allow enablin...

Страница 16: ...ith this host Slave Set up the unit as a slave in the network All slave units will play synchronous content with the host Sync Methods Choose the communication method for synchronous playback 2 4G The...

Страница 17: ...pre loaded digital signage software when the unit is turned on If disabled the Android system will be loaded upon start up The unit s Work Mode can be changed from SINGLE LAN WIFI or 3G modes Please...

Страница 18: ...e selected if the unit is being connected to a 3G mobile network All network related menus are available OPEN Media files such as images and videos stored in the root directory of a USB disk can be pl...

Страница 19: ...WIFI 3G mode This menu is unavailable in SINGLE mode GTV Use CDMS as the content management software to create and publish playlists as well as control the unit through the internet EzPoster ADPE Use...

Страница 20: ...will allow you to choose where the data is being stored Please note this menu will be different as the work modes change LAN WIFI 3G Mode In this mode the unit will download data from the server and...

Страница 21: ...set to work in Open play mode users may setup the playback duration for each image to be played This is not applicable in other play modes This menu allows users to choose how the unit communicates w...

Страница 22: ...l Manage Soft If the content management software is set to CDMS the Server Configuration window will appear like below Local Server Server connection mode The unit can find the server by IP address or...

Страница 23: ...te file server then set the server connection mode and enter its IP address and port If the content management software is set to EzPoster NET_ID is required for the server connection Rev 00 03 2018 w...

Страница 24: ...be set to DHCP mode or static IP mode Please note this option is only available when the unit is set to LAN mode DHCP IP address will be assigned from the LAN DHCP server Manual IP address will be set...

Страница 25: ...and must use the wireless network adapter The system will automatically search for the available wireless networks in the area Choose a wireless network from the list and click enter if the network h...

Страница 26: ...d when the unit is set to work in LAN WIFI or 3G mode The units MAC Address is also shown here Navigate to the Date And Time section to change the unit s system date and time The options Start Sync ti...

Страница 27: ...on start up Time Zone Select the time zone bar to change the units zone Sync Time Now Press this button to synchronize the unit s local time with the online management platform connected to the networ...

Страница 28: ...of the week Uniform Setting This mode will turn the unit off and on automatically at the specified time every day 1 If set to week mode select the day you wish to configure on the top scroll bar For...

Страница 29: ...ed times If the the unit is turned on manually it will automatically turn off after two minutes if no operation is detected Manual Allows control of the powered on and off times manually 3 If Timer co...

Страница 30: ...source in a specified period Volume time will allow the user to define the playback volume at specified times When this feature is disabled the user may adjust the volume via the remote control If it...

Страница 31: ...3 6 2 PORT TIME This feature will allow the unit to switch between different sources and display them in specified times Rev 00 03 2018 www avenview com Page 30 of 35...

Страница 32: ...perfom the update USB Drive Upgrade If the device is disconnected from the network or is set to stand alone mode the upgrade can be performed via a USB disk 1 Enable the USB port in the OSD menu via S...

Страница 33: ...de file is copied sucessfully a prompt message like below will appear 7 Remove the USB disk and the system will reboot to start the upgrade 8 The upgrade will be take around 90 seconds and once it is...

Страница 34: ...es Stylus USB 2 0 auto import VGA HDMI Audio 3 5mm 1x Component 1 x HDMI DVI 1 x USB Video MPEG1 2 4 H 264 WMV MKV TS flv Picture JPG JPEG BMP PNG GIF Audio MP3 Remote control AC Power Cord Operating...

Страница 35: ...www avenview com Page 34 of 35...

Страница 36: ...ental or consequential damages in connection with the furnishing performance or use of the Avenview hardware software or other products and documentation provided herein Avenview Inc reserves the righ...

Отзывы: