

General use & adjusting default settings
Follow the procedures described below to adjust your audio settings and
default settings on the Avee microphone add on.
Connect the Avee mic add-on to the aircraft
•
Plug the Avee mic add-on into the headset and connect the interface cable to the
aircraft and to the Avee.
•
Switch on the ANR feature on the headset.
•
When the aircraft radio & intercom is switched on, the mic add-on will detect the
bias voltage generated by the aircraft avionics, and the Avee-add on is ready to
be used. This is indicated with 5 flashes on the Avee status led.
Please note that the Bluetooth connection available in the Bose
™
700 will be
switched off whenever the Avee add-on is plugged into the headset.
Positioning the Avee microphone
The noise cancelling microphone element on the Avee add-on will only pick up
audio from the very close proximity of the microphone element
.
Ensure the white indicator located by the microphone element is facing towards
your mouth and place the microphone approximately 6mm/1/4 inch from your
mouth at all times.
Headset volume setting
The volume in the Bose
™
700 can be adjusted from the headset itself by swiping
your finger up or down on the right earpiece.
Please follow the description found for the Bose
™
700 headset on how to do this.
Please note that the volume in most cases is set to maximum on the headset, and
the headset volume normally is adjusted from the aircraft avionics panel.
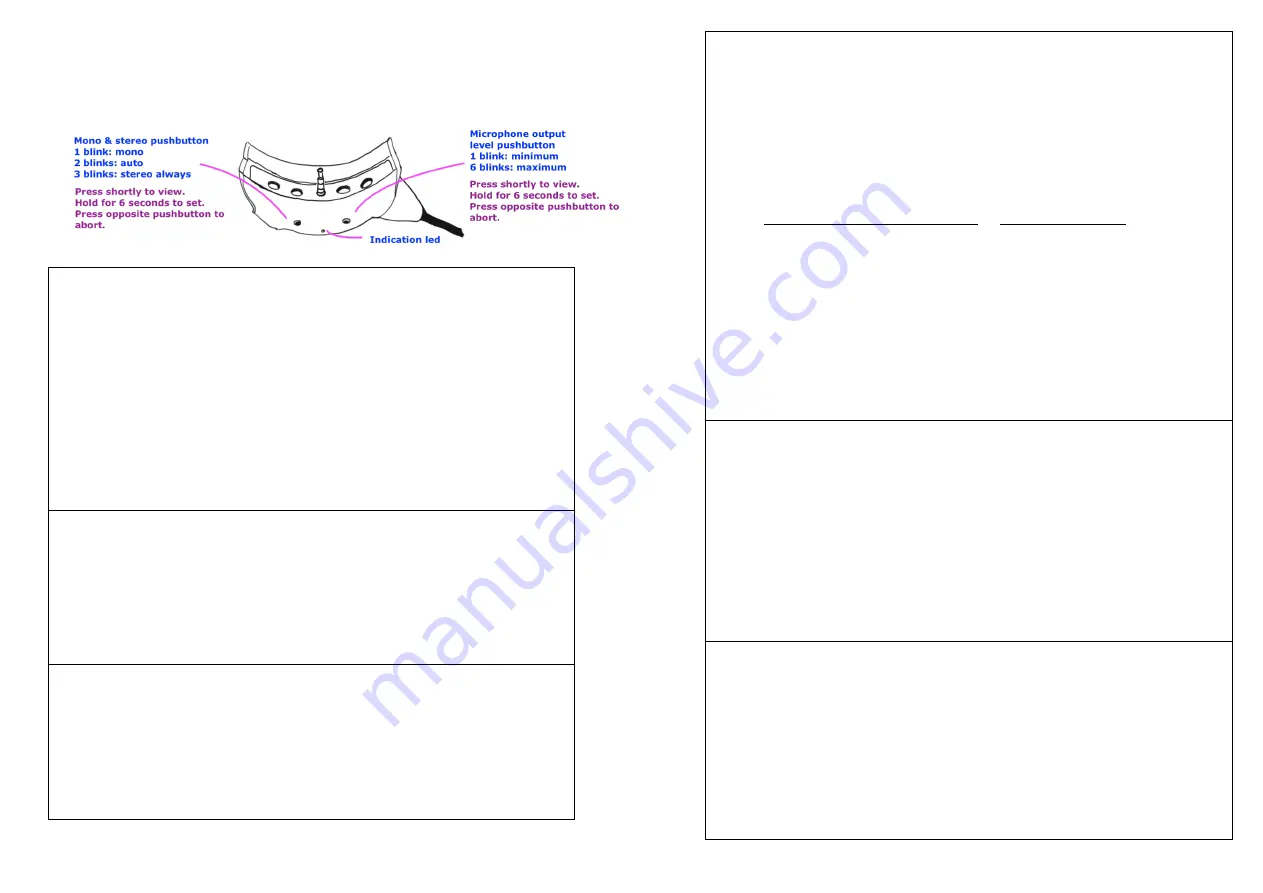
Microphone output level
The Avee add-on microphone level can be adjusted even if the microphone output
level is preset to a standard which is accepted by most aircraft avionics.
Check this level by pressing the mic pushbutton. One blink is minimum level while
six blinks is maximum level.
The microphone output level can be adjusted according this procedure while the
Avee unit is connected to an active intercom/avionics system:
•
Enter
microphone level adjustment mode
by pressing and holding the mic push
button (the one closest to the mic) until the indication led starts blinking
rapidly (6 seconds). Release the mic sw.
•
The indication led will now continuously blink a number of times indicating which
output level is set from 1 (min) to 6 (max). Repetitively press the mic pushbutton
to change the microphone output level while talking into the microphone.
•
Press the Mono/stereo key to leave the mic volume setting. The add-on will
automatically revert to normal operation after a couple of minutes.
Automatic mono & stereo mode
Aircraft stereo or mono availability is detected automatically by
the Avee add-on
by default
. It can however be set (see next chapter).
This feature works like this:
If no audio is detected in the aircraft right audio channel, the left channel is
switched to both left and right speaker in the headset.
If audio in the right aircraft channel is detected, the left aircraft channel is switched
to the headset left speaker, while the right aircraft channel is switched to the right
speaker.
Changing mono & stereo mode
The mono & stereo detection mode can be set according to the following
procedure:
Press & hold the mono / stereo push button for 6 seconds to enter stereo setting
mode.
•
By repetitively pressing the mono/stereo push button, you step from mono (1
status led flash) , auto (2 flashes) and ‘always stereo’ setting (3 flashes).
Press the mic push button to leave the mono / stereo setting mode.
The add-on will automatically revert to normal operation after 40 seconds.


