background image

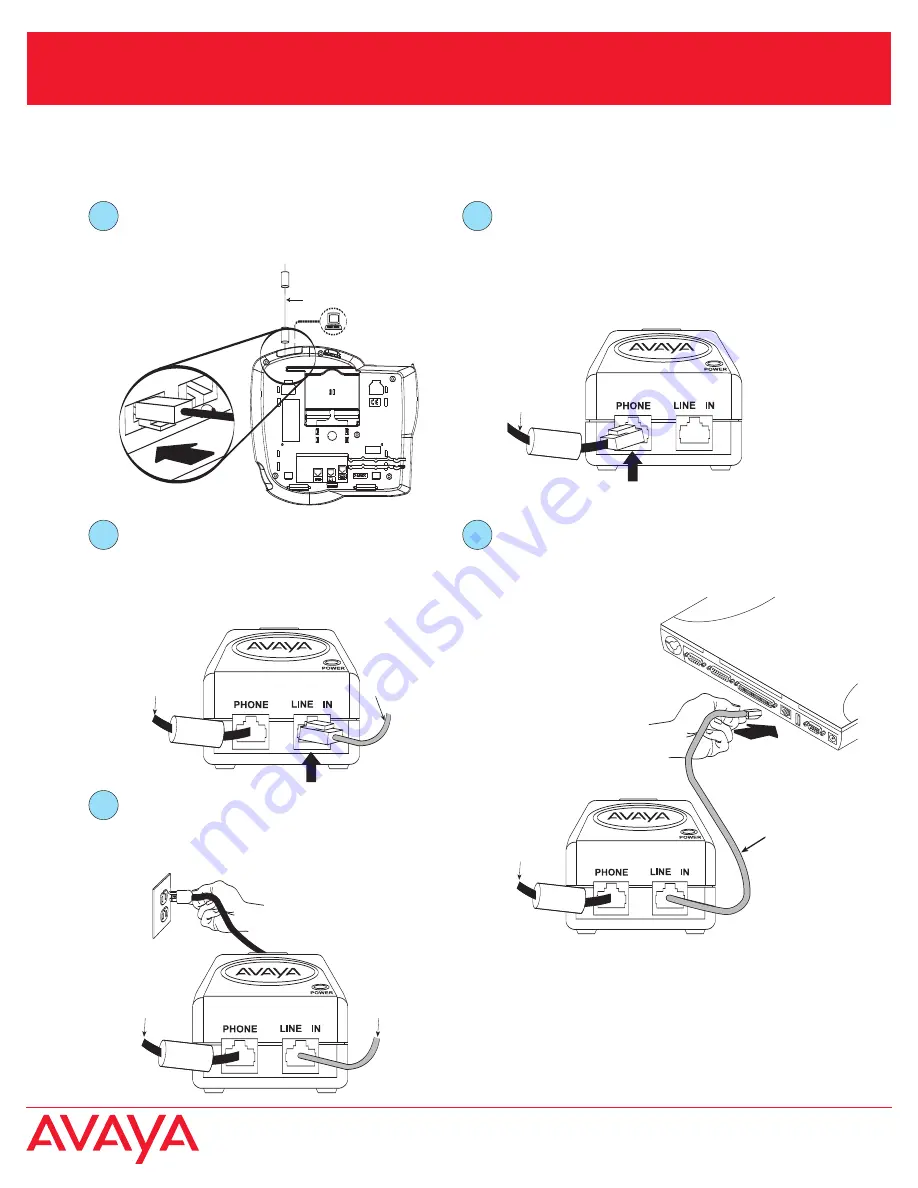
1.  Connect the Ethernet cable to the right 
     port on the back of the telephone.

Ethernet cable

1

Ethernet 

cable

2.  Connect the other end of the Ethernet 
     cable to the Avaya power source phone 
     jack. The phone jack on the Avaya 
     power source is on the left side and is 
     labeled Phone.

2

Connecting the VPNremote Phone to your computer

Use the following procedure to connect your VPNremote phone to your 

:

computer

Ethernet 

cable

CAT5

4.  Disconnect your 

 from your SOHO 

     and connect the other end of the straight 
     through Ethernet cable to your 

.

computer

computer

4

Ethernet 

cable

CAT5

3.  Connect the Cat5e cable to the Avaya 
     power source line in jack. The line in 
     jack on the Avaya power brick is on 
     the right side and is labeled Line In.

3

CAT5

Ethernet 

cable

5

5.  Connect the Avaya power brick or PoE 
     switch power cord to an AC outlet to 
     power-up the telephone.

Computer

NOTE: Your 

 and VPNremote Phone 

             are only connected to one another. 
             Your 

 is not connected to your 

             SOHO.

computer

computer

VPNremote for 4600 Series IP Telephone Installation 

©2007 Avaya Inc, All rights reserved.         P/N 19-

     06/07

602363

Содержание VPNremote for 4600 Series

Страница 1: ...ter provide QoS guarantees for the telephony tunnel The procedures in this guide will assist you to complete the installation and configuration of your VPNremote Phone Use the following procedures in the stated sequence to complete the installation and configuration 1 Verify that your computer is connected to your SOHO and that you have connectivity to your corporate network 2 Download the VPNremo...

Страница 2: ...from your corporate network 5 Physically disconnect your computer from your SOHO 6 Connect the VPNremote Phone to your computer See Connecting the VPNremote Phone to your computer 7 Navigate to the InstallVPNremoteFor46xx bat file 8 Double click the file to execute the Self Installer Before the installation process begins the telephone tries to find a DHCP server Once the telephone finds the DHCP ...

Страница 3: ...ur from your SOHO and connect the other end of the straight through Ethernet cable to your computer computer 4 Ethernet cable CAT5 3 Connect the Cat5e cable to the Avaya power source line in jack The line in jack on the Avaya power brick is on the right side and is labeled Line In 3 CAT5 Ethernet cable 5 5 Connect the Avaya power brick or PoE switch power cord to an AC outlet to power up the telep...

Страница 4: ...ide and is labeled Phone 2 Installing the VPNremote Phone into your SOHO Use the following procedure to install the VPNremote Phone into your SOHO 4 Connect the other end of the straight through Ethernet cable to your SOHO DSL or Cable Modem 4 Ethernet cable CAT5 3 Connect the Cat5e cable to the Avaya power source line in jack The line in jack on the Avaya power brick is on the right side and is l...

Страница 5: ...o enter the user name and password 1 Select the VPN option to change by using the gray buttons on the left of the display Press the User Name button or second gray button to change the VPN user name The user name is the same name used to login to the enterprise network using VPNremote Client 2 Enter your user name using the telephone key pad Press the alpha numeric keys until the desired letter ap...

Отзывы: