

Setting Up this Device
Use Avaya IX Tracking Camera TC220 as main camera
Step 1
Step 2
Step 3
Step 4
Connecting the IX Tracking Camera to the XT
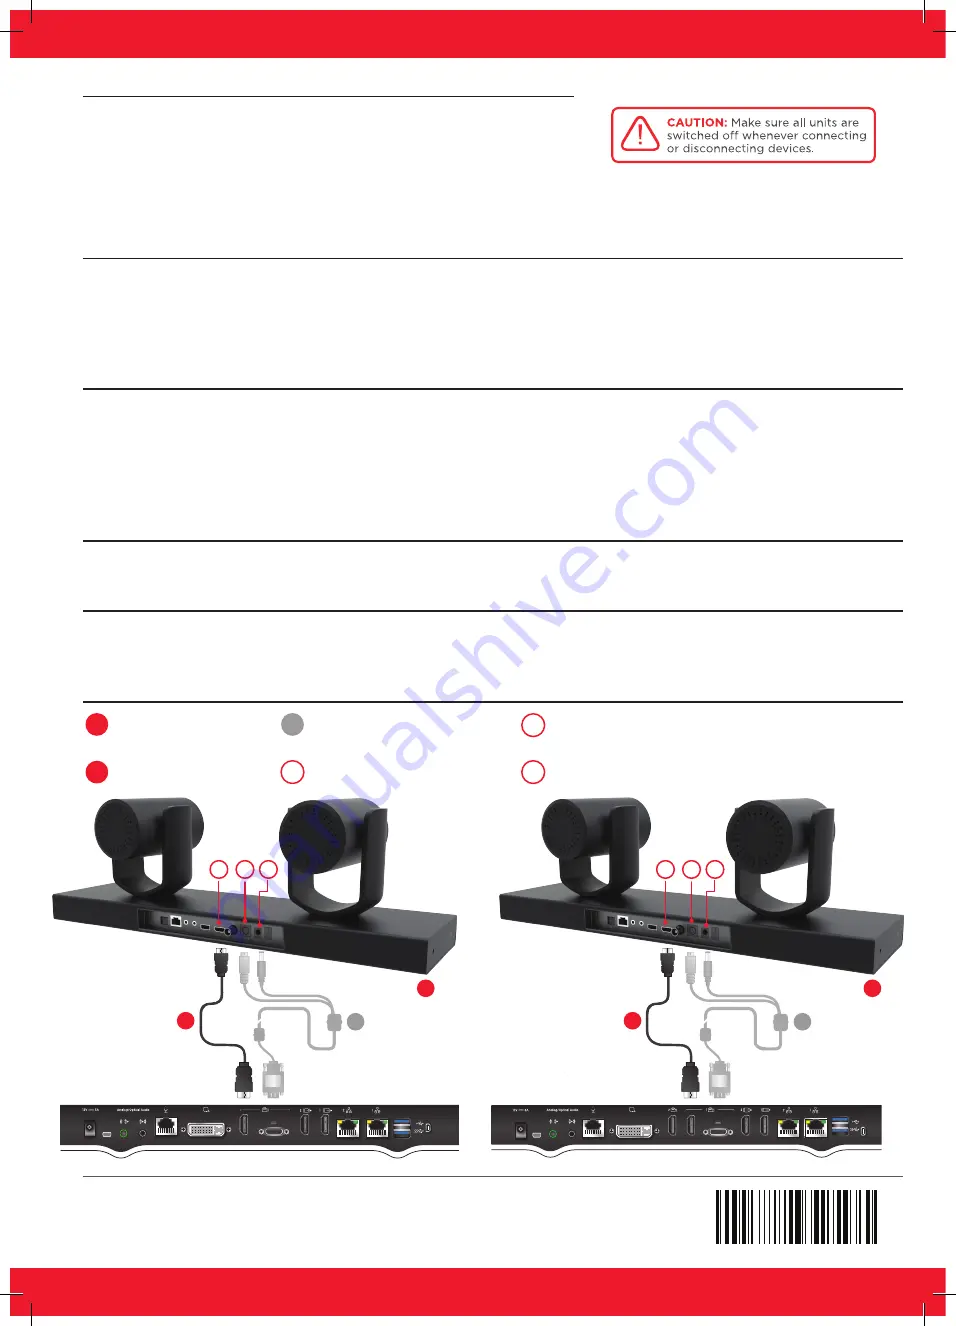
XT7000 Series Codec Unit
Connect the cables as detailed in the diagram overleaf, then follow the
steps below to complete the setup of theAvaya IX Tracking Camera
TC220 . For details on how to use the system after setup, see the User
Guide for Avaya IX Room Systems XT Series.
Using the provided Visca and Power Cable connect at the rear of the tracking camera:
• The 8-pin connector to the Camera Ctrl IN socket
• The power Connector to the DC IN 12 V socket
Using The provided HDMI cable insert it in the HDMI connector of the tracking cable
Attach the two connectors to the camera sockets at the rear of the XT Series endpoint (XT4000, XT5000, XT7000 or XT
Executive 240):
• The HDMI connector to the vertical socket
• The connector for power and serial control to the horizontal socket.
Note:
if for custom setup it’s necessary to power the camera with the power supply, it is available in the optional cable kit.
Check that HD1 camera is enabled in the menu
Configure
>
Advanced
>
I/O connections
>
Camera
>
HD1
Set the camera driver to the option ”XT Series TC220 Camera” in the menu
Configure
>
Advanced > I/O connections
>
Camera
>
HD1
© 2019 Avaya Inc. All Rights Reserved.
Avaya and the Avaya logo are trademarks of Avaya Inc. and are registered in the United States and other countries. All
other trademarks identified by ®, TM, or SM are registered marks, trademarks, and service marks, respectively, of Avaya Inc.
05/19 • 700514974 QSG Avaya IX Tracking Camera
P/N 700514974 A01
Help
XT5000 Series Codec Unit
Tracking Camera
HDMI OUT Connector
HDMI Cable
VISCA and POWER Cable
is provided with the codec
DC12 V Connector
RS232 Connector
1
2
5
3
4
4
4
5
5
1
1
3
3
2
2
6
6
6