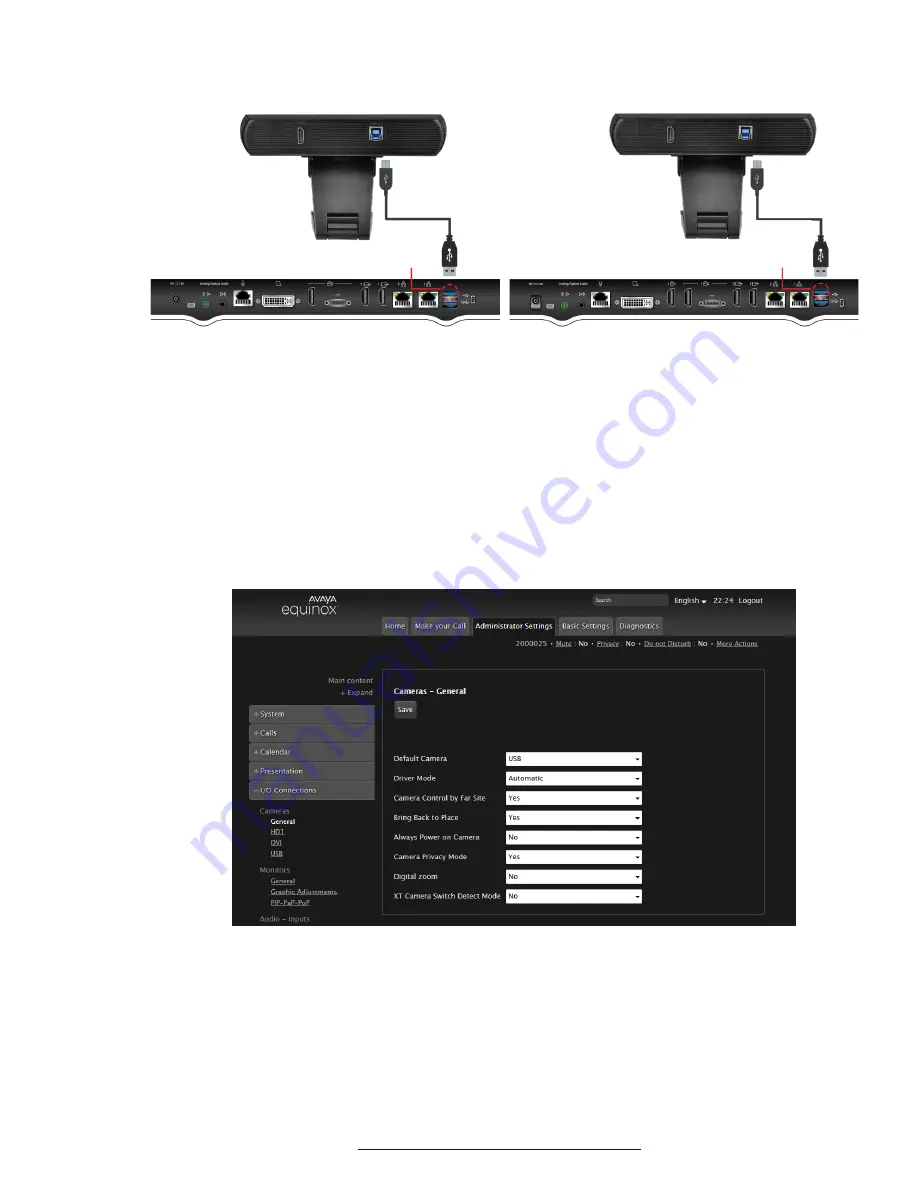
background image

Plug the USB

connector into

the upper

USB socket

Plug the USB

connector into

the upper

USB socket

XT5000 or XT4000 Series Codec Unit

XT7100 Series Codec Unit

2. Plug the USB Type-A connector into the upper USB Type-A socket at the rear of the XT

Series endpoint (XT4300, XT5000 or XT7100).

3. Remove the small plastic lens cover before using the camera.

4. If you are using Avaya IX

 Huddle Camera HC020 as the first camera, you must enable it

as the default camera in one of the following two ways:

• Using the directly attached interface (monitor and keyboard), select: 

Configure

 >

Advanced

 > 

I/O connections

 > 

Cameras

 > 

General

 > 

Default Camera

 > 

USB

• Through the web using the IP address, select: 

Administrator Settings

 > 

I/O

Connections

 > 

Cameras

 > 

General

 > 

Default camera

 > 

USB

The video signal source for the XT unit is changed to the USB port.

5. To configure the audio source, see 

Avaya IX Video Conferencing XT Series Deployment

Guide

.

Setting up Avaya IX

 Huddle Camera HC020

November 2019

Using Avaya IX

 Huddle Camera HC020

10

Comments on this document? [email protected]

Содержание IX HC020

Страница 1: ...Using Avaya IX Huddle Camera HC020 Release 10 2 Issue 1 November 2019...

Страница 2: ...ERMS AVAILABLE ON THE AVAYA WEBSITE HTTPS SUPPORT AVAYA COM LICENSEINFO UNDER THE LINK AVAYA SOFTWARE LICENSE TERMS Avaya Products OR SUCH SUCCESSOR SITE AS DESIGNATED BY AVAYA ARE APPLICABLE TO ANYON...

Страница 3: ...L PARTNER S HOSTING OF AVAYA PRODUCTS MUST BE AUTHORIZED IN WRITING BY AVAYA AND IF THOSE HOSTED PRODUCTS USE OR EMBED CERTAIN THIRD PARTY SOFTWARE INCLUDING BUT NOT LIMITED TO MICROSOFT SOFTWARE OR C...

Страница 4: ...ecting cables power cord and AC adapters shipped with the equipment or specified by Avaya to be used with the equipment If you use any other equipment it may cause failures malfunctioning or fire Powe...

Страница 5: ...device or place heavy or sharp objects on the device Do not attempt to repair the device yourself Always use a qualified service agent to perform adjustments and repairs Keep the device away from benz...

Страница 6: ...a HC020 as the main camera 9 Setting up Avaya IX Huddle Camera HC020 as a USB camera for your Avaya IX Workplace Client 11 Chapter 4 HC camera software client setup 12 Chapter 5 Infrared remote contro...

Страница 7: ...his brings a high quality 4K sensor video source to your endpoint with HD 1080p and 30 frames per second fps including 8x digital zoom and an optimal horizontal field of view for video conference room...

Страница 8: ...Packing List Avaya HC020 Remote control 2x AAA batteries USB 3 0 Quick guide Safety declaration Type A and Type B November 2019 Using Avaya IX Huddle Camera HC020 8 Comments on this document infodev...

Страница 9: ...t on page 11 Setting up Avaya IX Huddle Camera HC020 as the main camera About this task You can use the Avaya IX Huddle Camera HC020 as the main camera on XT4300 XT5000 and XT7100 The HC camera has em...

Страница 10: ...must enable it as the default camera in one of the following two ways Using the directly attached interface monitor and keyboard select Configure Advanced I O connections Cameras General Default Came...

Страница 11: ...onnector into the USB Type B socket at the rear of the camera 2 Plug the USB Type A connector into your laptop USB port To ensure optimal camera performance plug it into a USB 3 x port and not a USB h...

Страница 12: ...ollowing steps to use the camera with Avaya IX Workplace Client Before you begin Install the camera Procedure 1 Run the Avaya IX Workplace Client application on Windows or macOS 2 Select the Settings...

Страница 13: ...Figure 2 macOS November 2019 Using Avaya IX Huddle Camera HC020 13 Comments on this document infodev avaya com...

Страница 14: ...Chapter 5 Infrared remote control November 2019 Using Avaya IX Huddle Camera HC020 14 Comments on this document infodev avaya com...

Страница 15: ...ion of the pan Simultaneously press L R SET 1 STD set the pan turn the same direction as the L R Set Simultaneously press L R SET 2 REV set the pan turn the opposite direction as the L R Set 9 Focus B...

Страница 16: ...ss MENU to enter or exit menu 16 BLC Backlight Compensation ON OFF Button Press BLC ON OFF to enable the backlight compensation Press it again to disable the backlight compensation Note Effective only...

Страница 17: ...Do not use any type of solvents which may damage the surface Use a soft dry and clean cloth to polish the lens Incorrect use Do not point the camera at extremely bright objects for a long period of t...

Отзывы: