Installing an IG550 Integrated Gateway using the Disk on Key
16 Installing and Configuring the IG550 Integrated Gateway
Note:
Note:
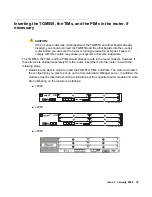
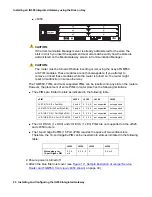
The TIMs and Physical Interface Modules PIMs should already be installed in the
router chassis. If you have modules that are not already inserted, insert the
modules as shown in
Inserting the TGM550, the TIMs, and the PIMs in the router,
3. Label the DB-9 adapter and the flat rollover cable for the TGM550 to say “TGM550”. Label
the DB-9 adapter and Ethernet cable for the router console to say “router.”
4. Verify that the equipment matches the packing list.
5. Verify that the equipment matches the list of equipment from the project manager.
Verifying the router has the power for the TIMs and PIMs
The J-series routers have limits on the power they can expend on TIMs and PIMs and still
maintain normal operation. Verify that the project manager, sales representative, or sales
engineer has ordered the appropriate quantity and types of TIM and PIM modules for the router
you are installing.
If the power required of the TIMs and PIMs has not yet been calculated, see "TIM and PIM limits
based on heat and power used by the IG550" in
Overview of the Avaya IG550 Integrated
Gateway
, 03-601548.
Installing the router in the rack
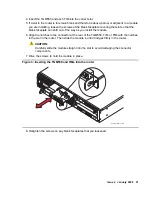
1. If the customer has a four-post rack and is using a shelf, install the shelf according to
manufacturer guidelines. Set the router on the shelf.
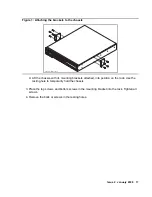
2. If the customer is using the brackets supplied with the router, do the following:
a. Partially screw customer-provided bolts or screws in to a 19-inch (48 centimeters) rack.
Note:
Note:
These bolts or screws are for the resting holes.
b. Temporarily slide the resting holes of the brackets over the resting bolts or screws.
Ensure that a mounting screw position exists for the two top holes and two bottom holes.
c. Install the mounting brackets onto the chassis, as needed. Avaya recommends that you
use the center-mount chassis holes in the center of the chassis sides to mount the
brackets.
Содержание IG550
Страница 1: ...Installing and Configuring the Avaya IG550 Integrated Gateway 03 601554 Issue 2 January 2008 ...
Страница 10: ...What procedure you should use 10 Installing and Configuring the IG550 Integrated Gateway ...
Страница 27: ...Issue 2 January 2008 27 Figure 9 DC power connections to the 6350 chassis h LAO 100306 3magnd2 ...
Страница 67: ...Issue 2 January 2008 67 4 From the Summary list click Interfaces The Interfaces screen appears ...
Страница 116: ...Installing an IG550 Integrated Gateway with the CLI 116 Installing and Configuring the IG550 Integrated Gateway ...
Страница 176: ...Recovering passwords 176 Installing and Configuring the IG550 Integrated Gateway ...
Страница 196: ...196 Installing and Configuring the IG550 Integrated Gateway Index ...

