background image

3

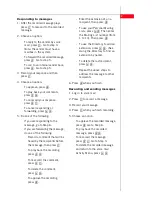
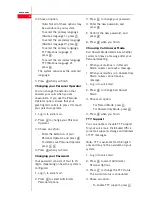
Responding to messages

1. After the recorded message plays, 

press

1

 to respond to the recorded 

message.

2. Choose an option: 

- To reply to the sender by voice 

mail, press

1

. Go to step 3. 

Note:

 the sender must have a 

mailbox in the system.

- To forward the recorded message, 

press

2

. Go to step 5.

- To call to an internal sender back, 

press

3

. Go to step 5.

3. Record your response and then 

press

1

.

4. Choose an option:

- To approve, press

#

.

- To play back your comments, 

press 

2 3

.

- To re-record your response, 

press

2 1

.

- To cancel responding or 

forwarding, press

* 3

.

5. Do one of the following:

- If you are responding to the 

message, go to Step 6.

- If you are forwarding the message, 

do one of the following:

- Record a comment that will be 

heard by the recipients before 
the message, then press

1

.

- To play back the recording, 

press

2 3

.

- To re-record the comment, 

press

2 1

.

- To delete the comment, 

press

* 3

.

- To approve the recording, 

press

#

.

- Enter the extension of an a 

recipient, then press

#

.

- To use your Personal Mailing 

Lists, press

* 5

 Then enter 

the Mailing List number (from 
1 to 10). Then press

#

.

- To use the Directory to add an 

extension, press

* 2

. (See 

Using the Directory to find an 
extension by name).

- To delete the last recipient, 

press

* 3

.

- Repeat the above steps to 

address the message to other 
recipients.

6. Press 

#

 when you finish.

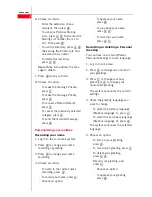
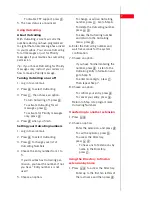
Recording and sending messages

1. Log in to voice mail.

2. Press 

1

 to record a message.

3. Record your message.

4. Press 

1

 when you finish recording.

5. Choose an option:

- To approve the recorded message, 

press

#

. Go to Step 6.

- To play back the recorded 

message, press

2 3

.

- To re-record the message, 

press

2 1

. Go to Step 3.

- To delete the recorded message 

and return to the voice mail 
Activity Menu, press

* 3

.

Содержание Distributed Office Voice Mail

Страница 1: ...our password is not set Press Follow the prompts to enter a new password record your name and select your preferred language if applicable Logging in from a remote location 1 Call in on a line that is answered by the Distributed Office Messaging Automated Attendant or Call Answer Service When you hear the menu or greeting press 7 See your system manager for the voice mail service number 2 Enter yo...

Страница 2: ...configured To skip the message press The message will remain as new until you listen to the body To replay the header only press 2 3 To delete the message press 3 To play or replay the message press 0 To change the message status back to new press 6 then press to go to the next message The next time you log in for messages you hear this message again as a new message To return to the previous mess...

Страница 3: ...re the message then press 1 To play back the recording press 2 3 To re record the comment press 2 1 To delete the comment press 3 To approve the recording press Enter the extension of an a recipient then press To use your Personal Mailing Lists press 5 Then enter the Mailing List number from 1 to 10 Then press To use the Directory to add an extension press 2 See Using the Directory to find an exte...

Страница 4: ...ur name recording 4 Choose an option To listen to the current name recording press 0 To record your name press 1 Choose an option To approve your name press To play back your name press 2 3 To re record your name press 2 1 Recording or deleting a Personal Greeting You can have one or two different Personal Greetings for each language 1 Log in to voice mail 2 Press 3 to change one or both of your g...

Страница 5: ...viewing or modifying Mailing Lists 1 Log in to voice mail 2 Press 5 to select Administer Personal Options 3 Press 1 to select Mailing Lists 4 Press 3 to review or modify Mailing Lists The system announces the number of entries in the first Mailing List 5 Choose an option To review or modify the list press 1 Go to step 7 To delete the list press 3 To skip to the next list press The system announces...

Страница 6: ...of four to 15 digits depending on how the system is configured 1 Log in to voice mail 2 Press 5 to select Administer Personal Options 3 Press 4 to change your password 4 Enter the new password and press 5 Confirm the new password and press 6 Press when you finish Choosing Call Answer Mode Call Answer Mode determines whether callers can leave a message after your Personal Greeting When your mailbox...

Страница 7: ... entry number from 1 to 5 If your mailbox has Outcalling per mission you hear the number If not you hear Entry number x is not used 5 Choose an option To change or add an Outcalling number press 1 Go to Step 6 To delete the Outcalling number press 3 To keep the Outcalling number and return to the Outcalling menu press 6 Enter the Outcalling number and wait five seconds for the system confirmation ...

Страница 8: ...information please see the documents Avaya Support Notices for Software Documentation 03 600758 and Avaya Support Notices for Hardware Documentation 03 600759 These documents can be accessed on the Web site support avaya com On the Web site search for the document number in the Search box ...

Отзывы:

Похожие инструкции для Distributed Office Voice Mail